As an organization expands, it needs more sites for better management. But this becomes a complication when unused sites take up storage space & make it hard to seek recent information for the new users.
But with site policy in SharePoint, as a site collection admin, you can overrule the piling of leftover sites.
In this article, I will show how to use the site closure & deletion policy that can give music to your ear. Let’s jump in.
Site policy is one kind of rule by which you can control a SharePoint site’s lifecycle. With a custom site policy, you can specify a close date of a site, including its deletion date. This is mostly beneficial for larger companies where multiple sites are created & need to be controlled by automatic elimination.
But there is a catch. You must have to be a site collection administrator to use the feature. Not only this, but in modern SharePoint Online, you have to activate the feature before creating a new policy when you use the feature for the first time.
So, how to enable site policy?
For the first time, when I tried to set a site policy, I was puzzled. Because there was no site policy option in my site settings. I asked my organization’s head & from there I learned that I have to activate the feature to display the option. Follow the steps below to show Site policies in Site settings.
- Go to your SharePoint site & then click on the gear icon from the top right side.
- Select Site contents.
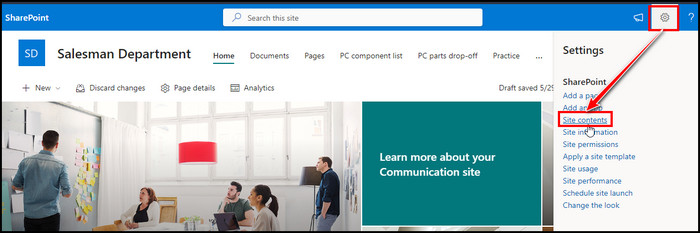
- Click on Site settings.
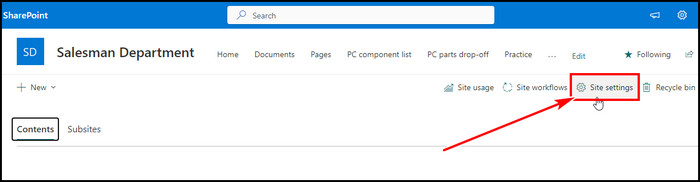
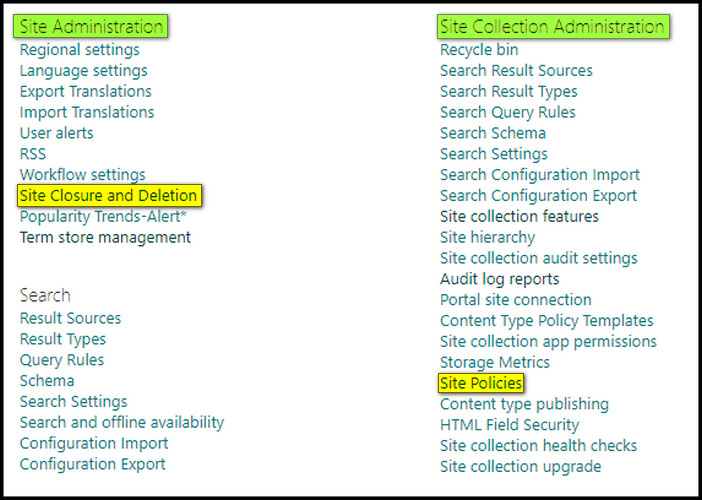
- Choose Site collection features under Site Collection Administration.
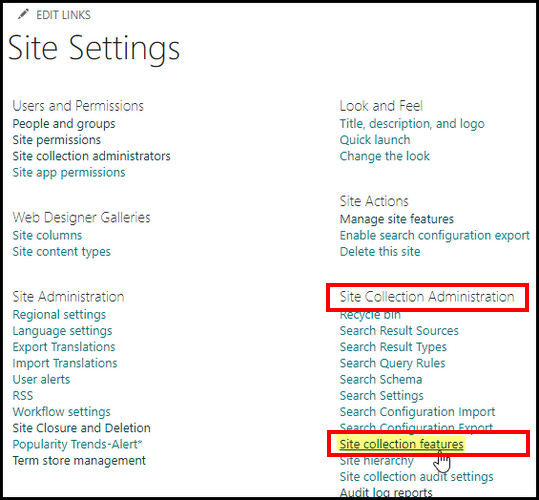
- Scroll to the bottom, find Site Policy & Activate it.

This will expose two new relevant options on the Site settings page.
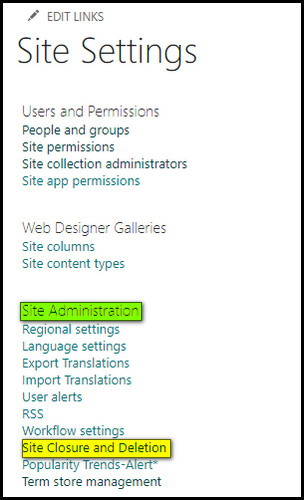
- Site Policies under the Site Collection Administration section: With this, we can create new site policies. Only the Site Collection Administrators can view this.
- Site Closure and Deletion under Site Administration: This is the place to apply the created site policy. Both the Site owner & Site Collection Administrators can access this.
Now it’s time to create a policy for site closure & deletion in SharePoint. Keep reading to learn the process.
By default, no site policy is selected for all sites to protect a site from deletion. But the reason we require to create & apply a site policy is to remove— inactive project sites, ceased business sites, or sites that are created for provisional periods.
To set up a new custom site policy in SharePoint, follow the steps below:
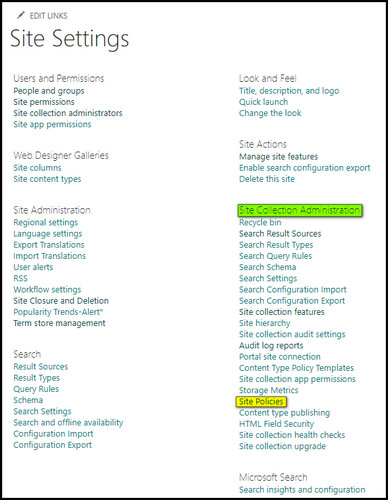
- Go to the SharePoint site settings page.
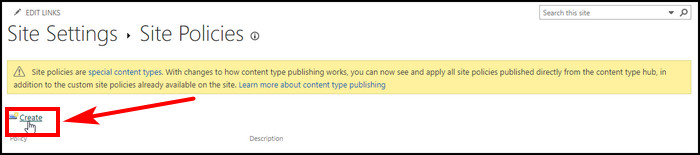
- Select Site Policies from Site Collection Administration section.
- Click on Create.
- Set a name & description.
- Select Close and delete sites automatically from Site Closure and Deletion section.
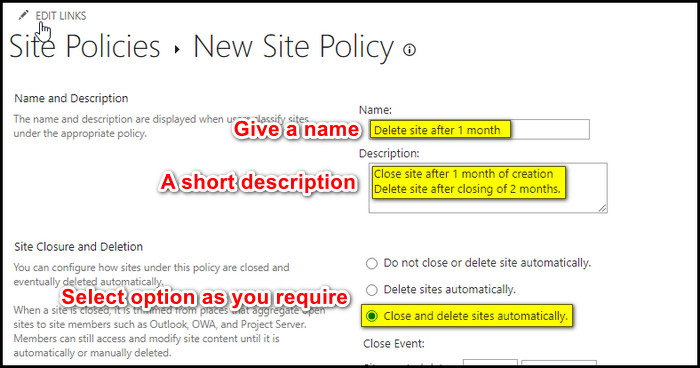
Now choose a close event date after the site is created. You can pick days, months & years from the dropdown. Afterward, set a time for deletion of the site after closing it. You can also set notification reminders. 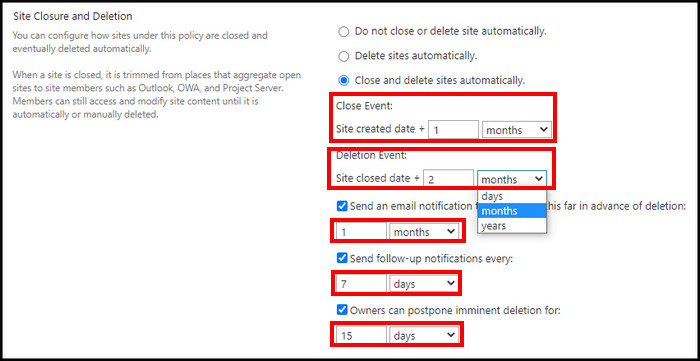
After closing the site, members can still modify site contents. However, if you don’t want this, you can check the box The site collection will be read only when it is closed option from Site Collection Closure section. After that hit OK to create the site closure and deletion policy.
Now it’s time to apply the policy. Continue reading to know how to apply the deletion policy in SharePoint to a site.
After creating the site policy with a closure & deletion date, now we have to apply the policy to the desired site.
When I created a site for one of my short projects, I had the intention to delete the site after 15 days. I created a site policy according to it. But I got an emergency call, so I had to go outside & later forgot to apply the policy. So try to apply the policy after creating one to avoid such blunders.
By default, No Site Policy is set for the sites. So ensure you apply the site policy after creating one. Follow the steps below to apply a custom site policy to a SharePoint site.
- Go to SharePoint site settings.
- Click Site Closure and Deletion from Site Administration section.
- Pick your created policy from the drop-down in the Site Policy section.
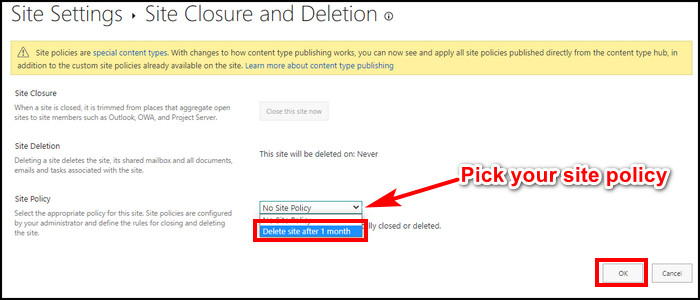
- Hit OK.
You will see a notification of the closing date on the top of the site. From the Site Closure and Deletion page, you can immediately close the site or hold off the site deletion. 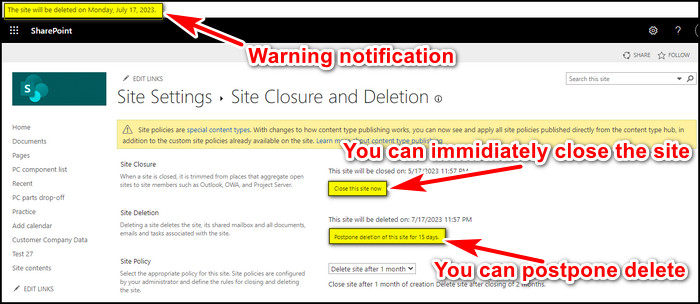
Now, after the site policy is applied with read-only option, you can’t remove or edit any site content from the site. Additionally, you can leave a News post page in SharePoint about when the site will be deleted, so if anyone needs any details regarding the site, they can contact the authorized people.
After the site deletion date is reached without the interference of extension, the site will be removed & transferred to the SharePoint Admin Recycle bin in where the site will remain for 90 days to recover. If no retention policy in SharePoint is set, it will delete the site forever.
FAQs
How to manually delete a SharePoint site?
If you create a site for a short-term project, you can create a site policy to automatically delete the site after a certain period. However, you can manually delete a site as a site owner at any time. To remove a site, go to the SharePoint site > click on the gear icon from the top right side & select Site contents. Select Site settings from the right side & under Site Actions you will find Delete this site option. With this, you can delete the site.
Can you cancel automatic site deletion in SharePoint?
After a site closure & deletion policy is applied to a site, the site collection admin can still postpone the automatic deletion. In the Site Closure and Deletion page from Site Administration section in the SharePoint Site settings, the site collection admin can cease the deletion for a certain period set by the policy.
Final Thought
Without giving extra time to manage & delete unused sites, you can focus on other essential things for your organization.
All you have to do is set & apply a site policy for site closure and deletion. After the set period, the site will be auto deleted & keep your SharePoint clean without manual touch.
In this article, I described the process, how easily you can accomplish the task.