As a content creator, you don’t want to make your audience feel like missing out. If some of your viewers miss the live broadcast, they should be able to catch up later.
Saving your streams on Twitch is the best way to do so. Hence, in this post, I’ll guide you through the steps to save your streams on Twitch (also known as VOD or Video On Demand).
I’ll also discuss the various aspects of it. So ensure you read the full post carefully.
What Is VOD (Video On Demand) On Twitch?
In Twitch, the VOD or the Video On Demand refers to the past saved streams or broadcasts. After enabling the VOD option, Twitch saves your streams and features them on your profile. Therefore, your audience can watch the streams when they demand.
As the most successful online streaming platform globally, Twitch has a lot to offer. It continuously pumps out new features and services to make the platform more user-friendly.
There could be many reasons you’d want to save your past streams on Twitch. Maybe you’re playing a story-based game and want to make a playlist. Or perhaps you want the viewers to catch up to all your streams in their own time. Check out our separate post to fix adblock not working on twitch anymore on Chrome.
Whatever the reason is, Twitch VOD serves the purpose. Twitch will save the past streams and showcase them on your channel if enabled through the settings.
Depending on your subscription, you get storage capacity. Twitch will store the VODs for 14 days if you don’t have any subscriptions.
But if you have either the Twitch Turbo or the Prime Gaming subscription, Twitch will store the VODs for two months or 60 days.
Hence, if you’re serious about Twitch streaming and stream regularly, you should consider getting a subscription.
Why Should You Save Streams On Twitch?
You should save streams on Twitch to make your past streams accessible to the audience who’ve missed the live stream. It also gives your audience something to watch while you’re offline. If you’re streaming anything sequential (story-based games), saving streams will help the audience.
As a content creator, your primary goal is to engage with your audience and create a fanbase. Making your content accessible to the viewers is one such task.
The more quality content you make and the more accessible it is, the more your Twitch channel will grow. Your audience shouldn’t feel left out when they miss a stream or two of yours.
An average Twitch stream has a duration of three hours. It’s hard for people to watch streams for a long time without getting busy in between. Moreover, everyone gets to a point where they’re suddenly busy and out of schedule. When these viewers come back, they should be able to catch up at their own pace. It’ll ensure your audience sticks with you. So, your ublock won’t Block video ads on Twitch? Check our epic guide on how to fix ublock not blocking twitch ads.
If there’s a long delay between your two streams, saving past streams help viewers binge upon something while waiting. Creating a backlog of your content always helps.
Playing games that depend a lot on the storyline is quite popular. Some are hard to understand if you start watching from the middle.
Hence saving all streams of such games will ensure the audience understands the game and can enjoy it with you. Fans of such games can binge-watch the entire playlist and become followers of your channel; who knows?
You should also save the streams so that you can create highlights or clips if there’s something epic. As most streamers do, you can also download them later and upload highlights on other platforms like YouTube. Therefore, saving streams on Twitch is quite essential. Refer to the next section if you don’t know how to do it.
How To Save Streams On Twitch
Saving streams on Twitch is not a cumbersome process. You need to enable an option in the Twitch settings, and it will start saving future streams automatically. It doesn’t get easier than that.
Once you save the streams, they are known as the VOD or Video On Demand (people can watch the videos when they demand). But Twitch will not save the VOD forever. It’ll have a limited lifespan, after which the VOD will be removed to make space for future broadcasts. Hence you might want to know about the alternatives as well. These will help you store the VODs for an extended period or forever. Follow our step-by-step guide to make twitch overlay. You don’t need Twitch mod commands to make the overlay.
Here are the methods to save Twitch streams:
1. Use Twitch VOD storage
Twitch can automatically save your live streams for a limited period. But you have to enable the option in settings to do so manually.
Here are the steps to use Twitch VOD Storage:
- Launch Twitch in a desktop browser or the desktop app.
- Sign in to your account.
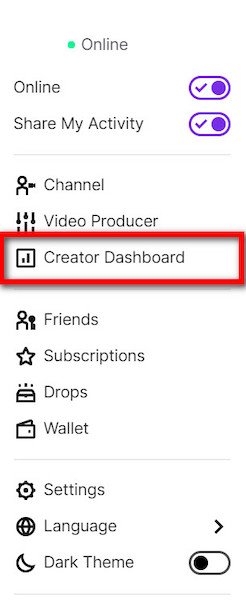
- Click on your avatar from the top-right corner to open the menu.
- Go to the Creator Dashboard.

- Click on Settings from the left to expand it.
- Go to Stream.
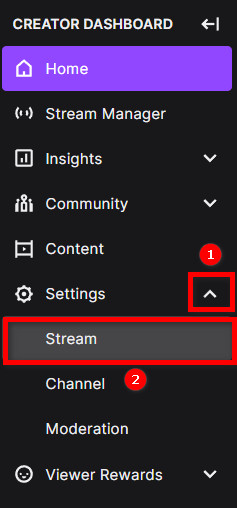
- Find the VOD Settings section.
- Turn on the Store Past Broadcasts option.

And that should be it. From now on, Twitch will save your live broadcasts for a defined period. The period will depend on your subscription state. Twitch will save the VOD for 14 days if you’re not subscribed to any package. Subscribing to anyone of the Twitch Turbo or the Prime Gaming subscription will extend to 60 days. 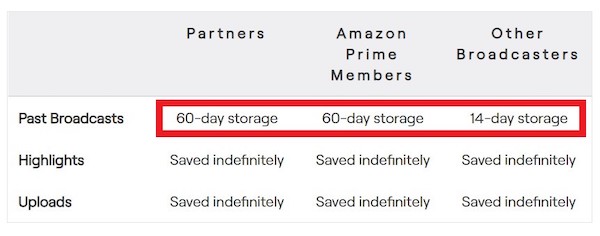
You can save streams using the Twitch mobile app too. Follow the following method to do so.
2. Use the Twitch mobile app
If you stream using the Twitch mobile app, it gives you an option to save the stream after the stream ends. Saving the stream from here adds it to the Videos section of your channel. Follow our expert’s advice to fix the twitch studio audio not working error.
Do as follows to save streams on Twitch mobile:
- Open Twitch mobile app.
- Login to your account.
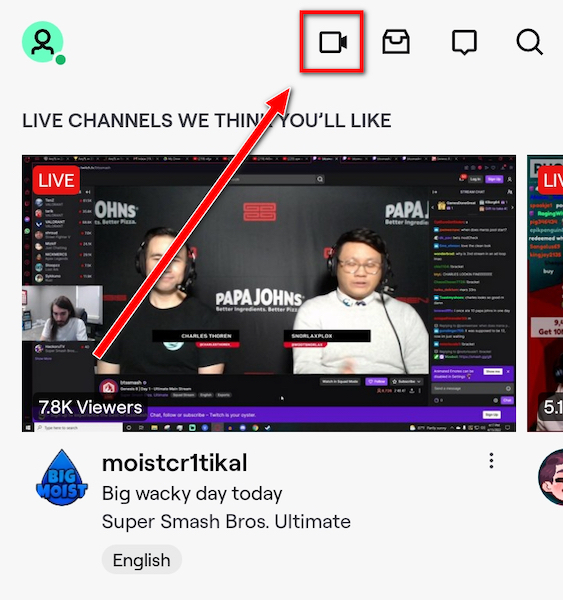
- Start a stream by tapping on the camera icon at the top.
- End the stream. Twitch will present you with a preview of the stream and various options such as Review, Save, etc.
- Tap on the purple Save button to save the stream.

Now you can find the video by going to your channel > Videos. From here, you can delete the video as well as clip it. But what if you want to save streams for longer? The following method discusses it.
3. Use Twitch highlights
If you want to save your streams forever on Twitch, you have to turn them into a Twitch highlight. Twitch highlights are the best portions of your Twitch streams featured at the top of your channel. Usually, you’d keep the best and epic moments of your live stream on the highlights to attract the audience.
There is no limit on the number of highlights and the duration of the highlight. However, because of the nature of a highlight, it’s recommended to keep highlights short and feature no more than 3 highlights on a channel.
It ensures you have only the best moments, which a new audience will appreciate. But if your main goal is to save past streams permanently on Twitch, you can mark all of the saved VODs as highlights.
If you have enabled the VOD settings as in method 1, Twitch will save the past streams as VOD. But it’ll take some time to process. Once the processing is done, you can turn the VOD into a highlight.
Hence, do the following after every live stream:
- Open Twitch in the desktop browser or desktop app.
- Click on your avatar from the top-right.
- Select Creator Dashboard.

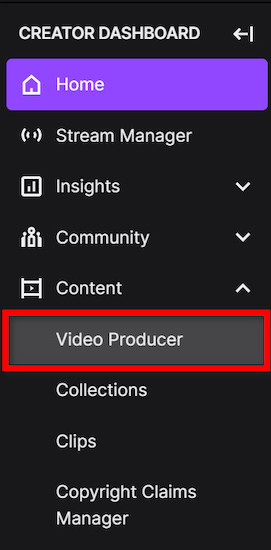
- Click on Content from the left menu.
- Go to Video Producer.

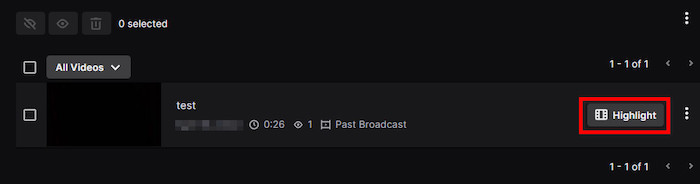
- Choose a video you want to highlight, then click on the Highlight button next to it. If you cannot see the Highlight button, click on the three dots next to the video, then select Highlight from the context menu.
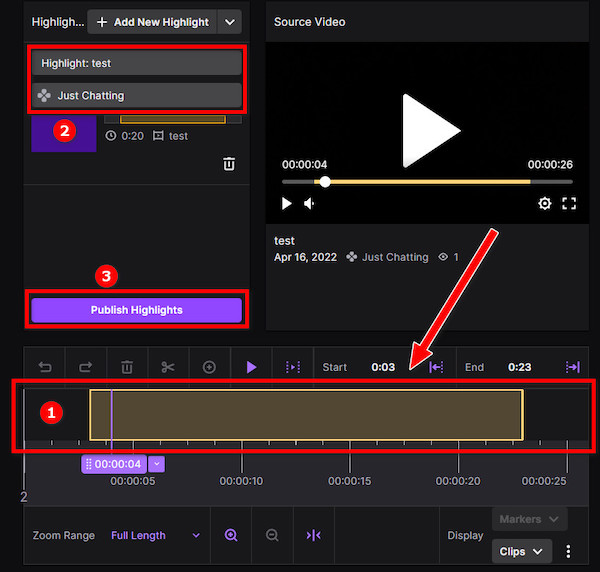
- Select the portion of the video you want on the highlight using the yellow bars at the bottom. It can be the entirety of the video.
- Set an appropriate title, tag, and thumbnail for the highlight.
- Click on Publish Highlights.
If you’ve read this method carefully, it’s clear that saving all your VODs as a highlight is not the most optimized way. It results in overflowing your channel highlights section.
To avoid it, you can save your streams locally. Refer to the following method.
4. Use your computer for a local backup
You can do a local backup of your streams if you don’t need them to be on Twitch. Twitch will store the VODs for a limited period (14 or 60 days), but they’ll be saved on your PC for as long as you want. This method is helpful if you want an archive of your streams and do not necessarily feature them on Twitch.
Do as follows to save Twitch streams to the computer:
- Open Twitch in the desktop app or a web browser.
- Login to your account.
- Open the menu by clicking on your avatar from the top-right.
- Go to the Creator Dashboard.
- Go to Content > Video Producer from the left menu. You’ll see a list of all your past streams and videos.
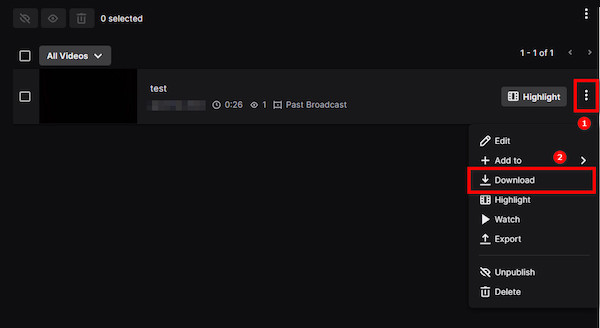
- Click on the three vertical dots beside the video you’d like to download. You’ll see some options in the context menu.
- Click on the Download button. The video will process for a while and then start downloading on your PC.
Following this method, you can download past streams in mp4 format.
How To Manage Saved Streams On Twitch
By default, Twitch publishes all the saved streams on your channel as VOD. However, you might want to review the videos before featuring them on the channel. You might also want to check videos of a specific category and make others publish default.
Twitch has covered all these options, and it also lets you manage the old videos (unpublish, highlight, clip, delete, download, etc.)
Follow the steps below to Manage Saved Streams On Twitch:
- Open Twitch on desktop.
- Click on the avatar at the top-right corner.
- Select Creator Dashboard.
- Go to Settings > Stream from the left.

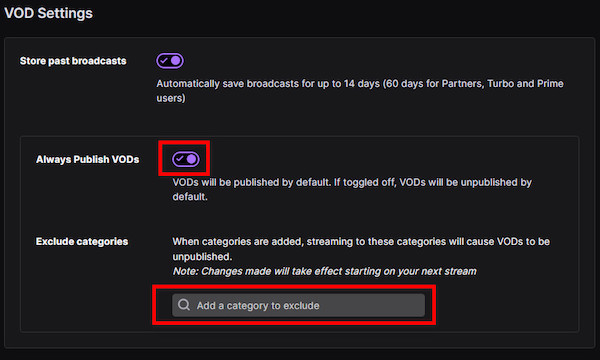
- Go to the VOD Settings section.
- Turn off the Always Publish VODs option if you want to review your streams before publishing them manually.
- Turn on Always Publish VODs and select categories from the Exclude Categories option. It’ll allow you to automatically publish videos except for the categories chosen in the Exclude Categories section.
- Go to Content > Video Producer from the left menu. You’ll see a list of your past streams, videos, clips, and highlights. You’ll have options like edit, delete, and download here.
In a nutshell, Twitch offers extensive management options for its VODs.
FAQ
Question: Does Twitch saves streams automatically?
Answer: Twitch saves streams automatically if you enable the Store Past Broadcasts option in Creator Dashboard > Settings > Stream.
Final Thoughts
Twitch has the option to save your streams on the platform. Depending on your subscription status, it will store the past streams for 14 or 60 days.
If you want to store the videos for longer, you can turn them into a highlight or download them on your computer to create a local archive.
Twitch also offers many options to manage the saved VODs.