The toolbar is an important part of the PowerPoint user interface. It quickly lets us save a file, undo/redo or perform other actions.
The toolbar also has extensive customization options, allowing you to add different functionalities as needed.
It can be a big issue if the PowerPoint toolbar does not work.
This post will guide you through the steps of fixing a PowerPoint toolbar. If the toolbar does not appear as you expect, you can fix that, too, following this post.
You will also learn how to customize the toolbar and toggle the visibility of the ribbon beneath it.
So keep reading the post till the end.
Check out our separate post on how to use cameo in PowerPoint.
How To Fix The PowerPoint Toolbar Not Working
If the PowerPoint toolbar is not working for you, it could be a number of issues. It could be due to the privacy of shared documents which makes the toolbar grayed out, PowerPoint being used by another process, conflict with antivirus, installation issues, outdated PowerPoint version, etc.
Whatever the reason is, there are a handful of ways of dealing with the issues. You can try the methods described below subsequently to fix the issue.
Here are the methods to fix the toolbar not working in PowerPoint:
1. Check if you have sufficient access
If you see the PowerPoint toolbar grayed out, it is due to the privacy settings of the file. Each file has an owner who can set the privacy of the file.
The file owner can limit the accessibility of the file and only allow specific Microsoft accounts to access them. It works under the Information Rights Management system of Microsoft Office.
So, if you do not have enough access to the file, then the toolbar will be grayed out. In such a case, you need to contact the file owner and ask for access.
Related content you should read: add or delete table rows and columns in Powerpoint.
2. Update the PowerPoint software
Updating the Microsoft Office apps help to get rid of any out-of-date files containing bugs and glitches. Hence you can attempt to update the PowerPoint software in case any bug is causing the toolbar not to work.
Here are the steps to update PowerPoint:
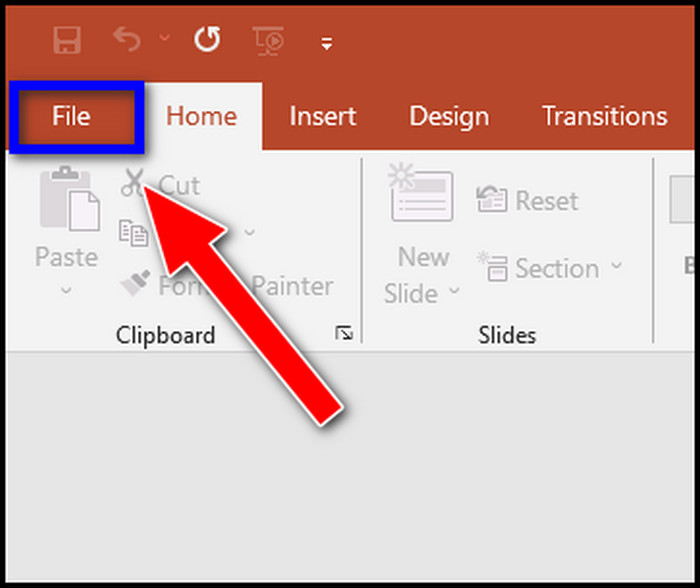
- Go to the File tab from the top.
- Click on Account from the left menu.
- Click on the Update Options button. A dropdown list will open.
- Select Update Now from the dropdown.
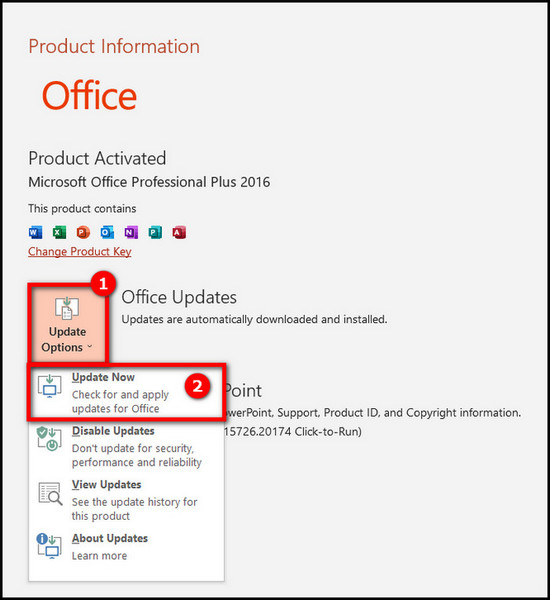
Now Microsoft Office will look for updates and, if available, update the PowerPoint software. After updating, check if the PowerPoint toolbar works fine.
You may also like to read: 3 ways to add grammarly to PowerPoint.
3. Check if another process is using PowerPoint
The status bar at the bottom of the PowerPoint window indicates if any process or activity is using the PowerPoint. PowerPoint toolbar might not work for the time being when a certain process is utilizing the software.
So check the bottom bar of the PowerPoint window to check the PowerPoint status and ensure no other process is using the software. If some process uses PowerPoint, you should wait for the processing to finish and then try using the toolbar.
4. Repair Microsoft Office
There might be corrupted files in the Microsoft Office installation folder, causing issues like the toolbar not working. Perhaps the installation procedure was interrupted by another process.
Whatever the case, if there are any missing or corrupted files in the Microsoft Office directory, the PowerPoint toolbar may not work.
Luckily, you do not need to uninstall and then reinstall the whole software. Microsoft Office includes the repair option in the Office installer.
Here is the procedure for repairing Microsoft Office:
- Close all Microsoft Office apps.
- Open Control Panel. If you cannot find it, open Windows Search and type the control panel.
- Go to Programs and Features.
- Scroll and find Microsoft Office from the list of installed applications.
- Right-click on Microsoft Office.
- Select Change from the context menu.

- Click on Repair.
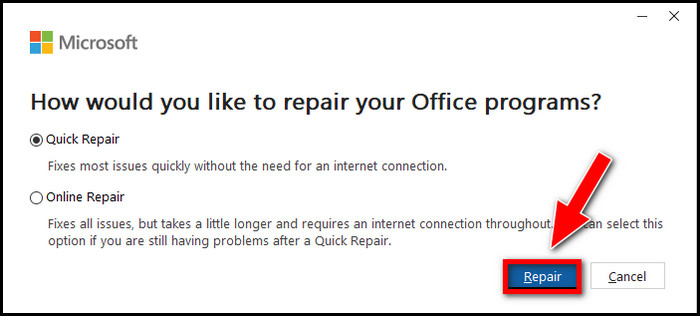
Microsoft Office will take time to check all the files and update or add corrupted or missing files. Once the process finishes, you can launch PowerPoint and check if the toolbar works now.
Follow our guide to fix PowerPoint design ideas not working.
5. Ensure the add-ins are not causing the issue
Add-ins help us a lot to perform the required action in PowerPoint. They enable us to work faster and be more efficient.
But since third parties make add-ins, there might be a compatibility issue with PowerPoint. The add-ins might conflict with the PowerPoint functionality and cause the toolbar not to work.
So you need to ensure it is not the add-ins causing the issue.
Here are the steps to check the add-ins in PowerPoint:
- Close the PowerPoint software.
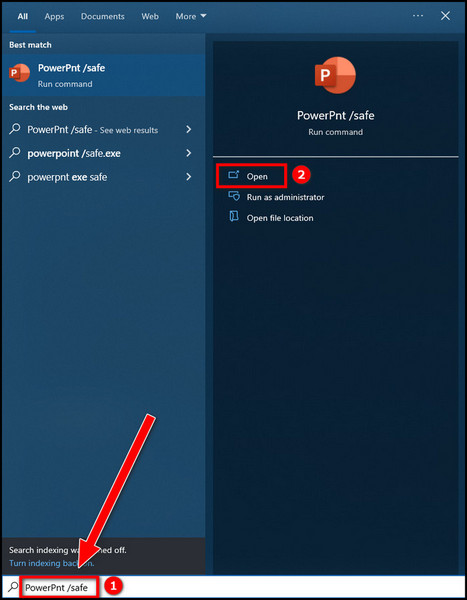
- Open Windows Search.
- Type PowerPnt /safe and press Enter. PowerPoint will start in safe mode.
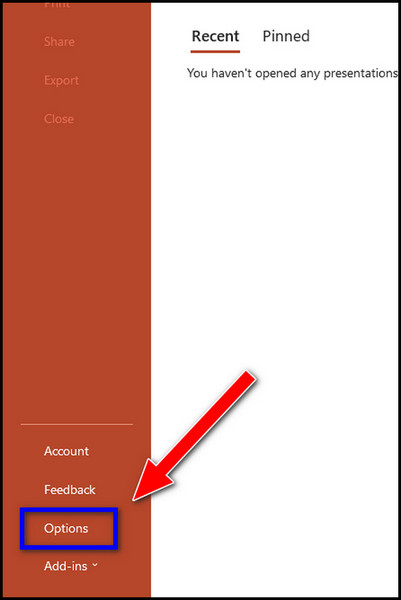
- Go to the File tab.

- Select Options from the left menu.
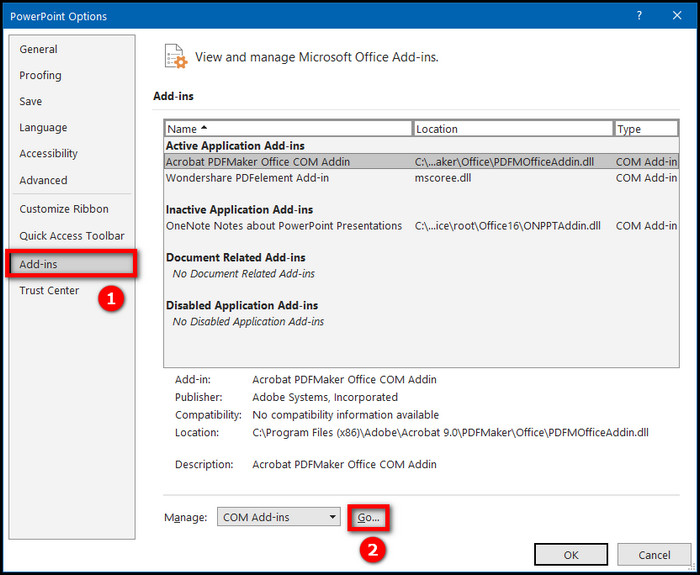
- Go to Add-Ins from the left.
- Select COM Add-Ins beside the Manage dropdown and click on the Go button.
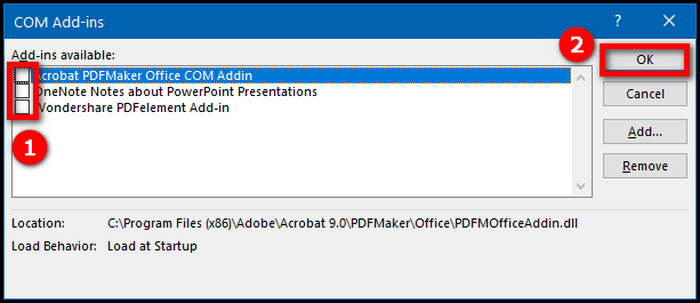
- Clear all the checkboxes to disable all the add-ins.
- Click OK and restart PowerPoint.
- Check if the toolbar works fine now. If it does, then one of the add-ins was causing the issue.
- Enable an add-in and restart PowerPoint.
- Check if the issue reappears. If it does not, enable another add-in and restart the software.
- Repeat the procedure until you have found the add-in causing the issue.
Once you have found the culprit add-in, you have to decide how you will go about it. You can find an alternative add-in doing the same job; stop using the add-in or check for updates.
Quickly check out our separate post: your browser is up to date error on PowerPoint.
6. Check your computer antivirus
Computer antivirus can mess up with Microsoft PowerPoint. Some antiviruses have integration with PowerPoint or have add-ins available for PowerPoint.
If these antivirus integrations conflict with the PowerPoint, then the toolbar might not work. So, if you have an antivirus, look for any PowerPoint integrations built into it. In case you find a PowerPoint integration with the antivirus, disable it and check if the issue persists.
How To Fix The Powerpoint Toolbar Not Showing
Sometimes the PowerPoint toolbar does not appear as expected. Luckily, it is a matter of PowerPoint options and not some error. So going to the PowerPoint options and making appropriate changes should bring back the toolbar as we expect.
Follow the methods below to show the PowerPoint toolbar:
1. Show the toolbar during the slideshow
The PowerPoint toolbar is hidden by default when you start the slideshow and go into the Fullscreen mode. But if you want to see the toolbar during the slideshow, then you need to enable it from the PowerPoint options.
Here is the procedure:
- Click on the File tab from the top-left corner.

- Select Options from the left menu.

- Go to Advanced from the left.
- Scroll to the Slide Show section.
- Check the box next to the “Show popup toolbar.”
- Click on the OK button.
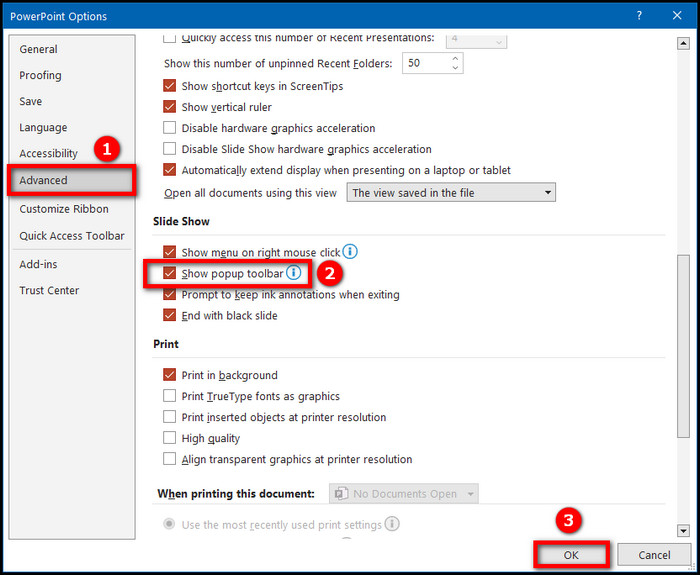
Now the toolbar will appear during the slideshow, along with the other elements like the current slide, next slide, navigation, and notes.
2. Show mini toolbar
The mini toolbar is a handy feature in PowerPoint which lets you format text quickly. It shows up beside the selected text and contains basic formatting options like font, font size and color, alignment, text style, etc.
If the mini toolbar is not showing when you select text in PowerPoint, then it might be disabled in the PowerPoint options.
Here are the steps to make the mini toolbar appear in PowerPoint:
- Go to the File tab from the top-left corner.

- Click on Options from the left menu. The PowerPoint Options dialogue box will appear.

- Go to the General option from the left.
- Scroll to the User Interface options.
- Check the “Show Mini Toolbar on selection” box.
- Click on OK to save the changes.
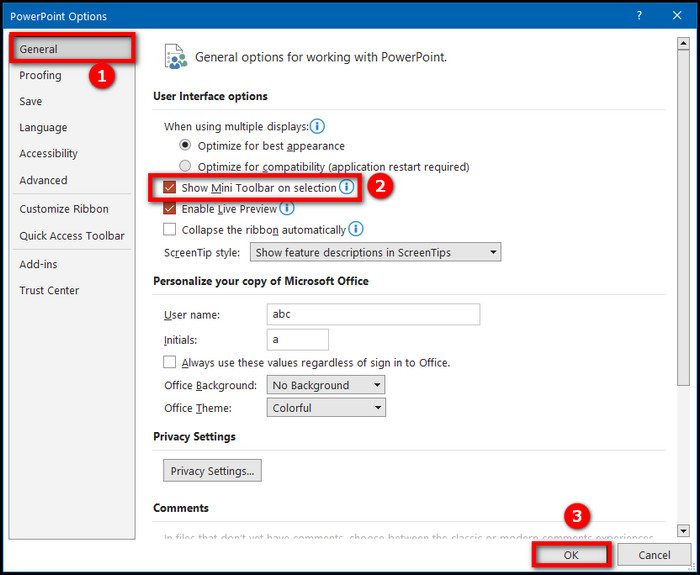
Now go back to the slide and select some text. The mini toolbar will appear beside the selected text.
How To Customize The Quick Access Toolbar
The quick access toolbar is present at the top-left corner of the PowerPoint window and contains some basic functionalities like Save, Undo, Redo, etc.
You do not need to add or remove the toolbar, as it is always present at the top-left corner of the PowerPoint window. You can change the presence of the tabs and ribbon beneath it and the options available on the toolbar.
Before diving into details on how to add or remove options from the toolbar, let’s talk about showing/hiding the tabs and the ribbon under the toolbar.
To toggle the visibility of the ribbon, click on the Ribbon Display icon at the top-right corner beside the minimize button. It will reveal three options: Auto-hide ribbon, show tabs, show tabs and commands. 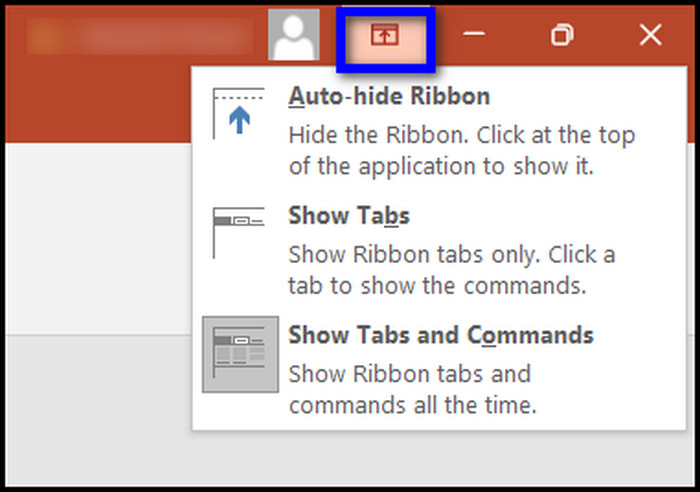
Auto-hide ribbon will remove the ribbon from the display when not in use. Show tabs will only show the tabs but not the commands below the tabs. Show tabs and commands will display both the tabs and the commands beneath them (the default option).
Now let’s get back to customizing the quick access toolbar. You can add many options to the quick access toolbar. Typically, you would add the functions you use the most in the quick access toolbar.
Here are the steps to customize the quick-access toolbar:
- Open any slide in PowerPoint.
- Click on the Customize Quick Access Toolbar button (downward arrow sign) from the top-left. A dropdown list will appear.
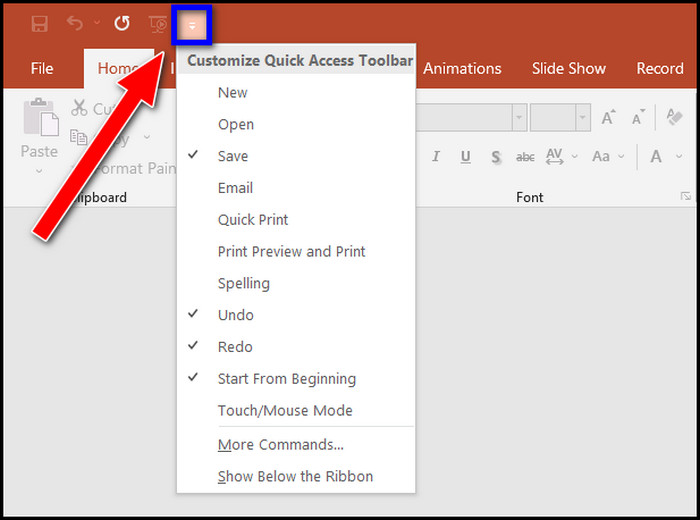
- Select the options that you want to add to the toolbar.
- Click on More Commands to open PowerPoint Options, where you will find a complete list of options.
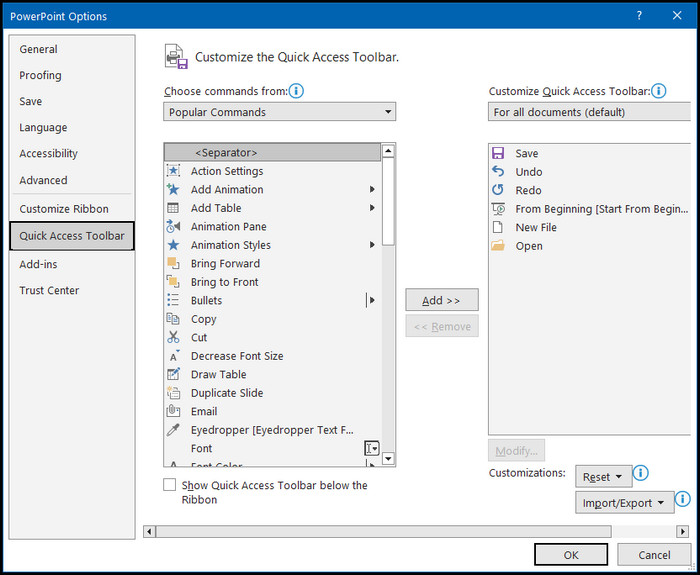
As you can see, the quick-access toolbar is quite flexible.
Final Thoughts
PowerPoint toolbar helps us to perform a basic action quickly. Different buttons can be added to the toolbar to enhance our efficiency further.
It can be quite frustrating when the toolbar does not work for different reasons. You can perform the different fixes mentioned in the post to determine which one works for you.
The toolbar does not appear in all the different modes in PowerPoint. You can fix that by applying the appropriate settings from the Options.