Imagine launching an Office 365 app in a dimly lit environment, and BAAM! You get blasted with blinding light as the dark mode did not work correctly for unknown reasons.
On a serious note, many MS Office users have reported such unwanted scenarios, especially in Microsoft Word or web-based clients. However, the reasons and subsequent solutions are pretty obvious, which I have thoroughly addressed in this write-up.
So, without further ado, let’s see how you can fix the Microsoft Office dark mode not working issue effortlessly.
Why is Dark Mode Not Working in Microsoft Office?
Most of the time, the dark mode in Microsoft Office doesn’t work properly due to improper configuration. For example, even though you’ve enabled dark mode in Microsoft Word, you’ll still get a white document page if you’ve ticked the Never change the document page color option.
Nonetheless, here are some of the reasons why the dark mode might not be working on Microsoft Office:
- Incorrect settings in Office apps related to the dark theme.
- Office Online is using the browser’s default theme instead of dark mode.
- Lack of proper subscription.
- Using an outdated Office client.
- Underlying technical issues.
Furthermore, since Microsoft Office includes many services/apps, some of them can have different ways to enable the dark mode. Not to mention, the web-based services have different settings than the desktop apps.
On a side note, check out how to fix Microsoft Office error code 0x426-0x0 in Windows.
How to Fix Microsoft Office Dark Mode Not Working Issue
As I have mentioned before, the most common reason for the aforementioned error is due to improper user-defined settings. As a result, users need to do some tinkering in the settings, along with checking a few things, to get back into the darkness.
Speaking of checking things, make sure you have a 365 subscription to get all the available options within the apps. Otherwise, the dark mode toggle won’t be available in Office 365.
As anti-consumer as it may be, having a license for Microsoft Office Pro won’t be enough to get the dark mode button on all apps/services.
That being said, if you’ve met all the prerequisites but the dark theme is still not working as intended, follow the below-listed solutions in a step-by-step manner.
Here’s how to fix the dark mode not working issue on Microsoft Office:
1. Disable Page Color for Microsoft Word
After checking all the forum posts about dark mode not working on MS Office, it became pretty apparent that most people are having trouble with Microsoft Word. To be precise, they are getting a white document page despite enabling the dark theme for the program’s UI.
In those instances, users need to change an additional setting for both desktop and web versions. That is also how you can make Microsoft Word dark mode on MacOS.
Before we begin, it goes without saying that different Office versions have different names/paths for an option. Nonetheless, the following steps should give you an idea of which option to choose to make the necessary changes.
This is how to change Word from light mode to dark mode:
For Desktop App
- Launch Microsoft Word on your PC and open a blank document.
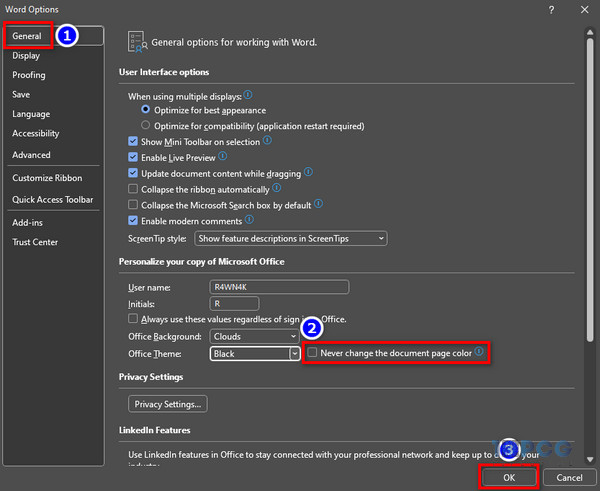
- Click on File > Options.
- Go to the Personalize your copy of Microsoft Office section in the General tab.
- Uncheck the box for Never change the document page color and hit OK. The aforementioned box can have different names, like Disable dark mode, Never change the message background color, etc, based on different Office versions.
For Word Online
- Go to Microsoft Word Online with your personal or organization account.
- Open a blank document and click on the View tab from the top ribbon.
- Select Dark Mode. Skip this step if you already have dark mode enabled.
- Click on the Switch Background to turn the white page into a black page.
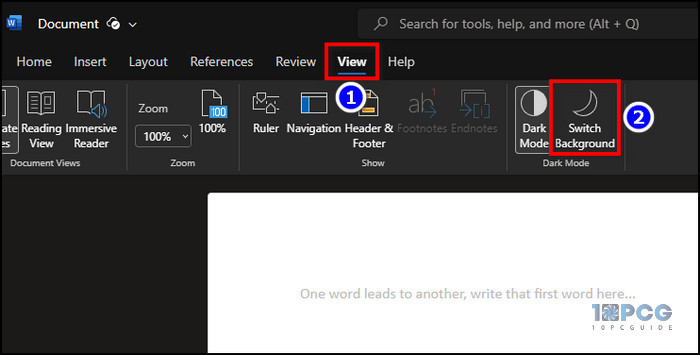
Furthermore, clicking on the crescent moon icon enables the dark theme, while the sun icon enables light mode for the document page. But they don’t change the layout theme of the app/service.
2. Change the Settings for Office 365 Online Apps
Many web-based Office 365 services, like Outlook, have the option that matches the theme with the browser’s current light/dark mode. However, incorrectly configuring the said option can prevent the Office 365 UI from showing a dark theme.
To resolve this:
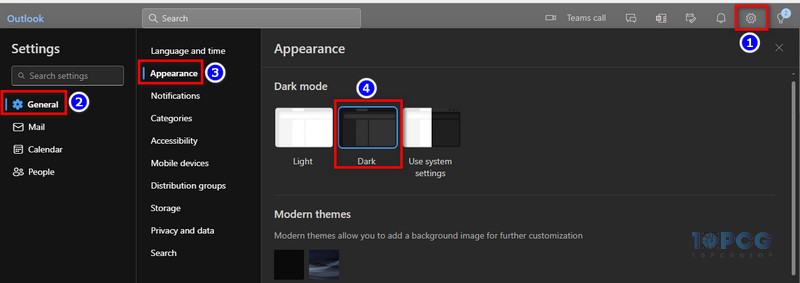
- Go to OWA(Outlook on the web) and sign in with your Microsoft account.
- Click on the gears icon to open Settings.
- Select General > Appearance.
- Click on Dark from the Dark mode section. If your browser has a dark theme, you can select the Use system settings as well.
For other services, like Word Web, go to the corresponding website and click on the Settings icon. Then, enable the Dark Mode toggle. 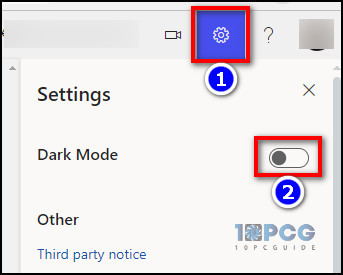
Now, if you notice that the Outlook dark mode settings are missing, you’ll need to have a 365 subscription or non-volume licensing, which are the current requirements for the dark theme.
3. Enable Black Theme from Registry Editor
Many people may not like the idea of paying twice for a basic feature like a dark theme. You’ve already paid for the Office license, so why would you have to buy a subscription as well?
For them, there’s an easy workaround to get the dark mode options in your Microsoft Office apps. Here’s how:
- Press the Windows Key+R to bring up the Run dialogue box.
- Type regedit and hit Enter.
- Go to Computer\HKEY_CURRENT_USER\Software\Microsoft\Office\16.0\Common.
- Double-click on the UI Theme from the right side pane.
- Change the Value data to 4 or 5(3 is for Dark Grey, 4 is for Black, and 5 is for the White theme).
- Click on OK and close the Registry Editor.
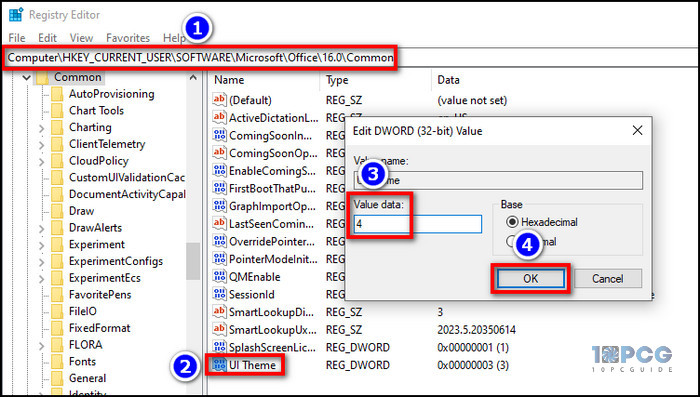
That’s it. Now, run the Office app, go to File > Options > General > Personalize section, and change the Office Theme to Black.
4. Run the Office Repair Tool
If you still can’t get the dark theme working after following the above-mentioned solution, the issue on hand can be caused by corrupted files or underlying bugs/glitches. The only way to remedy this situation is to run the built-in Office repair tool and let the software do the rest.
To do so:
- Go to your computer’s Control Panel and select Uninstall a program.
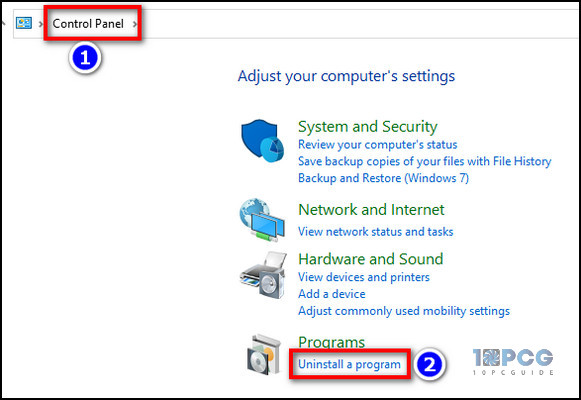
- Scroll down to find and select Microsoft Office from the app list.
- Click on Change from the top bar.
- Select Quick Repair > Repair.
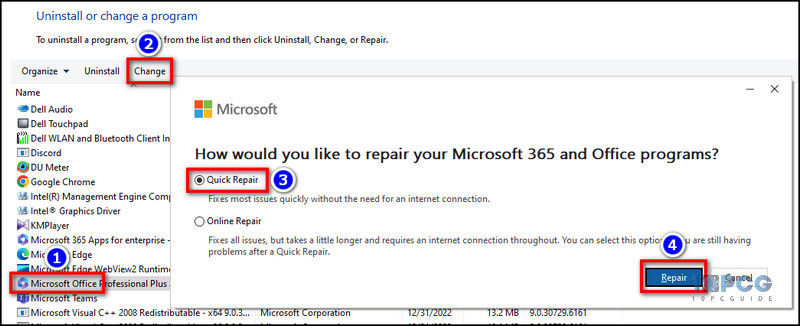
- Wait until the tool automatically detects and fixes any subsequent issues related to the Office desktop client.
Keep in mind, don’t select the Online Repair option, as it would most likely remove all the apps, and you’ll have to reinstall Office again.
You can also solve the error code 147-0 in Microsoft Office by following this method.
5. Uninstall and Install the Latest Office Client
Many new features in Microsoft Office won’t appear in the apps if the installed client on your PC is from 2019 or older.
So, if the Microsoft Office dark mode is still not working on Windows 10, consider uninstalling the current version from your PC and performing a clean install with the latest version of the Office client.
Here’s how:
- Navigate to Control Panel > Uninstall a program.

- Select Microsoft Office from the program list and hit Uninstall.
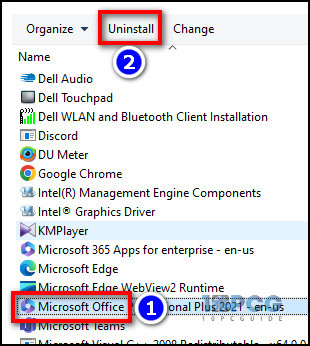
- Go to Microsoft’s official download page and download the Office Deployment Tool.
- Run the setup file as admin and complete the installation process accordingly.
After the installation is done, run any Office app and sign in to your Microsoft account to check if the dark mode is working correctly.
Wrapping Things Up
Whether you’re using desktop apps or web-based clients, following this article should give you a proper idea of utilizing the dark mode on any Microsoft Office service. And if all else fails, you can always seek help from the Microsoft support team.
Anyway, that’s it for today. If you ever need any further help on any Office-related errors, don’t forget to go through our website.
Have a good day!