Outlook scheduling assistant provides information on which individuals are available to plan a meeting in your organization.
The feature lets you view the participants’ schedules, detect any scheduling conflicts, and suggest appropriate time slots when everyone is free. However, the Scheduling Assistant’s effectiveness solely relies on how accurately the attendees put their calendar information.
In this article, I will show you the usage process of the feature in Outlook.
Let’s dive in.
What is the Purpose of Scheduling Assistant in MS Outlook?
The goal of using Microsoft Outlook Scheduling Assistant is to reserve a free room and a suitable time that works for all of your meeting participants by using their calendar information. The feature works alongside the Room Finder, which analyzes the available rooms based on the individual’s needs.
In Microsoft 365 or Microsoft Exchange account with Outlook, you can find a suitable time that works for your coworkers to plan a meeting with the Scheduling Assistant. The feature lets you pick the best time when every attendee is available to meet.
It simplifies your scheduling workflow. So, you can add meetings to Outlook Calendar easily.
Here are some reasons to use Outlook Scheduling Assistant:
- The feature lets you identify the attendee’s availability based on their calendar information.
- The room finder informs which conference rooms are free.
- Specify if there are any scheduling conflicts.
- You won’t have to wait for reply responses to plan a meeting, which saves time.
How to Use the Scheduling Assistant for Meetings in Outlook
Using the Scheduling Assistant with MS Outlook Calendar, you must create a new appointment or meeting from the Outlook calendar & go to the Scheduling Assistant tab. Then, add the required attendees, enter an event description, set an available time for all your attendees, and hit Send.
Here are the steps to use Scheduling Assistant for Meetings in Outlook:
- Press Ctrl+Shift+Q on the keyboard in Outlook.
- Add details of the meeting, like subject, participants in the Required & Optional box, time duration, and location.
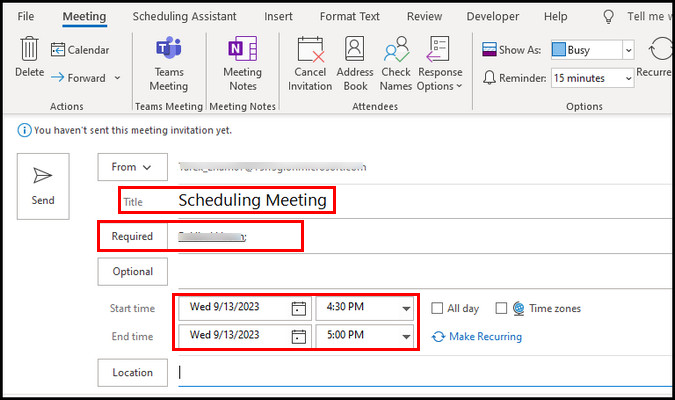
- Go to the Scheduling Assistant tab from the ribbon.
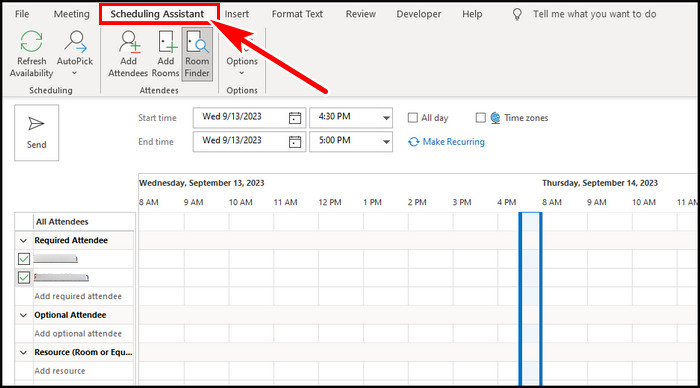
For location, you can pick suggested conference rooms set up by your Microsoft Exchange or Microsoft 365 administrator. Alternatively, you can use the Room Finder to check availability and schedule a meeting in Outlook.

In the Scheduling Assistant tab, based on the meeting’s location, time, and participants, the feature will display the attendees’ availability. The process is based on their Outlook Calendar working hours and resource availability (location).
The primary purpose of schedule assistant in Outlook is to avoid any conflicted times and set an optimal time & location where all or most participants can attend the meeting.
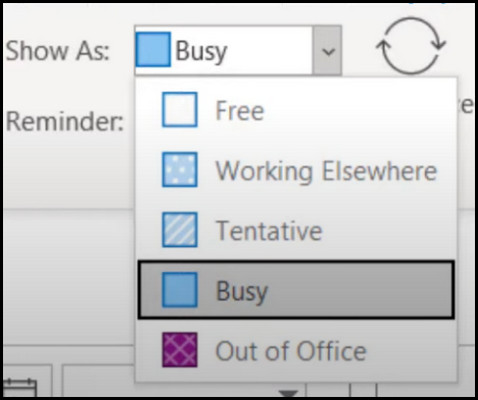
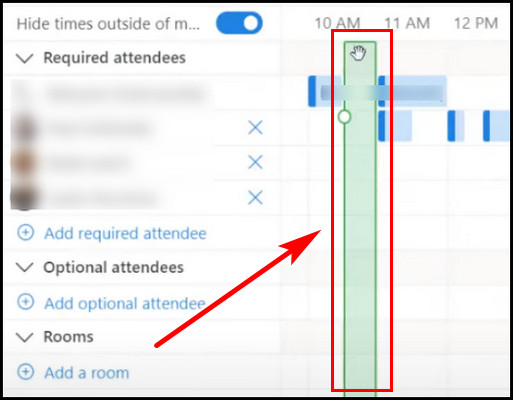
Depending on the Outlook version, five different colors can indicate attendees’ availability. Outlook Scheduling Assistant color meanings are given below to check availability.
- A blank row indicates the time is good and the participants are available.
- A light gray row with dots suggests the coworker’s working hour is over.
- A dark blue means the participants are unavailable (busy).
- A light blue hashed block indicates the attendees have a tentative appointment.
- A pink row with crosses suggests the attendee is out of office.
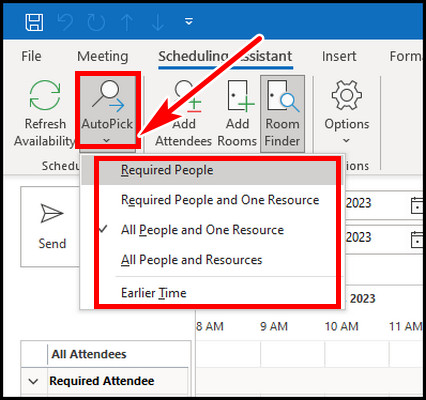
After finding a suitable time, you have set an available time for all of your attendees. If it is troubling to find a suitable time, you can use Outlook’s AutoPick feature. The option will analyze everyone’s time & assist you in picking up a time that works for most.
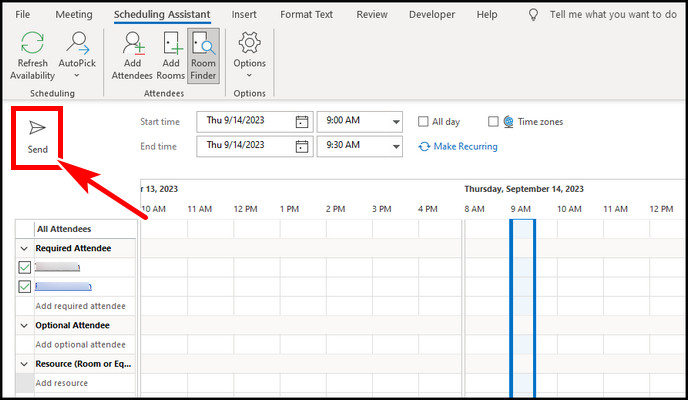
Optionally, you can make the appointment or meeting private in Outlook. After reviewing all the meeting details once again, click Send and invite the participants to the meeting.
If the participants set auto-accept meetings in Outlook, they can’t propose a new time or decline the meeting. But the scheduling assistant will appear for them.
As Outlook schedule assistant provides the optimal time & location, the meeting should not interrupt other work-related events. All or most participants should attend the meeting unless someone changes working hours in Outlook.
How to Use Outlook Scheduling Assistant in Web Version
Like the desktop version, you can also use the Scheduling Assistant feature if you are an Outlook Web user.
Here’s how to use Schedule Assistant in Outlook Web:
- Open Outlook Web on your web browser.
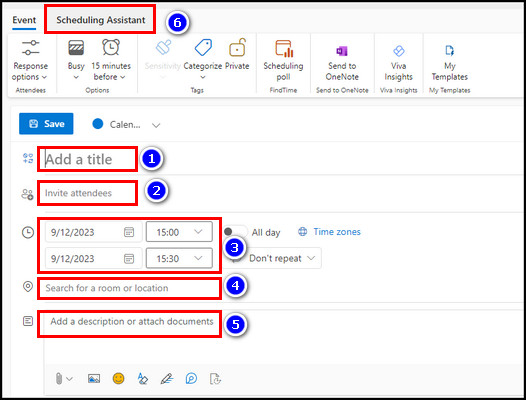
- Click on the New mail from the top left & select Event.
- Give a title, invite attendees, set a time, and a description.
- Go to the Scheduling Assistant tab from the top.
If the previously selected time conflicts with others, the Scheduling Assistant will display red, indicating it interferes with some attendees’ schedules.
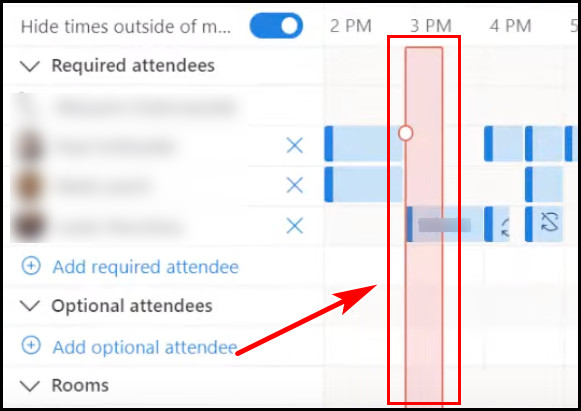
As the goal is to make a perfect time for everyone, you have to browse through different suggested times & book a time when the Scheduling Assistant will show up in green color.
Additionally, you can add more participants if required & when all things are properly set, return to the Event tab from the top. Hit the Send button to complete the meeting invitation.
Where is the Scheduling Assistant in Outlook?
The Scheduling Assistant in Microsoft Outlook is located in the Calendar view ribbon bar at the top. The ribbon will be visible when creating a new appointment or meeting. If Outlook Scheduling Assistant is not showing for you, the option can be disabled for you in the ribbon option.
So, what is the workaround if Schedule Assistant in Outlook is missing in the ribbon? To begin with, you have to ensure the feature is enabled to display in the ribbon.
Pursue the process below to enable Schedule Assistant in the Outlook ribbon:
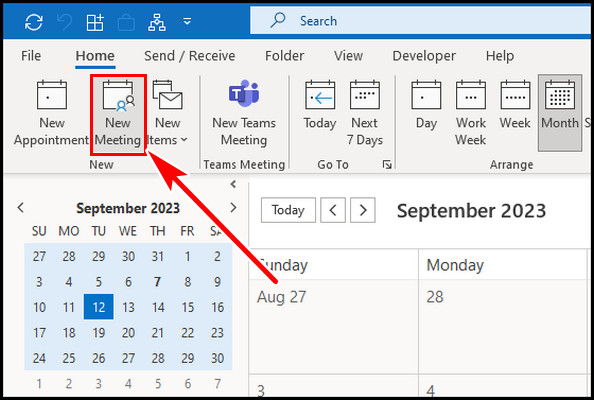
- Launch the Outlook app.
- Press Ctrl+2 on the keyboard.
- Click on New Meeting from the upper left.
- Right-click on the ribbon & select Customize the Ribbon.
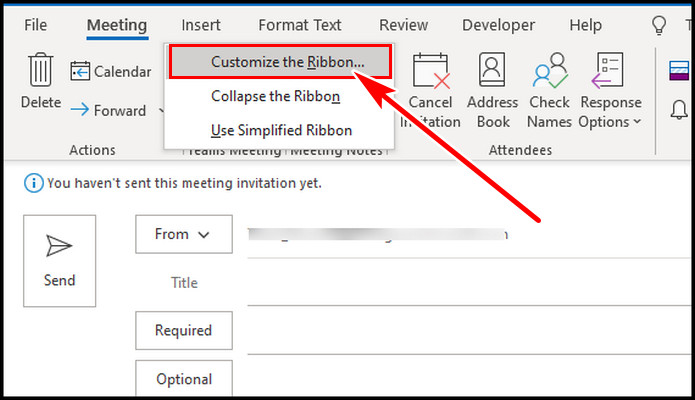
- Tick the Scheduling Assistant from the right side.

- Hit OK.
You can also select Reset from the below & pick Reset all customizations to restore the Outlook ribbon.
If the ribbon is missing to select, you can manually add the command to a new group on the Meeting ribbon.
To add schedule command in the Outlook Meeting ribbon:
- Navigate to the Customize the Ribbon section in Outlook.
- Select My Templates & hit New Group.
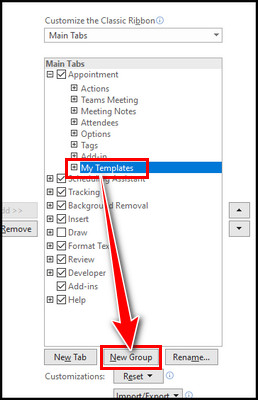
- Select All Commands from the left & add Scheduling to the new group.

- Hit OK from the below.
After this, a new ribbon will be added to your Outlook Meeting tab.

FAQs
Why is the Outlook Scheduling Assistant not working?
Scheduling Assistant in Outlook only works for the coworkers inside your organization. If you select attendees outside your organization, the feature won’t work. Moreover, a large number of invitations can also cause trouble with the feature. If there are more than 20 people, you should dictate a meeting time rather than finding a perfect time.
Is Outlook good for scheduling?
Outlook Scheduling Assistant helps you to plan a meeting across different time zones without the risk of scheduling errors. The feature auto-converts the meeting time to all participant’s local time. It helps keep track of meetings & pick the optimal time for attendees to attend the event.
Can everyone see your schedule on Outlook?
Your organization’s people & those who have permissions can see your free/busy times in Outlook. However, you can set your appointments or meetings to private in Outlook. But this can conflict with others while scheduling a meeting.
Conclusion
Outlook Scheduling Assistant helps you to plan a meeting at a suitable time & place where the majority of the attendees can attend. During making a new meeting, you can use the feature from the Scheduling Assistant tab.
In this article, I guided you on how effectively you can use the feature in Outlook to plan a successful event. If you have any further queries, please leave a comment.
Have a great day!