Manufacturers set CPU voltage to auto in BIOS to ensure stability for various possible combinations. But, tech gurus often recommend to undervolt the CPU voltage, as this is mostly overtuned from the factory.
In this article, I will show you why you should undervolt the CPU and how to undervolt the CPU in BIOS step by step easily.
Without further ado, let’s dive in.
What is CPU Undervolting?
CPU undervolting is an advanced process to lower the chip’s operating voltage. A properly tuned undervolting ensures less power consumption yet retains the max clock speed.
So, there is almost no performance loss.
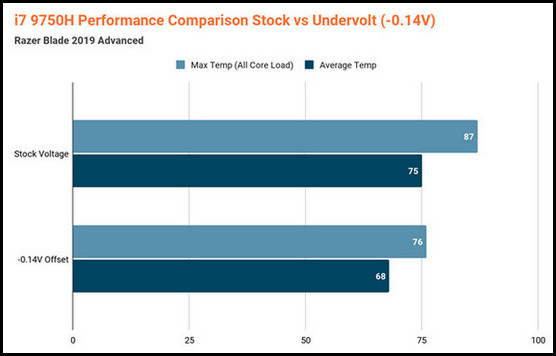
Power(P) is calculated with the multiplication of the current flow(I) and the voltage(V). So, when the voltage is reduced, total power consumption also drops. This results in a significant CPU package temperature drop. Due to the better thermal, the performance improves in various cases.
Undervolt can prolong a processor’s life by absorbing lower power without declining performance. So, the question arises: how to do it? The undervolting process can be daunting initially, but I explained stepwise steps in the next section to make it a piece of cake.
Preparation for the CPU Undervolting
Before dropping in the war, soldiers must prepare their arsenal so everything can go smoothly. They don’t want to experience a moment where the cartridges get stuck in the chamber.
Don’t worry. You are not in a life-death situation here, but before undervolting the processor, I recommend doing some groundwork before undervolting attempts.
At first, you will require some stress testing software. The stress test app will help to find the CPU stability after undervolting. You will also need temp monitoring software to display the real-time CPU temperature. So that you can detect and fix sudden CPU overheating.
My choices regarding CPU stress testing software are Prime 95, Y-Cruncher, and Cinebench R23. For monitoring temperature, voltages, and clock speeds, I prefer CPU-Z and HWiNFO.
Set a Baseline Before Undervolting CPU
After downloading and installing the softwares, you have to set a baseline. So that you can compare the performance loss or gain.
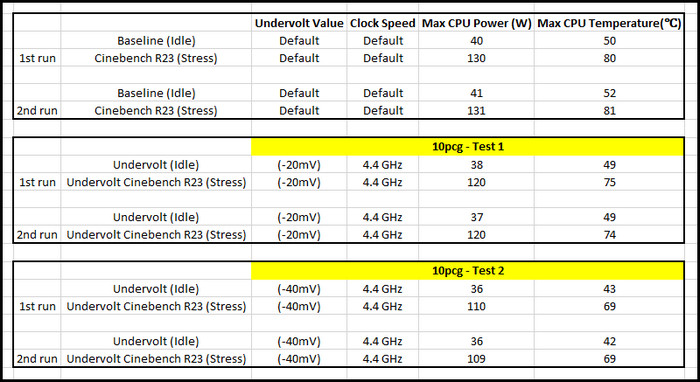
To begin with, I recommend opening an Excel spreadsheet and noting necessary info like the idle temp, volt & power from HWiNFO. Then, run a stress test, for example, with Cinebench R23, and note the numbers. You can also take note of single & multi-thread scores to ensure a minimal performance loss.
Here’s a reference spreadsheet. The values are noted to demonstrate examples and not present actual values. So yours will vary.
How to Undervolt a CPU in Bios
Lowering CPU voltage in BIOS is more reliable than software. Go to the BIOS > look for CPU voltage settings > gradually reduce the CPU voltage manually > stress test > keep decreasing the voltage slowly if it passes and fine-tune it until the PC crashes.
There is no specific value to say at which the CPU will work. It solely depends on the chip’s silicon lottery. So, you must shave off some VCore and dial in the voltage to find the sweet spot for optimal performance.
In this way, you can squeeze out most of your system while keeping it cooler than previously.
Here are the steps to undervolt a CPU through BIOS:
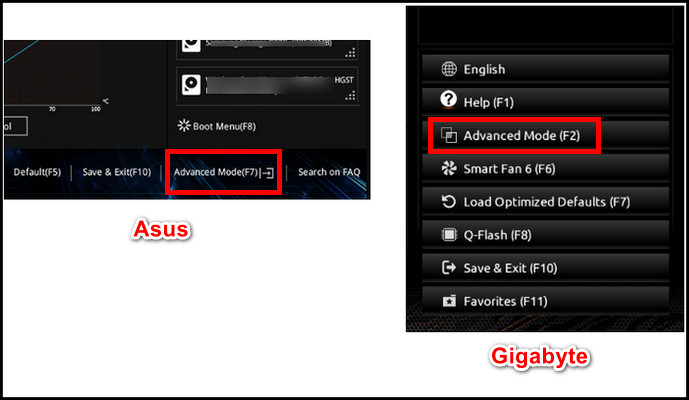
- Turn on your computer and hit the BIOS switch until it enters the BIOS menu. (BIOS keys depend on the motherboard manufacturer, usually Del, F1, F12, F10, or F11, etc.)
- Navigate to the Advanced Mode.

- Go to the Tweaker (Gigabyte), OC Tweaker (AsRock), OC(MSI), or AI Tweaker (ASUS) tab.
- Enter Advanced CPU Settings (Gigabyte), Advanced CPU Configuration (MSI), or similar tweaking options depending on the brand.
- Find CPU Core Voltage mode or Vcore Voltage Mode and set Manual/ Adaptive mode depending on the board.

- Select Internal CPU Vcore Offset/ Offset Voltage or a similar option and enter -0.020 (negative 20 millivolts). It indicates that the max voltage will be 20 millivolts less than the stock value.
- Choose Save and Exit in the BIOS and boot into the system.
- Run a stress test, check the system stability, and note down the temperature, clock speed, voltage, etc.
- Return to BIOS, input -0.040 offset voltage value, and repeat stress test.
- Keep lowering the voltage until the system crashes.
- Return to BIOS after a stability error and set the offset voltage slightly higher than the previous. For example, if the PC crashes at -0.080, set it to -0.070 and stress test.
If it passes the stress test, voila! You have successfully reduced your processor voltage. You should see a clear difference in power consumption and temperature from the stock settings. In addition, you can also set a fan curve in BIOS to reduce the temp.
Why Undervolting a CPU in Bios?
You will frequently hear about CPU overclocking to gain performance. But modern processors also gain benefits from undervolting.
A game, video rendering, or heavy CPU task can draw up to 250W power, and on the other hand, simple web browsing consumes around 40/50W.
High power draw will lead to higher electric bills and unnecessary high temp. Moreover, high voltage can eventually decrease the CPU’s lifespan, whether an Intel or AMD chip.
So here comes the undervolt, where you can gain the same performance while keeping the processor cooler, drawing less power, and not draining out the lifespan. Moreover, undervolting the CPU is also hugely beneficial to laptops.


That brings a question: is it safe to undervolt a processor?
Undervolting a CPU is safe when done carefully in BIOS. It can be risky only when you’re inattentive and put higher than the safe value, which can instantly burn your CPU or VRM.
Lower voltages than required can cause the system to crash, freeze, or stutter. But it has no risk of harming the CPU.
Final Thought
Undervolting a CPU can drastically improve thermal performance and sometimes increase FPS. It also improves silicon lifespan.
This article guides you on safely performing undervolting a CPU in BIOS. If you have further queries, please leave a comment.
Have a nice day!