You can enhance your content appearance in Google Docs by inserting horizontal and vertical lines. These lines help to organize and separate the data.
Depending on the data type, vertical lines are more appropriate for comparing something, whereas horizontal lines will be more helpful in breaking a paragraph.
Here, I will guide you to easily and quickly insert a straight line (vertical or horizontal) in Google Docs in all possible ways.
Let’s dive in without further ado.
How to Insert a Vertical Line in Google Docs
To insert vertical lines in Google Docs, you can use the drawing tool feature of Docs. Additionally, you can also add vertical lines by using text column options or table borders. Moreover, you can use shortcuts on your keyboard to highlight a small text portion or for aesthetic purposes.
The vertical line is mainly useful to split text or create a column for easy reading. These pillar lines make the contents more readable and engaging for newsletter writing or reports in Docs.
Here are all the methods to add vertical lines in Google Docs:
1. Use Keyboard Shortcut
If you want to add a design for a sentence on both sides of your document or simply highlight the portion, you can quickly use keyboard shortcuts to add a small vertical line.
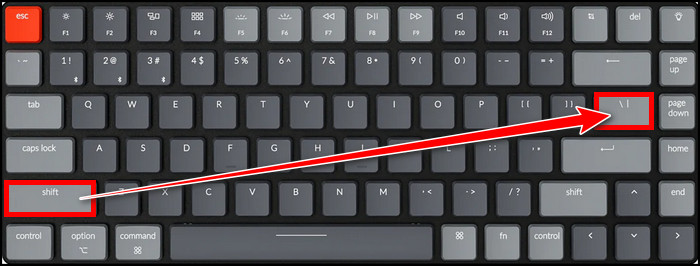
To include a small vertical line with the shortcut key, place the mouse cursor on the position to add a vertical line > press & hold the Shift key on the keyboard and hit the backslash key (\). The backslash key is usually found below the Backspace(←) and right side of the third bracket key (]).
This short vertical line is useful for aesthetic purposes or small sections. But can you insert a vertical line in Google Docs for a full page? Yes, you can, and keep reading to know that process.
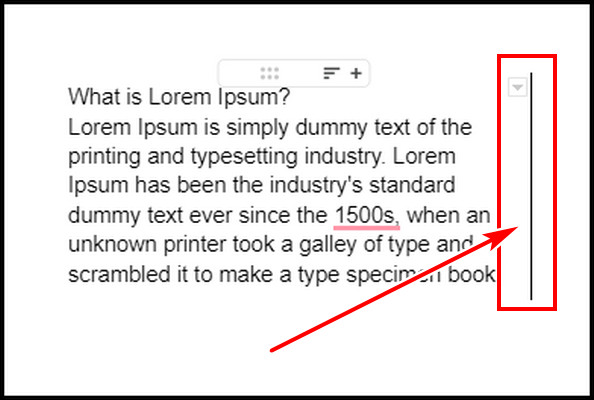
2. Use the Drawing Tool
Drawing tools let you input various shapes and text boxes with which you can curve text in Google Docs. The tool also allows you to include vertical lines in your document with different sizes & colors.
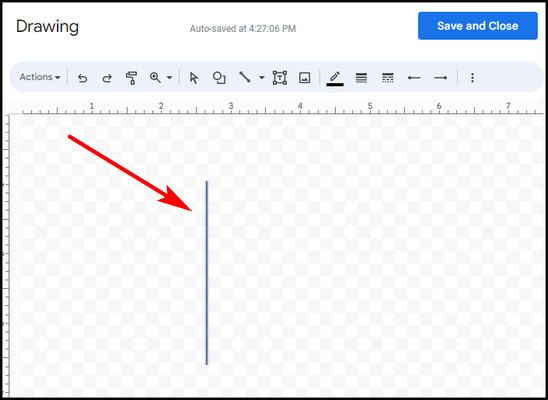
To make a vertical line on Google Docs with drawing tools:
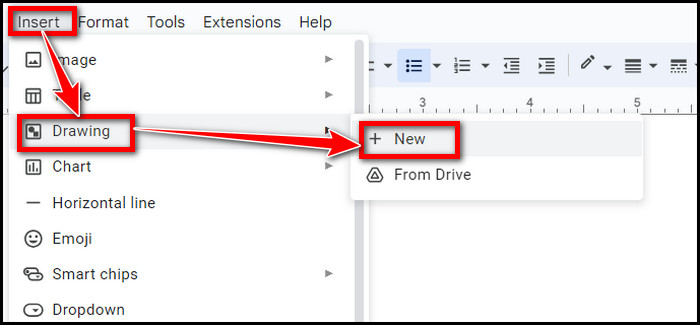
- Click on the Insert tab in Google Docs.
- Hover the mouse on Drawing and choose + New.
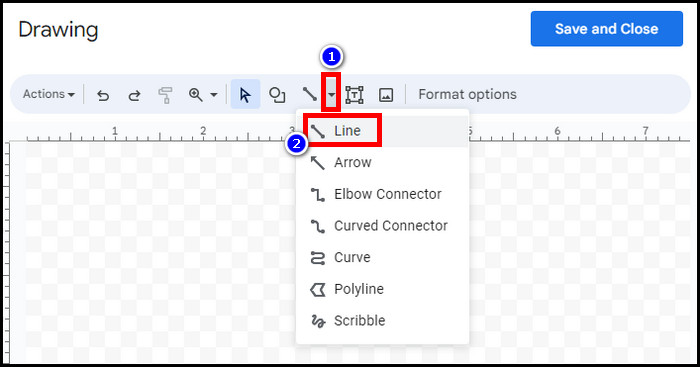
- Expand the Line drop-down and select Line.
- Click on the canvas, hold the Shift key, and drag your mouse downward.
- Release the mouse button.
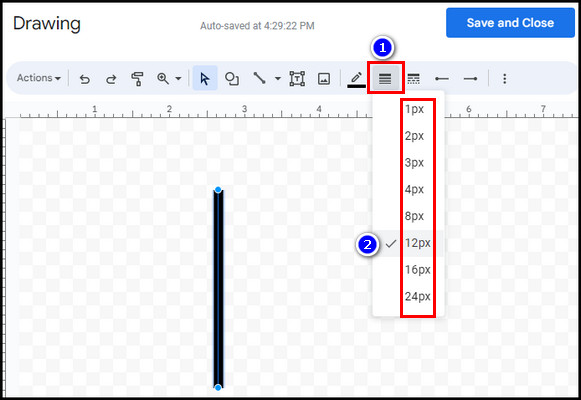
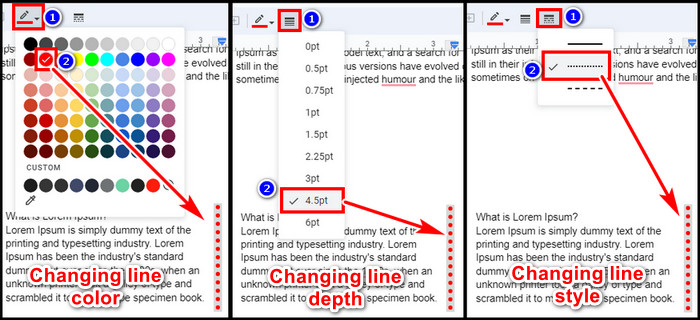
You can customize the vertical line’s thickness, style, and color from here. To adjust line width, click the Line weight option from the top (right side of the Line color) and select a size.
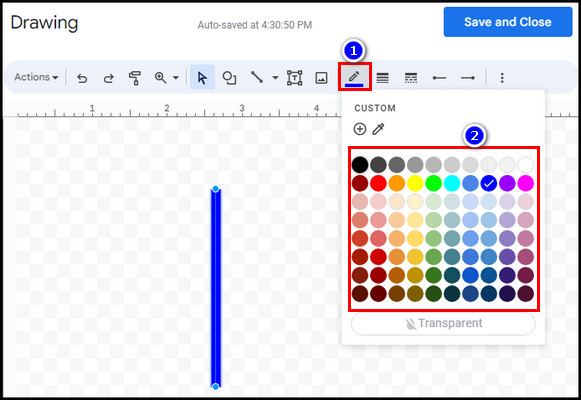
While the vertical line is selected, you can click the Line color option and change the line’s color from the default options. If you click on the CUSTOM option, you can pick various custom colors from that.
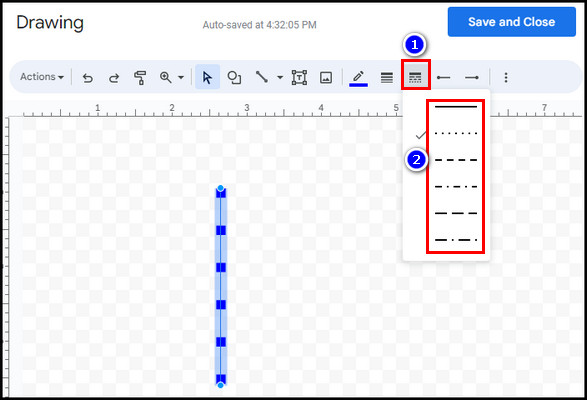
And with the Line dash option, you can use dotted or dashed vertical lines in the content. Once you are pleased with the outcome, hit Save and Close.
3. Divide with Text Columns
When you are writing content on Google Docs that requires multiple columns, you can add vertical lines between the columns. It will separate the columns clearly and will look tidy.
Here’s the step to put vertical lines on Google Docs with text columns:
- Highlight the texts in Docs to organize.
- Click on the Format tab, Columns, and then More options.
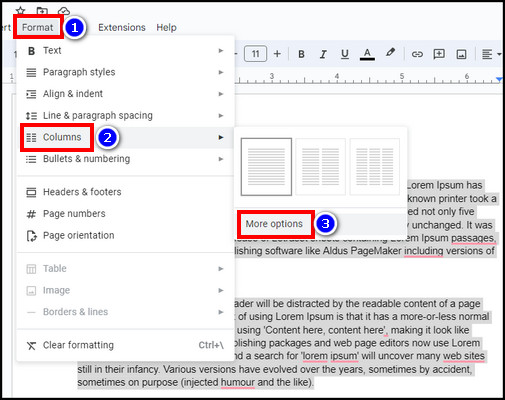
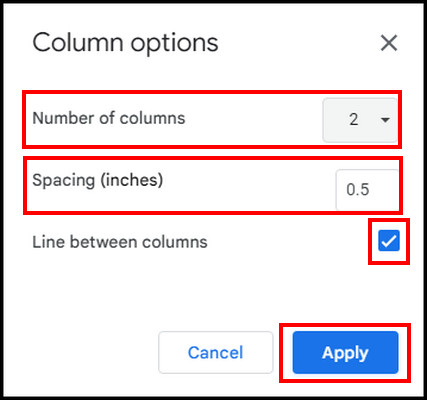
- Pick a digit in the Number of columns box and tick the Line between columns box.
- Adjust spacing if required and hit Apply.
However, one drawback of using this method is you can’t control the vertical line’s color or style. But you can overcome this by following the next procedure, which will act like column text, and you can also customize the line.
4. Use Table Border
Another effective way to display vertical lines on Google Docs is by using Table. The more text you type, the vertical line stretches below it. This extension is helpful if you haven’t finished your content yet.
Follow the steps to add vertical lines using a table in Google Docs:
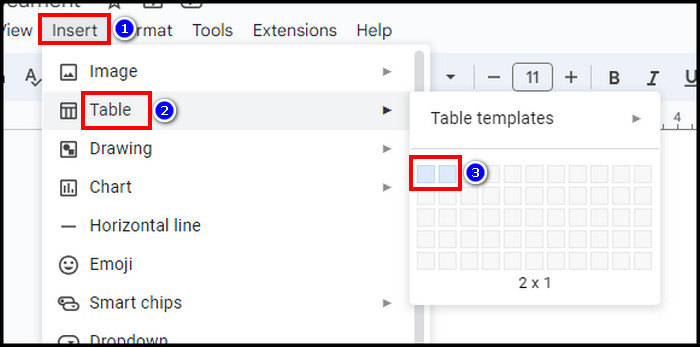
- Click on the Docs and go to the Insert tab.
- Hover the cursor on Table and select 2 rows.
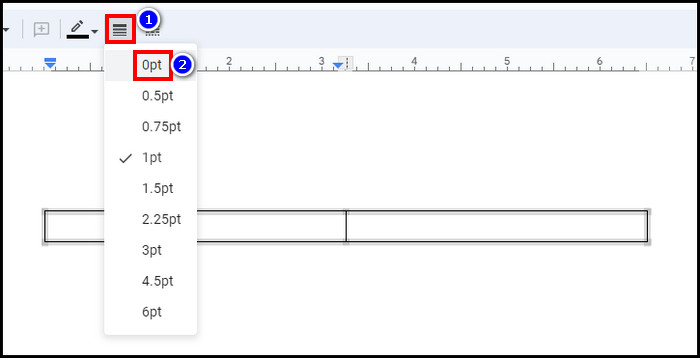
- Press the Shift key and select all the table borders except the one you want to show.
- Click on the Border Width icon from the top and pick 0 pt.
It will work like text columns, and as you continue typing, the vertical line goes downwards to cover the text.
In addition, you can also change the color, size, or style of the vertical line from the top menu.
How to Add Horizontal Lines in Google Docs
To insert horizontal lines in Google Docs, you can use Docs’s built-in feature to place a horizontal line in your content. In addition, you can use paragraph style to insert horizontal borders within the text. Moreover, you can use keyboard shortcuts to enter horizontal lines for quick purposes.
Lines in a document serve a smooth and coherent flow. Horizontal lines can separate sections or enhance the overall design of the document. It helps to improve readability for the readers.
Here are the ways to insert horizontal lines in Google Docs:
1. Use Insert Menu
With this method, you can insert the basic horizontal lines in Google Docs. It is quick & requires a few clicks. However, you can’t customize the line, such as changing color or increasing depth with this process.
Its best usage scenario is under the title or to break a paragraph when you just need a simple line.
To use the default Google Docs horizontal line:
- Click on the place on Docs where you want to add the horizontal line.
- Expand the Insert tab.
- Select the Horizontal line.
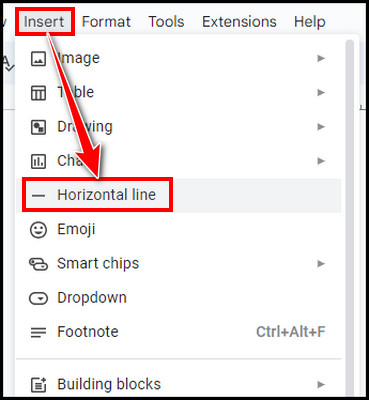
It will put a full-length, straight horizontal line in your document. But as mentioned earlier, this method lacks customization. So, keep reading to learn the other techniques with customization options.

2. Use Paragraph Styles
The paragraph style method works like a charm if you want to add a horizontal line with various customization options. This procedure lets you modify the line color, position, and style.
Follow the below to insert horizontal lines in Google Docs with paragraph style:
- Click on the Docs where you want to add a line.
- Select the Format tab.
- Hover the cursor on Paragraph styles and choose Borders and shading.
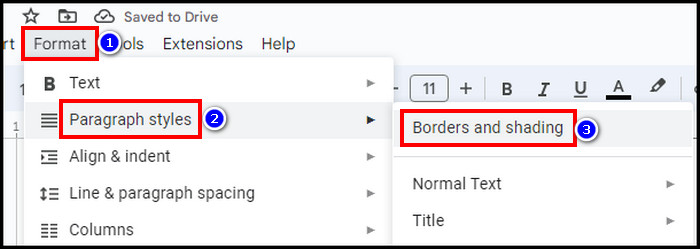
- Choose the bottom border from Position.
- Customize other parameters and set Paragraph padding to 0 pt.
- Hit Apply.
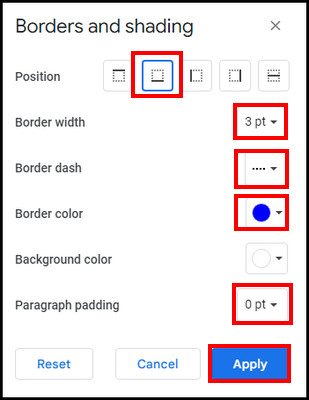
It will place a horizontal underline under your text. But you can control the horizontal line thickness with this process.

If you want to make the horizontal line thicker in Google Docs, increase the border width from the Border and shading. This way, you can insert a thick horizontal line in Google Docs.
3. Use Keyboard Shortcuts
You can use keyboard shortcuts to add horizontal lines. Unlike the above two, you can control the horizontal line length with this process and shorten the horizontal line.
However, it will require some labor and can be time-consuming if you need to repeat the process. I recommend using this process when you want a horizontal line with text in a limited area.
To use the shortcut key, press the Shift key on the keyboard and then hit the hyphen key (right side of the 0 (zero) key). Keep pressing to make enough horizontal lines for your texts. You must ensure to align the line according to the page requirements.

Besides these three methods, you can also use the drawing tool in Docs and make horizontal lines.
The process is similar to making a vertical line. You have to select the line from the toolbar, click on the canvas, hold the Shift key, and drag the mouse to the left or right. With this method, you can also edit horizontal lines later in Google Docs.
FAQs
What is the shortcut to insert a horizontal line in Google Docs?
The shortcut key to add the default horizontal line in Google Docs with your keyboard is Alt + I and then R. This is applicable for Windows. For Mac, the shortcut is Command + Option + I and then R.
Can you edit vertical or horizontal lines in Google Docs?
Yes, some methods allow you to customize a line’s size, shape, and style in Google Docs. With the drawing tool, you can do all the editing for a line. You can also remove a line by selecting it and pressing the Backspace or Delete key on the keyboard.
Can you change the vertical or horizontal line color in Google Docs?
If you insert horizontal or vertical lines in Google Docs with drawing tools or Paragraph styles, you can modify the line color from the options. With those methods, you can also edit the line style, like dotted or dashed, or line depth, like thick or thin.
Final Thought
Adding lines on Google Docs can be beneficial to visual appeal and structure. Though you can add a horizontal line directly from the Docs Insert option, adding a vertical line requires drawing tools or other methods.
I described all the methods to insert lines in Google Docs in this article. I’m sure your future content will surprise others by following this article.
Have a nice day!