The ability to share the screen content in Teams meetings is marvelous. Working with remote teams has become easier and more efficient.
Windows and Mac users can share their screen content during Teams meetings. However, Mac users often face errors while sharing display content.

In this article, I will show you the quickest and easiest method to enable screen sharing on our Mac devices.
Let’s start!
How to Enable Screen Sharing in Mac for Teams Meetings
Users must turn on the Screen Recording permission to enable screen sharing on Mac. You can access the option by navigating to Apple Menu > System Preferences > Security & Privacy. Switch to the Privacy tab and ensure Microsoft Teams is selected under Screen Recording.
Windows users can quickly request control and give control in Microsoft Teams. However, the security feature of macOS is slightly different from Windows.
In order to record or share the screen on macOS, you must turn on the Screen Recording permission from the Privacy settings. Go through the following instructions to enable screen sharing on macOS Catalina 10.15, Big Sur 11, or Monterey 12.
Here are the steps to turn on screen sharing in Mac for Teams meetings:
- Click the Apple menu and choose System Preferences in the top left corner.
- Select Security & Privacy from the System Preferences window.

- Switch to the Privacy tab under the Security & Privacy window.
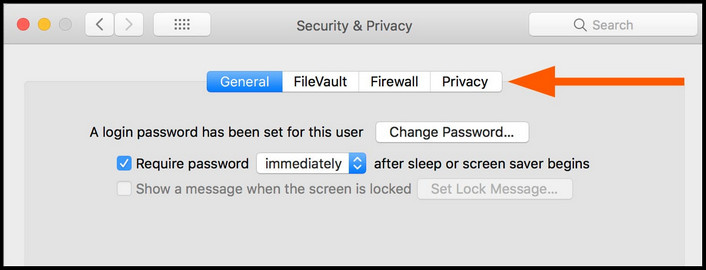
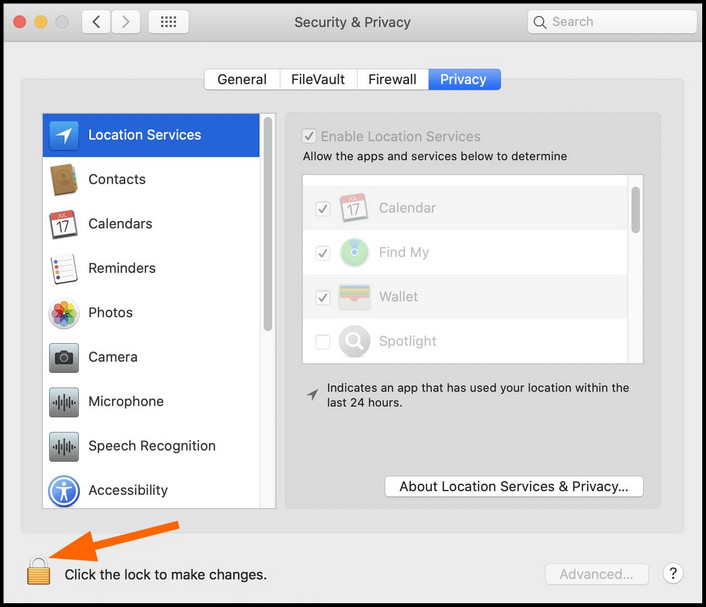
- Locate and click the padlock icon from the bottom left corner. Enter your username and password to make the changes.
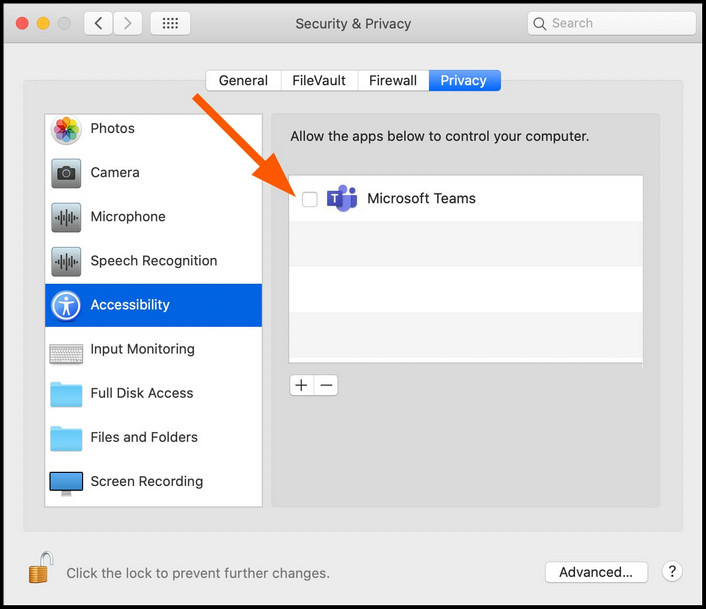
- Select the Accessibility section from the left column and check the Microsoft Teams checkbox. If you don’t find Teams on the list, click the Plus (+) icon and add it.
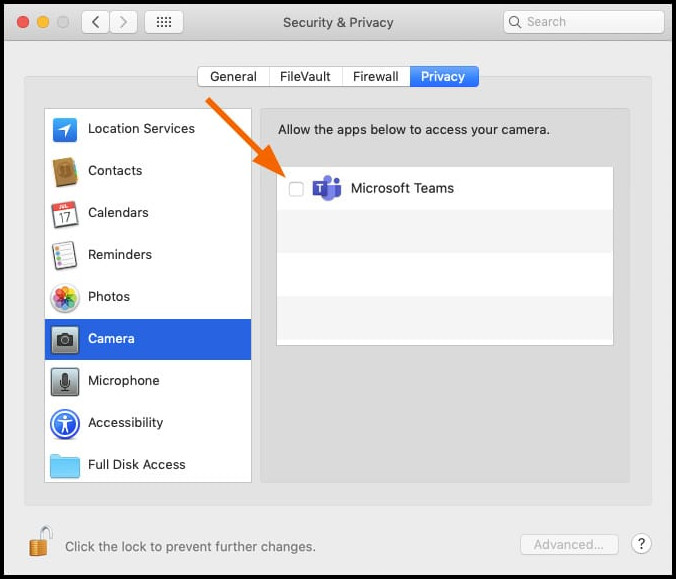
- Click the Camera section from the left column and tick the Microsoft Teams checkbox.
- Select the Microphone section and tick the Microsoft Teams checkbox.

- Click Screen Recording and check the Microsoft Teams checkbox.
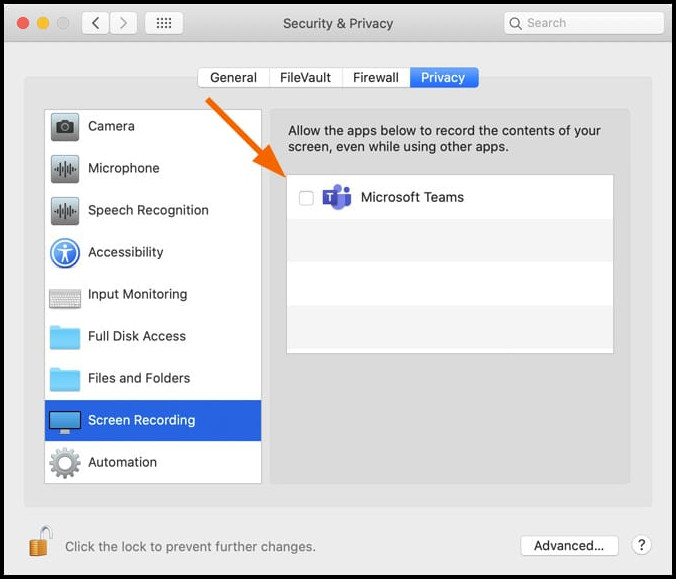
- Close the Security & Privacy screen and restart Teams.
You can effortlessly check the details if you need clarification on your macOS and its version. Simply click the Apple menu in the top left corner and choose About This Mac.
The above instruction applies to your device if you use a Mac running on Catalina Version 10.15, Big Sur Version 11, Monterey 12, or higher.
While sharing a screen on Teams meeting, the user can add PC sound by turning on the Include computer sound option from the Share content menu.
Importance and Advantages of Screen Sharing on Microsoft Teams
The screen sharing feature is dramatically changing the remote working field. People can do all the important stuff in one place during a chat or meeting using this option. It keeps everyone focused, assists team brainstorming, and makes the meeting more meaningful.
If the Microsoft Teams share screen stops working, you can effortlessly resolve the issue. Now, let’s look at the following discussion to understand the advantage of screen sharing.
Check the following list of importance and advantages of screen sharing:
1. Increases Understanding
While working with a team, it’s essential to ensure the team is collaborating to improve understanding and productivity.
Screen sharing can improve daily communication, making the learning process more meaningful because of direct visuals. For instance, sharing the screen with a step-by-step demonstration is more engaging than just talking about it.
2. Improves Focus
When you need to work on a new project, screen sharing can assist in demonstrating the process of developing the project, which keeps everyone focused.
MS Teams also has the feature of managing focus status to increase the focus during work pressure. You can quickly set the focusing status in Teams using Viva Insights.
3. Boosts Productivity
Because of high-level control over your presentation and the ability to show visual outputs along with sounds make the meeting quicker, more efficient, and more productive.
4. Assists in Brainstorming
Brainstorming is the reason behind zillions of fresh ideas and innovative solutions. Without this, a company won’t shine and last longer.
Screen sharing can assist in brainstorming with your remote teams while working on the same document. For example, a brainstorming session won’t be beneficial without collaborating with the participants, and the ability to share screen helps to collaborate on an idea.
If you are facing issues in planning your primary tasks, use the Microsoft Planner to increase productivity.
5. Creates an Efficient Working Environment
When multiple people work on a project, they often need to override each other’s content. If they need to visit each other every time before making any edits to the document, it can waste a lot of time and decrease productivity.
Users can resolve this problem using the screen sharing option. For instance, updating the information can be done during a Teams meeting.
Frequently Asked Questions
Why am I not getting the screen share option in Teams?
Several reasons can restrict you from getting the screen share option in Microsoft Teams. For instance, a poor internet connection can lead to this annoying issue. Besides, network lag can also lead to the same problem.
Where is the share button on Teams?
The Share button is only visible during a meeting. After joining a meeting, the participant will see a Share button in the top left corner of the meeting screen. Simply click the Share Content button to start sharing your device screen.
Why can’t I request control on Teams?
The request control feature of Teams needs the support of a graphics processing unit (GPU) to function correctly. The Control drop-down menu won’t appear if the device doesn’t have the GPU hardware acceleration option enabled.
Wrap Up
Don’t panic if the screen-sharing options don’t work on your Mac devices. Enabling the screen-sharing feature is more effortless than arranging a meeting in Teams.
You can quickly turn on the screen content sharing option by changing the permission of Screen Recording, Camera, Microphone, and Accessibility in the Privacy setting.
I hope this article assists you in enabling screen content sharing in Teams on your Mac device. Drop a note in the comment below for further queries or suggestions.