Email is the foundation of modern communication systems for its efficiency and flexibility. However, the email system wouldn’t be complete without the ability to store contacts.
Fortunately, Outlook has the functionality to store contacts, and in addition, it can also categorize the contacts in different address books.
In this article, I will discuss how to make an address book in Outlook, along with other address book-related features.
Let’s start!
What is an Address Book in Outlook?
Outlook Address Book is a unique feature that assists in categorizing numerous contact details and email addresses in an organized folder. An address book consists of multiple contact details to efficiently manage a group of people without searching the entire contact list.
While composing a new email in Outlook, you can use your address book to instantly send the email to all people added to that address book.
The data of the Contacts folder and Address Book are associated with each other. For instance, the contacts in the Contacts folder are the main content of an Outlook Address Book.
You can also use the contact categories feature to manage your contacts more efficiently.
If you use Outlook under an organization, you will see the Global Address List (GAL) in the available address book list. Outlook Exchange account users can access the Global Address List (GAL), which contains other Exchange Server users’ names and email addresses.
Moreover, Outlook allows users to change the contact display name for further control over their contact management.
How to Create an Address Book in Outlook
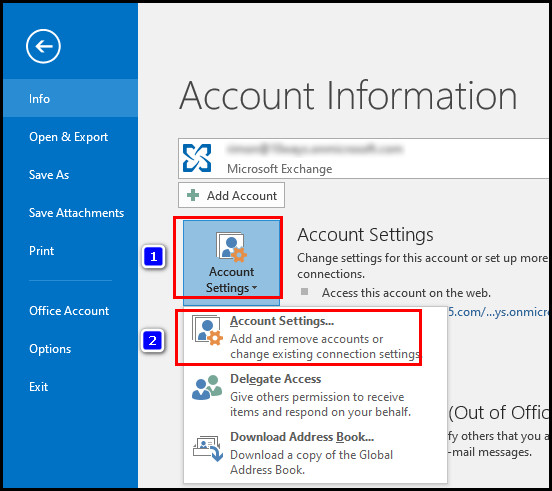
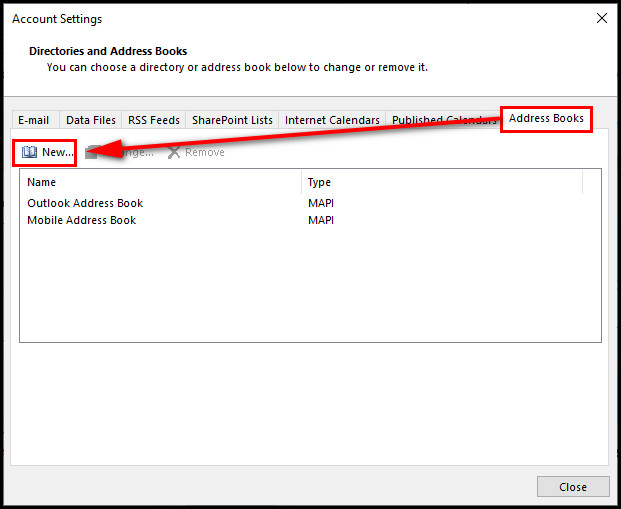
Using the default Outlook Account Settings, you can efficiently create an Outlook address book. Launch the Outlook app on your device and navigate to File > Account Settings >Account Settings. Then navigate to the Address Book tab and click New to make an address book.
There are two different ways to create a new address book. Consider the subsequent instructions to make a new address book in Outlook 2021, 2019, 2016, 2013, 2010, and Outlook for Microsoft 365.
Here are the methods to make an Outlook address book:
1. Use Account Settings
Using the Account Settings option, you can quickly make an Outlook address book. Go through the following procedure to create your address book.
Here are the steps to make an address book using the Account Settings option:
- Launch the Outlook application on your computer.
- Navigate to File > Account Settings > Account Settings.
- Switch to the Address Books tab and click New.
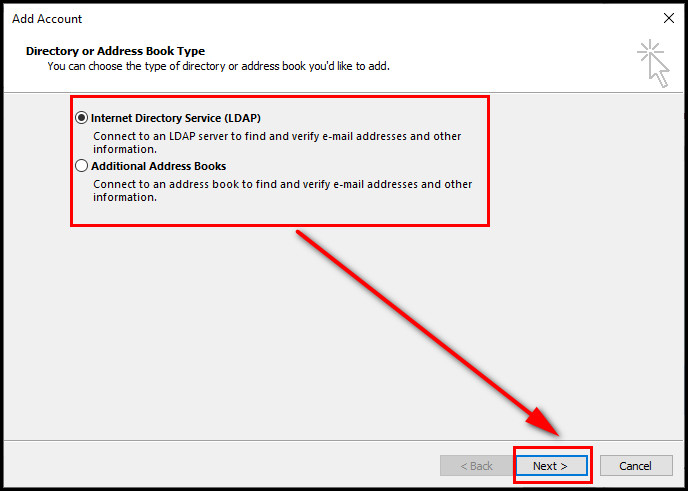
- Select Directory or Address Book type and click Next.
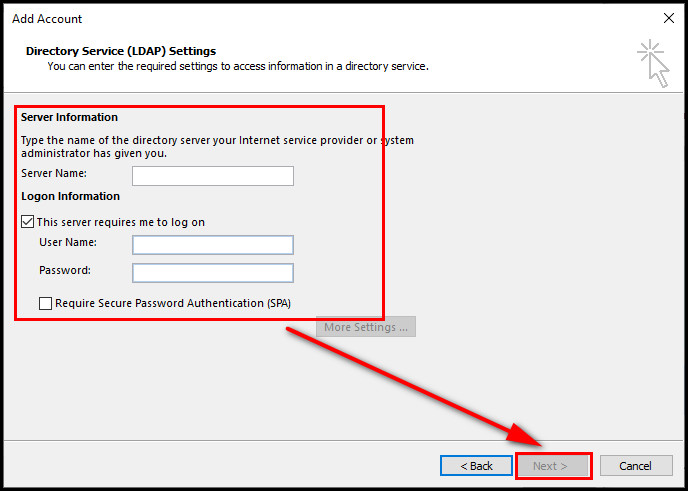
- Enter the Server Name, Username, and Password.
- Click Next to create a new address book.
Quick Note: If you choose the Additional Address Books option, you will get the option to create a Mobile Address Book and an Outlook Address Book. 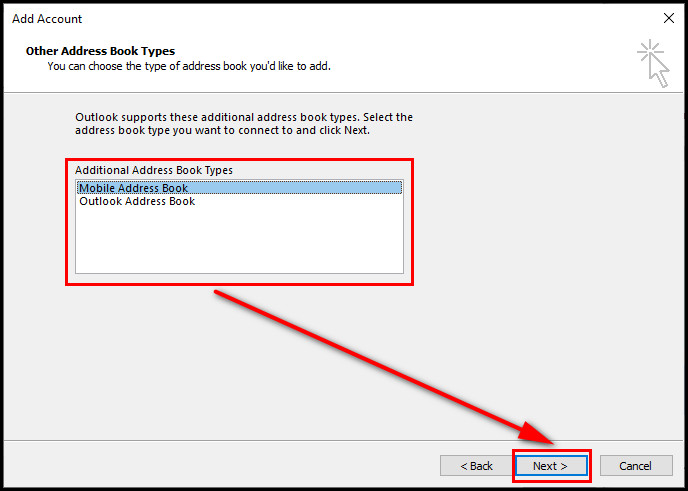
2. Use People Folder
Outlook’s People folder is dedicated to managing contacts efficiently. Using this option, you can easily create an address book. For more information, consider the following instructions.
Check the subsequent process to make an address book using the People folder:
- Open Outlook and switch to the People folder.

- Right-click on the Contacts folder under the My Contacts menu.
- Choose New Folder from the context menu.
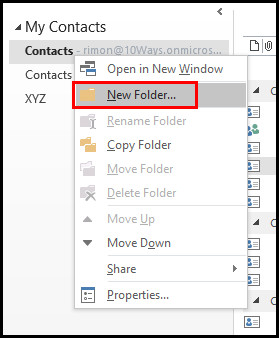
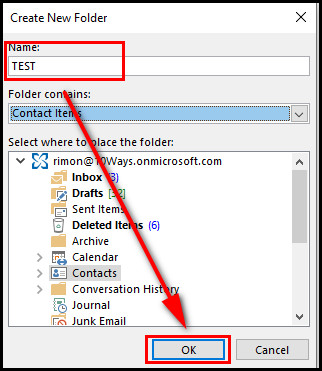
- Enter a name for the new Address Book and click OK.
- Right-click on the new folder and choose Properties from the menu.
- Switch to the Outlook Address Book tab.
- Check the Show this folder as an e-mail Address Book checkbox.
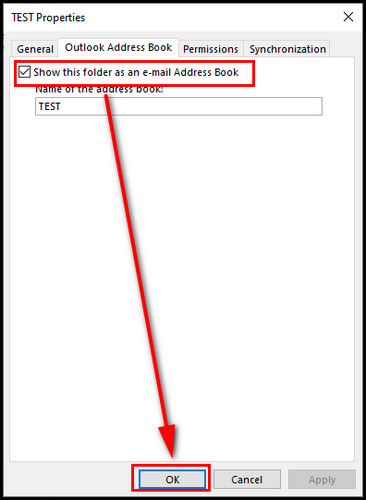
By creating a new address book, you can add your contacts to the address book. Move to the next section to add important contacts to the address book.
Yahoo Mail users can add their Yahoo contacts to Outlook. Besides, If you use Gmail as a daily email service provider, you can transfer contacts between Outlook & Gmail.
How to Add Contacts to Address Book in Outlook
Outlook Address Book allows users to add multiple contacts to a single folder to manage the same types of contacts more efficiently. You can use the New Contact option to add contacts to the address book. Besides, you can also Move or Copy & Paste the contacts from another address book.
Consider the following procedures to add your existing contacts to a new Outlook address book.
Here’s how to add contacts to an Outlook address book:
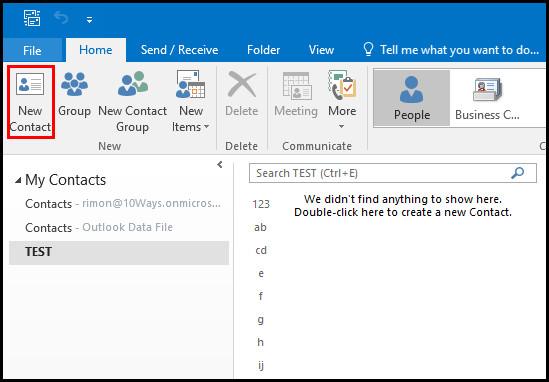
- Launch Outlook and switch to the People folder from the left pane.
- Select the address book and click on New Contact.
- Enter the contact details and click Save & Close.
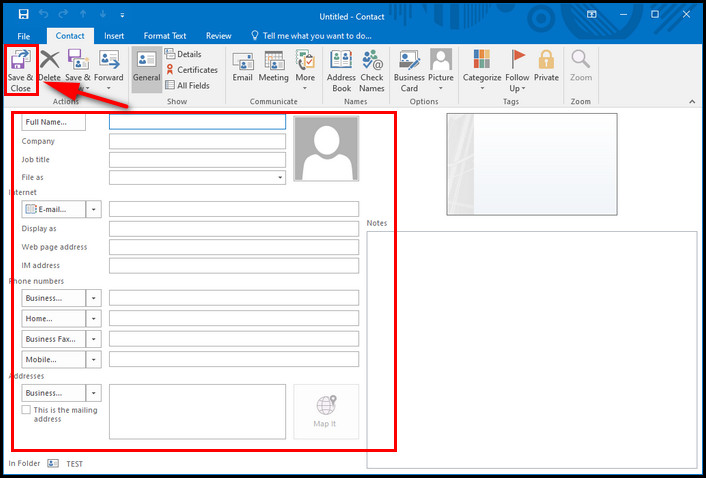
The above process will instantly add the contact to your selected address book. Furthermore, you can move your old contacts to the new address book.
To do so, open your previous contact list or address book from where you want to move the contact to the new address book. Right-click on the Contact, select Move from the context menu and choose your new address book.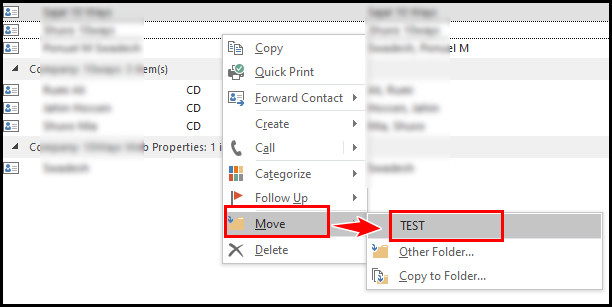
You can effortlessly change the default address book using the Outlook Address Book Options.
If you just want to copy and paste your existing contact to the new address book, simply click on the contact and press Ctrl + C buttons. Navigate to your address book and press Ctrl + V buttons to paste the copied contact.
Note: You can select multiple contacts at once by holding down the Ctrl key and clicking on the contacts.
How to View Address Books in Microsoft Outlook
Outlook Exchange Server account users can access their address book, including the Global Address List (GAL). This is the list of every Outlook Exchange Server user. You can also view other address books using the Address Book option in the Find group.
Go through the following process to check your address books in MS Outlook 365, Outlook 2021, 2019, 2016, 2013, and 2010 versions.
Check the procedure below to view the Outlook address book:
- Launch Outlook and switch to the Home tab.
- Select Address Book in the Find group.

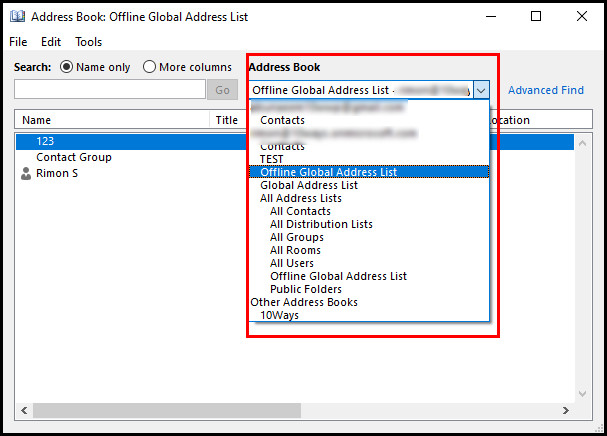
- Click on the Address Book drop-down menu.
- Select an Address Book to view its contents.
If you need to share some contact with someone, you can send your contact list in minutes. Furthermore, Outlook has a feature to export contacts to vCard files to save important contacts offline.
Frequently Asked Questions
How to remove an address book in Outlook?
Using the Outlook Account Settings, you can quickly delete an address book. Launch Outlook and navigate to File > Account Settings > Account Settings. Switch to the Address Book tab, select the address book you want to delete, and click Remove.
Can I print my Outlook address book?
Switch to the People folder from the bottom left corner to print your Outlook address book. Select the address book you want to print. Navigate to File > Print and click Print to start printing your address book.
How to import the address book in Outlook?
To import an address book in Outlook, switch to the People folder, and navigate to File > Open & Export > Import/Export. Select Import from another program or file and click Next. Click on Comma Separated Values, and click Next.
Wrap Up
Creating an address book is not enough, as you must add some contacts to it to utilize its benefits.
Users can easily add any existing or new contacts to an address book. It’s also possible to create multiple address books if needed.
Did you find this article engaging and helpful? Let me know in the comment section below.