So you built a new computer or set up your laptop with Windows 11. Seems like Microsoft did a pretty good UI Overhaul and everything looks perfect.
But you start to notice that your system takes a while to respond properly after booting up. You check the ‘Task manager’ and the system disk seems to be at 100% load for a couple of minutes.
This situation here is caused by a Windows feature called ‘Superfetch’. Don’t get me wrong, it is actually a useful feature but maybe in a different scenario.
As a Windows power user, I’m going to explain what Superfetch is, how it might help or hamper your system performance and how to disable this service step by step.
Keep Reading to find out how you can easily disable superfetch in windows.
What is Superfetch?
Superfetch is the short form of Service Host Superfetch. The aim of this Windows service is to speed up your app boot time, not the Operating System itself. It was introduced with Windows Vista and comes as a standard feature with all Windows versions after that.
What it does is it monitors the operating system and learns more about users’ app usage habitat. It marks the most used apps and pre-loads it when the system starts.
The goal is to make the app loading time significantly smaller.
But the trade-off is that the Operating system load time increases and when it preloads the apps in the memory, the system can get extremely sluggish.
Sometimes it leads to 100% disk usage and it takes a significant portion of processing power & memory.
If you have a High-End system, the possibility is you won’t even notice the Superfetch service and this might even make your computer faster.
But for most people, this might make the system sluggish especially if you are using a spinning hard drive as a boot drive.
Check out the easiest way to Fix Windows Can’t Access Network Drive On Windows 11
How to Disable Superfetch in Windows 11
There is more than one way to disable Windows’ System Host Superfetch or Superfetch Service. Here I’m going to describe a few tried and tested methods step by step for you to follow.
Here are the methods to disable superfetch in Windows 11:
1. Disable Superfetch using the Windows Services App
This is the most effortless way to disable Superfetch.
- Go to Search> Type in ‘Services’ > Hit Enter.
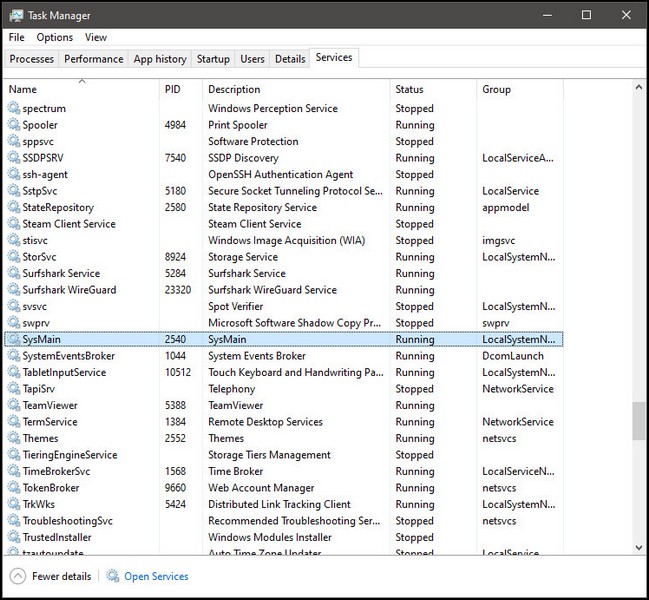
- Go to ‘Services (Local)’
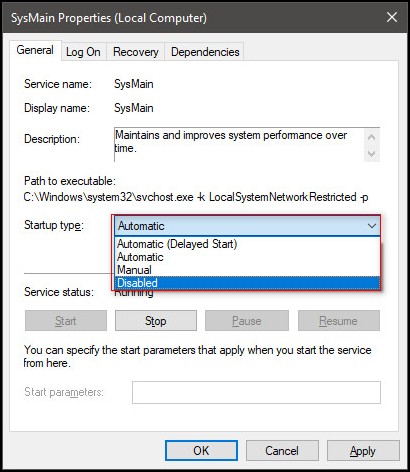
- Find ‘SysMain’. (This is the Superfetch Service.) and Double click.
- Select Startup type “Disabled”.
- Click “Apply”.
- Close all the Windows and Restart.
2. Use the Command Prompt
Another way to disable ‘Superfetch’ or ‘SysMain’ is to use a particular command on Command prompt. I recommend this method personally.
- Right Click on the Start > Select “Command Prompt (Admin)”
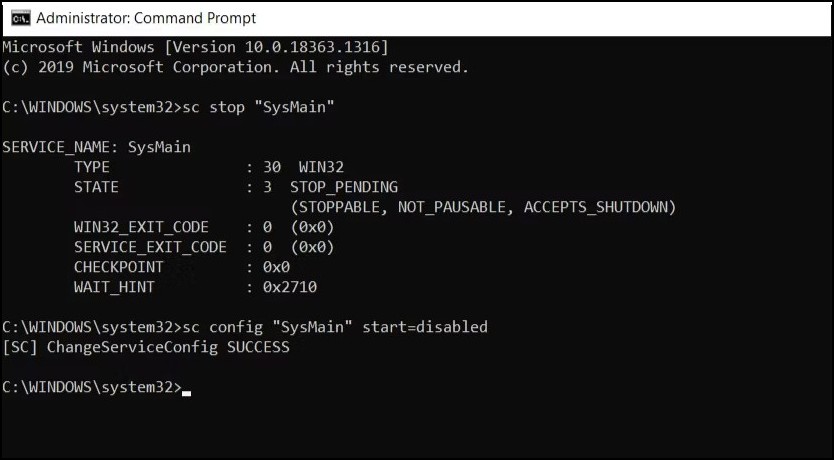
- Type in this Command and hit Enter:
sc stop “SysMain” - This will let you know about the current state of ‘Superfetch’ or ‘SysMain’.
- Now type in the next command and hit Enter:
sc config “SysMain” start=disabled
- If the next message says, “ [SC} ChangeServiceConfig SUCCESS “, it’s done.
- Exit the command prompt by using Command ‘Exit’ or close the CMD window.
- Restart the system.
3. Disable Superfetch by using Registry Editor
If any of the previous methods don’t work for some reason, you can always use ‘Registry Editor’ to fix this issue.
But please be aware that Registry Editor is a bit complicated and might create additional issues if not done exactly as the guide tells you to.
For safety reasons, we’ll create a ‘System Restore Point’ before beginning so that even if the process goes south, we can always restore our setting to the previous state.
Find out how to fix lock screen stucked on Windows 11.
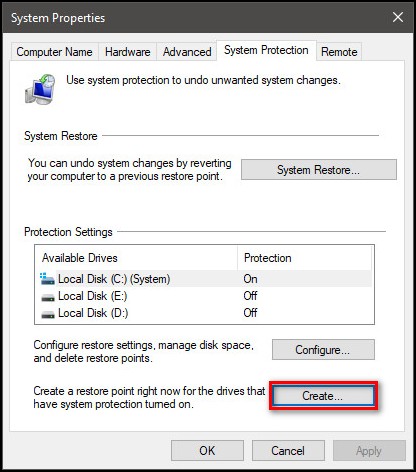
i. Creating a ‘System Restore Point’
- Go ‘Search’ and type in ‘Create a system restore point’
- Click on the app from the search menu.
- Select ‘Create’ on the bottom right of the Window.
- Input a name to make it easy to address later. Date and Time will be added automatically.
- Click Create. It will take a few moments.
- Once you get the confirmation, we can move on to the next step.
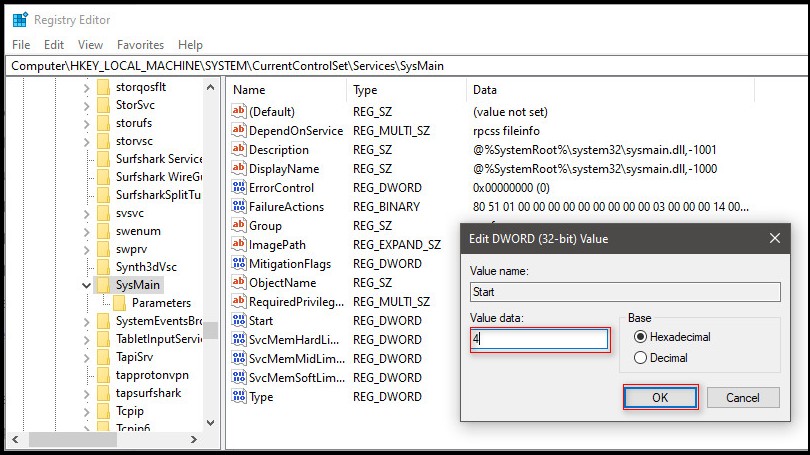
ii. Disable Superfetch using ‘Regedit.msc’
- Go to ‘Search’ . Type in ‘Regedit.msc’
- Select ‘Registry Editor’ from the search result.
- Go to ‘Computer’ > ‘HKEY_LOCAL_MACHINE’> ‘System’ > ‘CurrentControlSet’ > ‘Services’ > ‘SysMain’
- On the list from the Right side, find and double click on ‘Start’.
- Set the ‘Value data’ to ‘4’
- Click ‘Okay’ and close the Window.
- Restart the system.
This is how you can disable ‘Superfetch’ or ‘SysMain’ service in your system.
Also check our exclusive tutorial on does Windows 11 support Dolby vision.
FAQ
Q: Should I disable Superfetch?
A: If you are not having long windows load time or your system doesn’t feel slow after starting up, you don’t need to. Just let it be as it is. Because it might even be a little beneficial for your system if your system can handle it.
Q: Is disabling ‘Superfetch’ harmful in any way for Windows computers?
A: No, absolutely not. ‘Superfetch’ is pretty much a novelty feature at best, not an essential one. Disabling it should not create issues whatsoever.
Q: Does ‘Superfetch’ help with gaming performance?
A: Enabling Superfetch might lead to a better load time but the overall gaming performance should not be effected whatsoever. It’s more of a day-to-day experience-related thing.
Q: How do I re-enable ‘Superfetch’ ?
A: If you really don’t need the benefits of Superfetch disabled, I guess you might want to re-enable superfetch again. I’d recommend you use the “Registry editor” method. Open Registry Editor and go to Computer > HKEY_LOCAL_MACHINE> System > CurrentControlSet > Services > SysMain. Open Start, Set the Value data to 2 and Restart the Computer.
Conclusion
Even though the goal of superfetch is to make the system more responsive by decreasing app load time, this might be a reason for your sluggish user experience.
If you are using an old system with Windows 11 and the Computer is annoyingly less responsive, this might just do the trick.
Disabling ‘Superfetch’ can breathe new life into a slow system which will help you to use the latest and greatest operating system Microsoft has to offer. So if you are having such issues, try Disabling ‘SysMain’ or ‘System Host Superfetch’ at least once.