Worried about keeping your PC on standby mode after using Modern Standby Mode? Stop worrying and disable it. Whether you want to enable or disable the latest standby mode from Microsoft, this guide is all you need.
Windows 11 brought forward many upgrades, and one of those was in the power management section.
The standby mode introduced in Windows 8 would put your PC hardware to sleep, whereas the Modern Standby mode keeps specific components alive, including your internet connection. As a result, your PC wakes up from sleep instantly.
Scroll to the next section to learn how to enable/disable it.
Also read how to update drivers on Windows 11.
How To Enable Modern Standby Mode in Windows 11
You can enable modern standby mode in Windows 11 by tweaking registry settings, typing a command or by manually enabling the standby networking connectivity in Power Options. You can also enable network connectivity on standby in group policy settings to enable it.
If your PC came preinstalled with Windows 11, then it’s highly likely that modern standby mode is already enabled. However, if you upgraded from Windows 10, the feature can be disabled by default.
Either way, you can try the methods below to ensure that the feature is active and working as expected.
Follow these methods to enable modern standby mode in Windows 11:
1. Adjust Power Options
Changing registry settings or typing commands can be risky, as the wrong configuration can mess up your system, so it’s better to enable the new standby mode directly from the control panel.
Follow these steps to adjust power options:
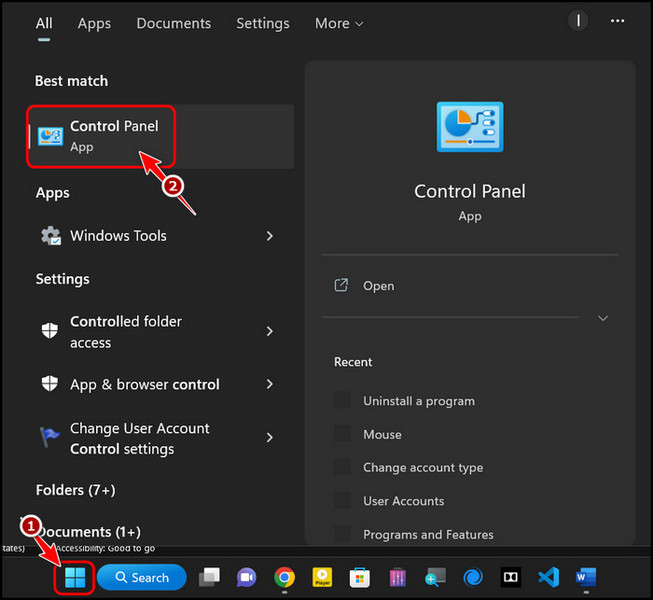
- Expand the Start menu by clicking on the Windows icon at the bottom left corner, search for the Control Panel and launch the first result.
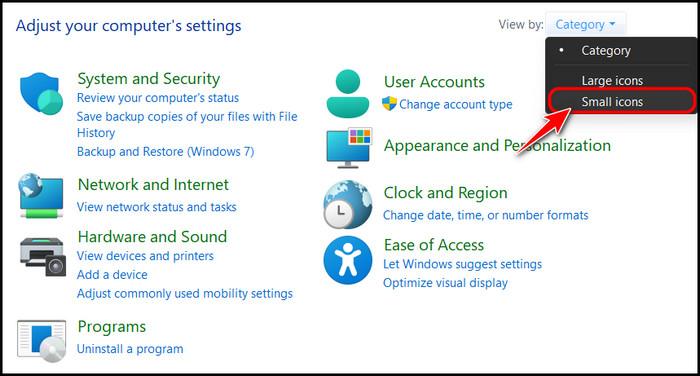
- Go to the View by drop-down menu at the top right corner and click on small icons from the options.
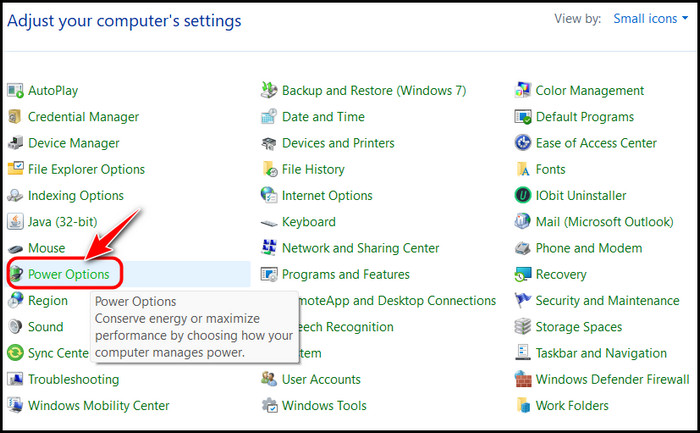
- Look for the Power Options button in the list and click on it.
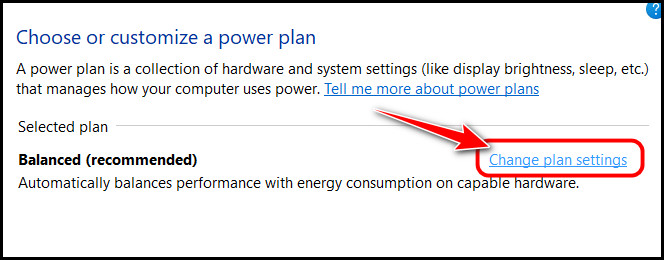
- Click on the Change Plan Settings option at the right corner of the currently selected plan.
- Select Change Advanced Power Options at the bottom left corner of the next page.

- Double-click on Networking Connectivity in the Standby option to expand it and set the value for all the options under it to Enable.
That’s all you need to configure to enable modern standby mode. However, in our testing, there were a few versions of Windows 11 that didn’t have the Networking Connectivity option in the control panel.
If you also can’t see this option, then proceed to the next method to enable it.
Follow our guide to fix blue screen on Windows 11.
2. Type CMD Command
The simplest and quickest way to enable modern standby mode on newer Windows editions is by launching a Command Prompt window and executing a one-line command.
Follow these steps to type the CMD command to enable modern standby mode:
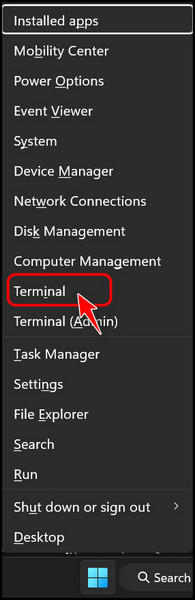
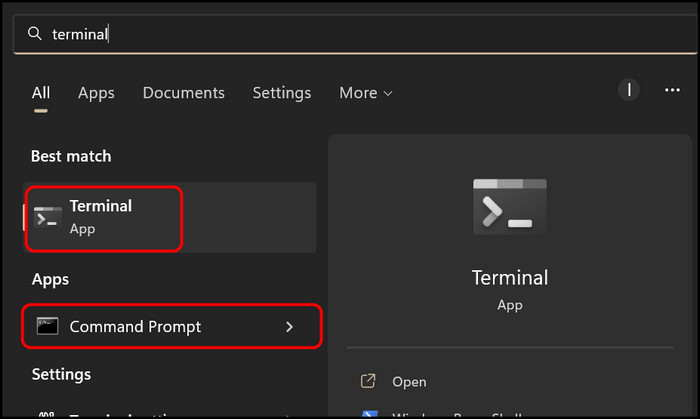
- Press the Windows and X keys at the same time to launch a context menu at the bottom left corner.
- Look for the Terminal, Microsoft PowerShell or Command Prompt option and select it.
- Copy and paste the following command into the CMD window and press the enter key to execute it.
reg delete “HKLM\System\CurrentControlSet\Control\Power” /v PlatformAoAcOverride /f.

Once it’s executed, the standby mode will be switched automatically in Windows. It’s best to reboot your PC, although not necessary.
This method is known to not work for some users, so if the command returns an error or you don’t see any differences, follow the next method to enable it.
Also, check out our separate post on how to fix PC won’t go to sleep in Windows 11.
3. Use a Registry Script
This method is very popular and is known to work across many systems without issues. You are basically going to create a custom script that modifies registry entries without you having to edit them manually.
It’s best to create a system restore point before modifying registry files, so follow these steps to do it:
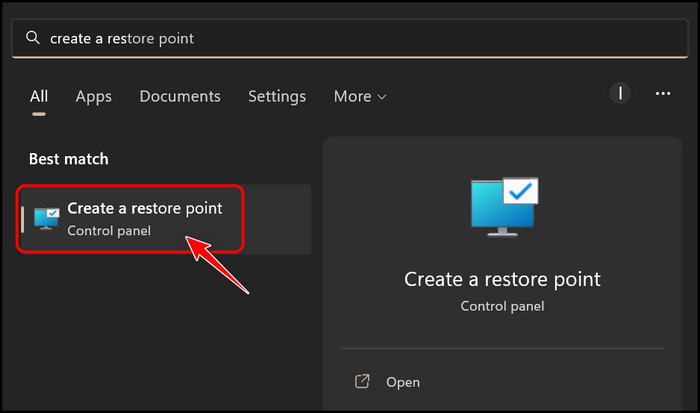
- Go to Start, search for create a restore point and click on the first result.
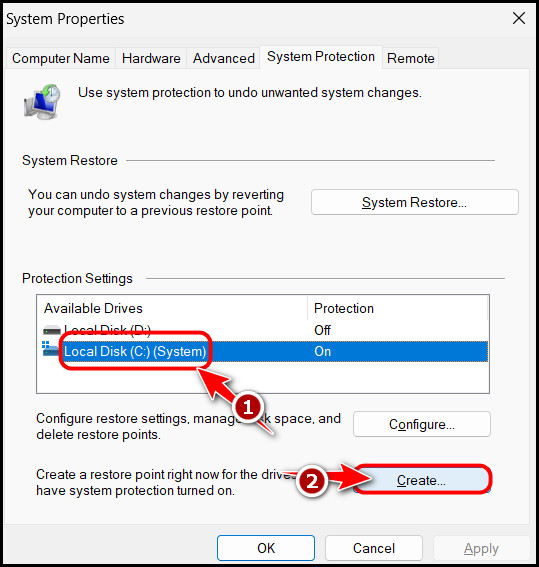
- Select the System partition (typically Local Disk C) in the box under Protection Settings. Click on the Create button after that.
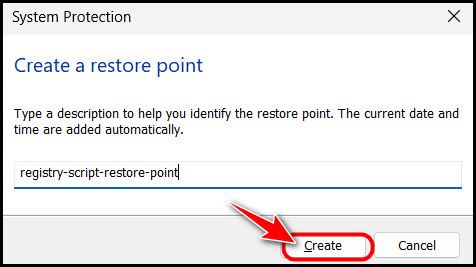
- Enter a name to identify the restore point and click on the Create button to finalize it.
Now that you have a restore point proceed with the steps below.
Follow these steps to use a registry script to enable modern standby mode:
- Expand the Start menu, search for Notepad and open the first result.

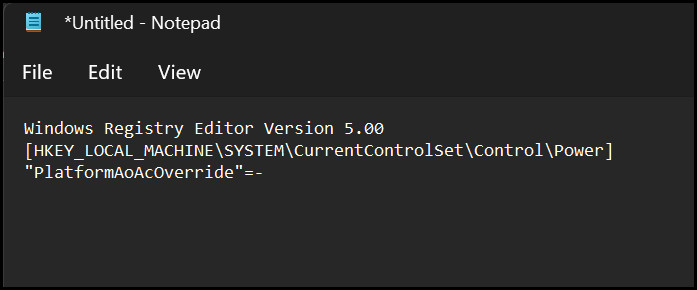
- Copy and paste the following text inside the Notepad window word for word, as shown in the image.
Windows Registry Editor Version 5.00
[HKEY_LOCAL_MACHINE\SYSTEM\CurrentControlSet\Control\Power]
“PlatformAoAcOverride”=-
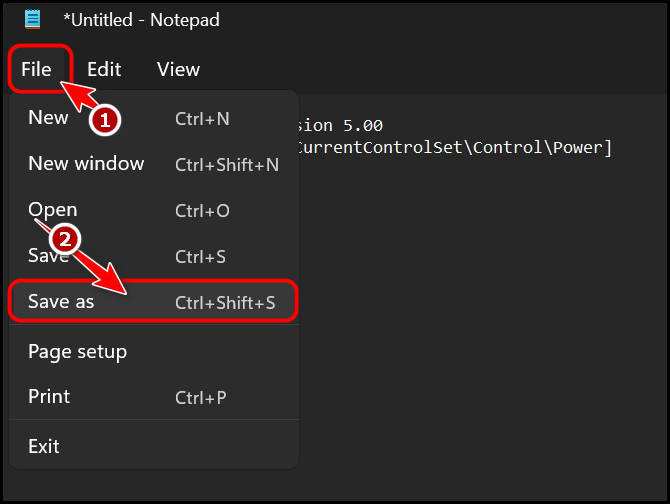
- Click on the File menu button at the top left corner and select Save As from the options.
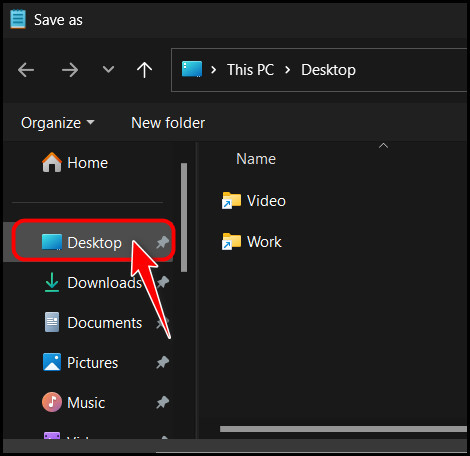
- Scroll upwards on the left panel and click on Desktop to set it as the save location.
- Expand the Save as type drop-down menu and choose All Files.
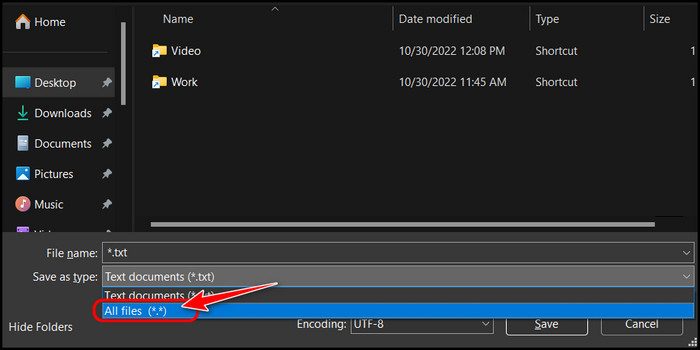
- Type Enable_Modern_Standby.reg in the File Name text box and click on the Save button.
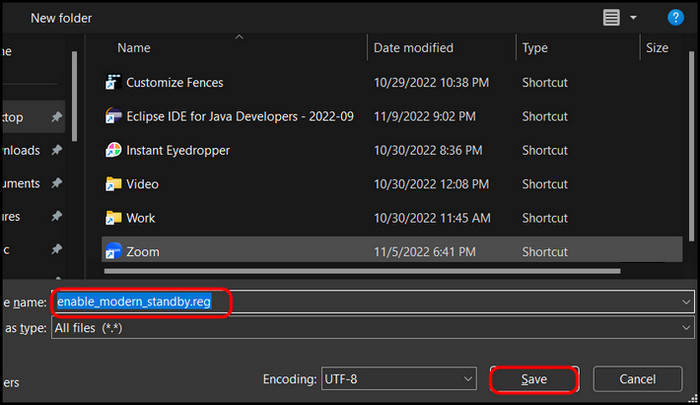
- Close the Notepad window and double-click on the file you just saved on your desktop.

- Click on Yes on the next window to enable Modern Standby mode.
Now that you know all the methods to enable modern standby mode, it’s time to take a look at how to disable it if things go wrong.
This step is important because not all hardware is fully compatible with modern standby mode, and this feature seems to do more harm than good on some PCs.
Check out the easiest way to install active directory users & computers on Windows 11.
How To Disable Modern Standby Mode in Windows 11?
You can disable modern standby mode in Windows 11 by running a custom script or by disabling the standby networking connectivity setting in the Power Options of the Control Panel. The simplest method, however, is to run a command that directly modifies your system settings.
Follow these methods to disable Modern Standby Mode in Windows 11:
1. Using Control Panel
The option that you enabled in the previous section needs to be disabled for this method to work. So, follow all the steps from the first method of the previous section until you reach the Change Advanced Power Options setting in Control Panel. 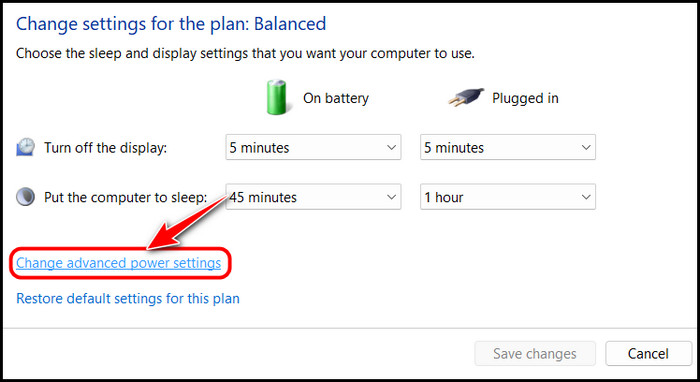
Locate the Networking Connectivity on the Standby option again, but this time disable all the options under that category. This would disable the Modern Standby mode if it was enabled.
If you can’t see this option, follow the next method.
Also, check out the easiest way to Windows can’t access network drive on Windows 11.
2. Using the CMD Command
This one is also similar to the previous section, and the steps are pretty similar.
Follow these steps to use the CMD command to disable modern standby mode in Windows 11:
- Launch CMD, Windows Terminal or Microsoft PowerShell by searching for it in the Start menu.
- Copy and paste the following command into the window and press the Enter key to execute it.
reg add HKLM\System\CurrentControlSet\Control\Power /v PlatformAoAcOverride /t REG_DWORD /d 0

- Reboot your PC after the command executes to ensure the changes are successfully applied.
That’s all! Now you know how to test out the modern standby mode in your PC and also how to disable it if things get messy. While it’s up to you to keep it enabled or disabled, I recommend disabling it for better PC health.
This is because keeping certain hardware components alive all the time can put a strain on your PC, especially if the hardware isn’t capable enough.
Final Thoughts
To conclude, you can easily access the Modern Standby mode on your PC and tweak it to your preference, even if there is no direct menu to it. The first section of this guide is dedicated to those who want to enable it, whereas the second is for those who prefer keeping it off.
So, did you enable or disable the modern standby mode on your PC? Let me know in the comments.