Having more cores is always better, as it boosts your device’s performance a lot. But imagine you already have enough cores for your needs, but some are not active all the time. In this case, you have the option to make enable them and get a boost in performance.
Here I am going to explain some methods to enable all the cores in your Windows 10 device to boost your performance. Carefully follow my instructions, and you will be able to enable them without any problem.
Without further ado, let’s dive into it.
Check our epic post on how to turn on auto login in Windows 10.
Why Do You Need to Enable All CPU Cores?
You will need to activate all your CPU cores to run multiple processes easily and make your PC perform significantly better than any single-core processors with the same clock speed. It will enable your device to take less time to perform each task and increase efficiency.
When you boot up your PC, multiple processes start running in the background. But as your PC resources are limited, these processes are done in the order of priority. If you enable all cores, these processes will get more resources to run, making your PC perform much better.
For some heavy applications, all cores divide parts of the heavy task among themselves, and thus the workload on a single processor is lessened, resulting in longer life of CPU cores.
Again, multitasking is more efficient if you have more CPU cores. The simultaneous switching between apps becomes more fluid. But suppose you already have enough cores. But some of them are not working and are remaining dormant. If this is the case for you, you are not using your PC’s full potential. So, enabling all cores is necessary.
Quickly check our epic post on how to use password instead of a PIN to log into Windows 10.
How to Enable All CPU Cores in Windows 10
Windows 10 manages the number of cores needed according to the workload provided by the user. But you can manually enable all of them if you need. Enabling them is easy, and it does not require any technical knowledge. All you have to do is follow my instructions to the point.
Here’s what you have to do to activate all cores in your Windows 10:
1. Run the System Configuration Tool
The powerful built-in system configuration tool of Windows 10 can easily change the number of active cores. So, you can change the number of cores manually from here.
Follow the steps to run the System Configuration tool:
- Press the Windows key + R on from the keyboard. The program Run will start.

- Type msconfig in the box that says Open and then click on OK. This will open the System configuration window.

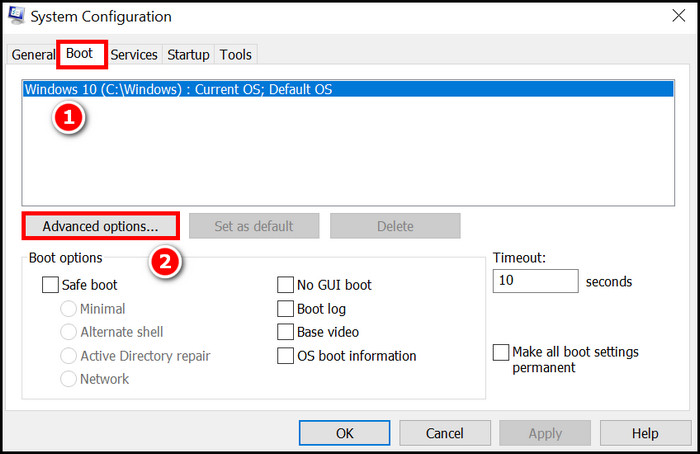
- Make sure the Boot tab is selected in the System Configuration window.
- Click on the Advanced option, and another small window will pop up.
- Check the box that says Number of Processors and then select the maximum number of available processors from the drop-down list.
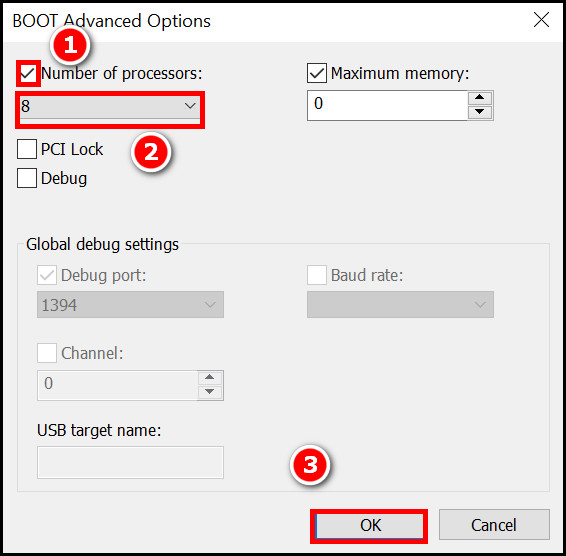
- Click on OK, and your PC might ask for a restart.
After the restart, your PC will use all cores for every task. But if somehow or other this does not work for you, try the next one from the BIOS.
Read more on how to Activate Windows 10 auto login.
2. Change BIOS Settings
Some users report that their number of cores was fixed from the BIOS, and tweaking a bit worked for them. You will find the option to change the number of cores in the advanced option. Some motherboard manufacturers even disable the multi-core support by default, preventing users from using the first method.
Follow the instructions below to use the BIOS setting:
- Click on the windows icon at your screen’s bottom left corner. Hover your mouse over the power icon, and you will see some options pop up.
- Select the Shutdown option, and your PC will shut down. Wait for it to shut down completely.

- Turn your PC on, and during the startup process, keep pressing the delete key until you see the BIOS opening. Remember that the BIOS key can change depending on your manufacturer and motherboard model. Generally, F2, F10 and F12 keys are used to start the BIOS.
- Look for the Advanced options and enable Hyperthreading.
- Click on the Active Processors, select All, and reboot after saving the new settings.
Though the BIOS layout or BIOS key can be different based on manufacturers and models, once you find the Advanced options, you will be able to do the change.
Follow our easy step-by-step guide to adjust page file in Windows 10.
Should I Enable All CPU Cores?
No, you shouldn’t enable all of the CPU cores in any normal situation. Microsoft incorporated the Core management system and logic within Windows 10. So, windows can use the cores as the user needs, and the rest remains inactive.
So, Windows already works for your best performance and maintains it throughout the task.
However, if your PC is lagging and showing slow behavior and poor performance, enabling all cores is worth the try. Your PC might consume more power and get heat issues by enabling all of them. But using the necessary cooling systems, it can be resolved.
So, it is recommended not to enable all CPU cores unless you really need to. Windows will manage them just fine automatically in any normal circumstances.
Also read how to update drivers on Windows 11.
FAQs
How do I enter Windows BIOS?
You can enter Windows BIOS by pressing the BIOS key repeatedly before the start logo of Windows appear. Now, the BIOS key is different based on the manufacturer and motherboard model. So, you will need to find that out from your manufacturer’s website or your PC’s seller.
Is it OK to enable all CPU cores?
Due to the management of Windows, it is really not necessary to go out of your way to enable all CPU cores. But it might help if your program is heavily dependent on computational power.
Conclusion
Activating all cores might prove useful to you if you are using an older PC model and encountering slow behaviors or need extra computing power for specific tasks. As I mentioned above, you can easily enable them using the BIOS settings or System Configuration Tool.
If you have any problem regarding any part of the article, feel free to write in the comment section below. I will try my best to resolve your problem.