The bees’ painful sting is now not only limited to real life. They have infected the vast realm of Destiny 2 as well.
As guardians, in the middle of epic battles or quests, the last thing you want is the Bee error. Because it will take you out of the game, and you’ll lose all your progress.
But you don’t have to worry anymore, as in this article, I’ve provided all the steps to fix the Bee error in Destiny 2 for good.
What Does Error Code Bee Mean in Destiny 2?
Regarding the Bee error in Destiny 2, Bungie said that the primary cause of this error is the disruption of communication from your local network to Bungie’s servers. The error code Bee occurs when your modem fails to establish a stable connection to the game servers.
The Bee error has nothing to do with bees; instead, it’s a network-related problem in Destiny 2. This error comes from nowhere and kicks you out of the game, taking you back to the main screen of the Orbit menu.
Not just the Bee error, the Fly and Lion error codes also occur due to connection issues and packet loss.
The good news is the error Bee can be automatically resolved, assuming it originated from Bungie’s end.
However, if your network is causing the Bee error code, you need to troubleshoot it, which I’ve explained in the following section.
How to Fix Error Code Bee in Destiny 2
To fix the Bee error in Destiny 2, check the game servers and make sure they are up and running. If Bungie’s servers are not the issue, try troubleshooting your internet connection. Also, close the apps using too much network and make sure your network drivers are updated.
Below I’ve provided the methods to fix the error code Bee in Destiny 2:
1. Check Destiny 2 Server Status
Visit the Destiny Server and Update Status page and make sure Bungie’s servers are running. Otherwise, you’ll need to wait before you can play the game again in case the servers are down.
2. Restart Your Console
If a temporary bug or glitch is causing the Bee error, restarting the console will fix the error.
Here are the steps to restart your console:
On Xbox One
- Press and hold the Power button until the console shuts down completely.
- Disconnect all the cables from the Xbox.
- Press and hold the Power button again. It’ll discharge the remaining power from the console and delete the cache files.
- Reconnect all the cables to the Xbox and turn it on.
On PS4 & PS5
- Press and hold the Power button for about 7 seconds to force close the console.
- Disconnect all the cables from your PlayStation.
- Hold the Power button again to get rid of any remaining charge left inside the console.
- Reconnect the cables to the PlayStation and turn it back on.
Now launch Destiny 2, and see if the problem is resolved.
3. Troubleshoot the Internet Connection
In case your PC’s network drive is causing the Bee error, run the internet connection troubleshooter. It’ll find the issue and fix it immediately. Otherwise, you’ll get constant game disconnections.
To run the internet connection troubleshooter:
- Press Windows + I on the keyboard to open Settings.
- Select Update & Security.

- Go to the Troubleshoot tab and choose Additional troubleshooters.
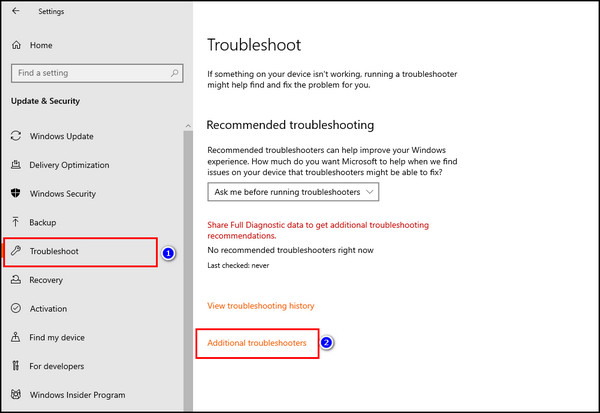
- Select Internet Connections and click on Run the troubleshooter button.
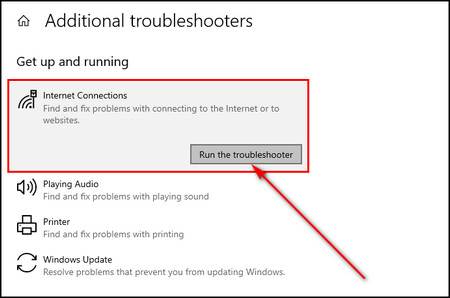
Now let the troubleshooter find out and resolve the issue.
4. Use a Static IP Address
Bungie has suggested users enable a Static IP address on their Desktop in their official guide to troubleshoot the Bungie error code Bee. Compared to dynamic IP addresses, it’ll enhance connectivity with outgoing servers.
But before you set a static IP address, you’ll need to gather details about your router network connection. For that:
- Press Windows + R on the keyboard to open the Run dialog box.
- Type CMD in the text field and click OK to open the Windows Command Prompt.
![windows-run-cmd]](https://10pcg.com/wp-content/uploads/windows-run-cmd.jpg)
- Write ipconfig /all and press Enter.
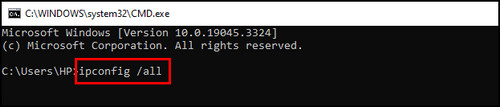
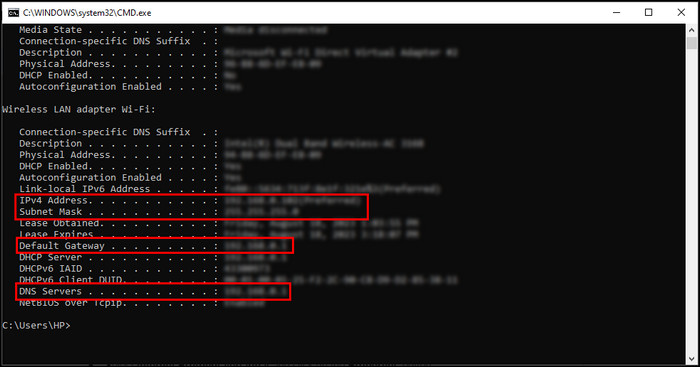
- Note down details such as your IPv4 Address, Default Gateway, Subnet Mask, and DNS Servers.
Now let’s assign a static IP address:
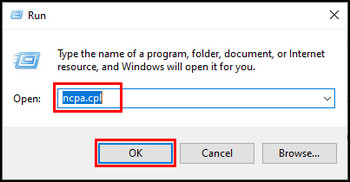
- Right-click on the Windows icon and choose Run.
- Type ncpa.cpl in the text box and click OK.
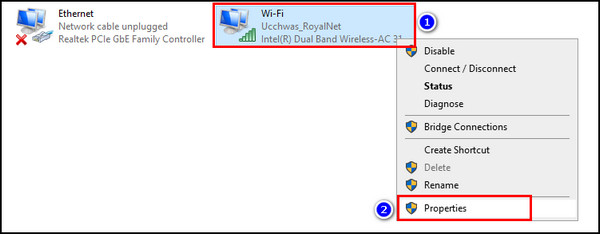
- Right-click on the network you are currently connected to and select Properties.
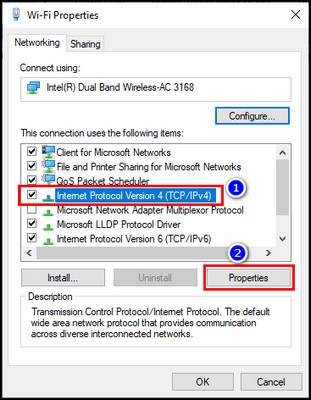
- Select Internet Protocol Version 4 and click on the Properties button.
- Check the Use the following IP address option.
- Input your IP address, Subnet mask, and Default gateway you’ve noted from the previous steps.
- Check the Use the following DNS server addresses options.
- Enter 8.8.8.8, Google’s DNS server, in the Preferred DNS Server box and 8.8.4.4 in the Alternate DNS Server box.
- Click OK.
Now you can leverage Google’s DNS to establish a stable connection to the game servers.
5. Enable Port Forwarding
Port forwarding is essential in enhancing connections, minimizing latency or lag, and improving the multiplayer gaming experience. This method provides significant advantages, ensuring a robust connection within your private network through peer-to-peer connections (P2P).
Before you begin, remember that the router menus can vary.
To enable ports in Destiny 2:
- Access your Default Gateway IP address from the steps provided in the previous section. You’ll need it to sign in to the router’s main interface.
- Locate the menu within your router’s interface to configure the ports.
- Input your static IP address if prompted.
- Enter the following TCP and UDP Destination Ports for Destiny 2 according to your device:
- Xbox Series X or S
TCP: 53, 80, 3074.
UDP: 53, 88, 500, 3544, 3074, 27015-27200.
- Xbox Series X or S
- Xbox One
TCP: 53, 80, 443, 3074, 7500-7509, 30000-30009.
UDP: 53, 88, 500, 3074, 3544, 4500, 1200-1299, 1001, 27015-27200.
- Xbox One
- PlayStation 5
TCP: 80, 443, 1935, 3478-3480.
UDP: 3478, 3479, 49152-65535, 27015-27200.
- PlayStation 5
- PlayStation 4
TCP: 80, 443, 1935, 3478-3480, 7500-7509, 30000-30009.
UDP: 2001, 3074-3173, 3478-3479, 27015-27200.
- PlayStation 4
- PC
TCP: 80, 443, 1119-1120, 3074, 3724, 4000, 6112-6114, 7500-7509, 30000-30009
UDP: 80, 443, 1119-1120, 3074, 3097-3196, 3724, 4000, 6112-6114, 27015-27200.
- PC
Port forwarding is a highly effective solution for resolving network connection issues in Destiny 2.
6. Reboot Your Router
After setting Destiny 2’s ports to your router, restart it to make sure the changes are applied.
Unplug the Power cable of your router. Wait 30 seconds before plugging in the Power cable again. Wait a few moments for the router to connect to the internet. Once the router is back online, launch Destiny 2 and see whether the Bee issue persists.
7. Close High Network Using Programs
In case an app currently running in the background is downloading an update or using too much data, Destiny 2 will not have enough network resources to run the game properly. Thus, the Bee error will show up.
To verify and close high network using programs:
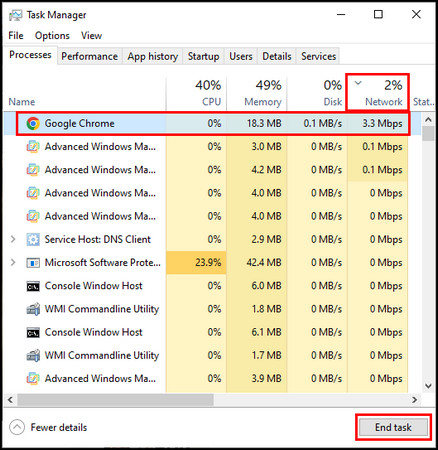
- Press Ctrl + Shift + Esc to open the Task Manager.
- Click on Network so all the processes are sorted from most to least data usage.
- Select the process using most network resources from the top and click the End task button.
8. Update the Network Driver
Outdated network drivers can also produce the Bee error in Destiny 2. So, upgrade the network adapters on your device to fix the issue.
Here’s how to upgrade the network driver:
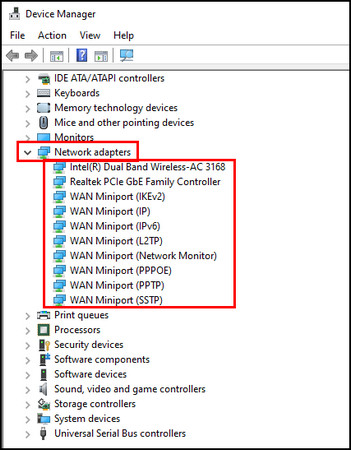
- Right-click on the Windows icon and choose Device Manager.
- Extend the Network Adapters sections.
- Right-click on each network device and select Update driver.
- Choose Search automatically for drivers.
After these steps, if an update is available, wait for it to finish downloading and installing.
9. Verify Installation Files
Corrupted game files can cause the Bee error to occur along with other Destiny 2 errors, such as Lion and Fly. Fortunately, using the game launcher, you can scan through each game file and fix the damaged ones.
Here are the steps to verify game installation files on Steam:
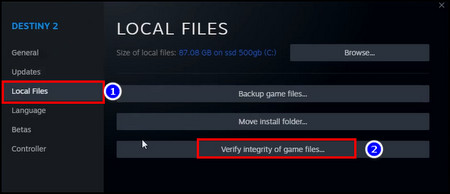
- Exit Destiny 2 and make sure it’s not running in the background.
- Open Steam.
- Proceed to Library, right-click on Destiny 2 from the list of games, and choose Properties.

- Go to the Local Files tab and select Verify integrity of game files.
10. Allow Destiny 2 through Windows Firewall
You’ll get the Bee error code if the Windows Defender Firewall prevents the game from connecting to the internet. To resolve this problem, add Destiny 2 to the list of games and programs which can pass through the Firewall.
Here’s the process to allow Destiny 2 through Windows Firewall:
- Search for Windows Defender Firewall and launch it.
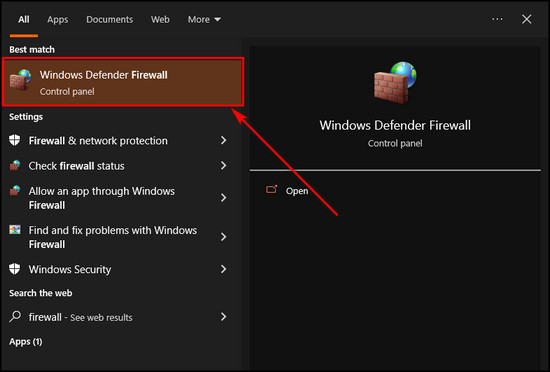
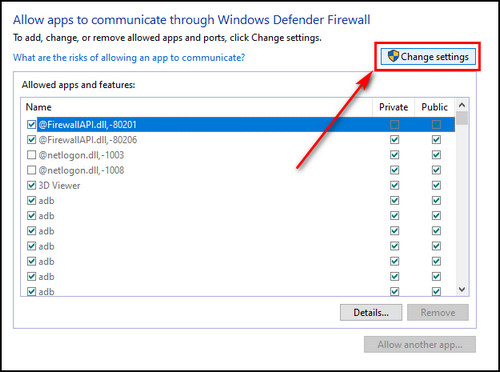
- Select Allow an app or feature through Windows Defender Firewall from the left menu.
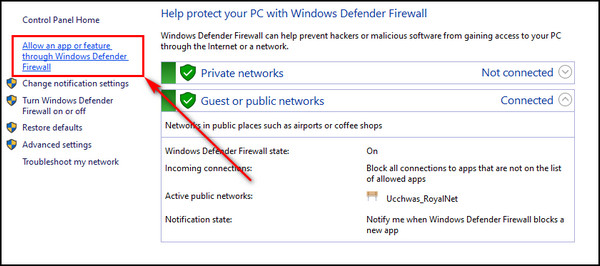
- Click on the Change settings option.
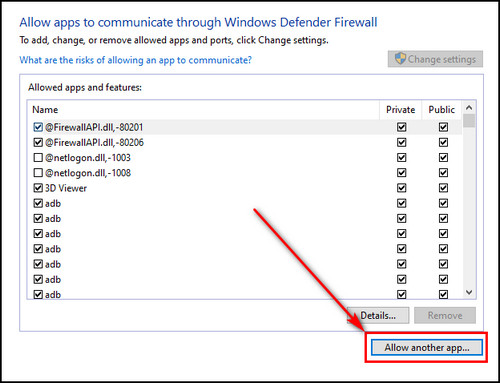
- Select Allow another app.
- Click on Browse and locate the folder where you’ve installed Destiny 2.
- Choose the game’s executable file.
- Select Open, then Add.
Now launch the game, and it will run without any connection issues.
FAQs
Why do you keep getting the Bee error in Destiny 2?
General disconnections between your modem or router and Bungie’s servers cause the Bee error in Destiny 2, along with Lion and Fly error codes. These unfortunate situations occur when you get packet loss or server congestion.
Why do you keep getting error codes on Destiny 2?
If you are bombarded with error codes in Destiny 2, it may be a server issue, network-related problem, or corrupted game file. When troubleshooting an error, you should first try to relaunch the game. Also, check your internet connection and make sure Bungie’s servers are all working.
Why does Destiny 2 use animal names for error codes?
Animal names are simply a way to remember which error you’ve got. So you can easily report it to Bungie later on. If you get a bunch of numbers instead of animal names, it will be significantly hard for you to remember the error code.
Final Thoughts
Guardians have been infected by the Bee error in Destiny 2 long enough.
Now, troubleshooting your internet connections, using a static IP address with port forwarding, and checking Firewall and network settings can quickly resolve the issue.
Comment below if you have further questions, and we’ll get back to you.