Tables are essential for presenting large quantities of data. However, a massive table can make the end user less interested in the data that’s present. Guess what you can do to spice things up? Style your tables.
Adding a theme or changing fonts has a great impact on improving a table’s readability. Also, it will appear more professional.
This article will show you how to make your table more professional in Microsoft Word. So, let’s begin.
Why Should You Style Your Table in Microsoft Word?
The main reason to style your table is to make the table easy to read. While a bare-bones style is okay for small tables, it does not bode well with a large data selection.
Think of some consensus information in a table. The number of rows and columns here will be huge. If you go through the data, it is easy to get lost after some pages. There must be some indicators or visual cues to help you navigate through.
Styling will also increase a user’s interest in a boring table. Different fonts, colors, and proper spacing help the table stand out. You will spot it easily, even in the middle of a large text.
Also, you can establish your brand by using a certain style. So, when someone sees the data, they will know where the table came from.
How to Create Professional-Looking Tables In Word
The best way to create a professional-looking table is to change its theme and apply a different style from the one built in MS Word. Tweak the table borders, margins, text alignments, change the fonts, and add spaces between the text to give it a unique look.
This list is basically endless. You can insert a table and make visual changes to your table using the robust table tools in Microsoft Word. So, let’s look at some of these.
These are the options to create a professional-looking table in Microsoft Word:
1. Change the Table Style
Microsoft Word comes with built-in themes that you can apply to the tables. These are color-coordinated, so they look great. Themes are a quick way to change the table’s style and improve the overall look and feel.
But you can always customize small aspects of the theme and make it into a new style. Then, you can reuse it for your future tables. Here, I will show you how to do that.
These are the steps to style your table in Microsoft Word:
- Open your Microsoft Word document.
- Click on the table.
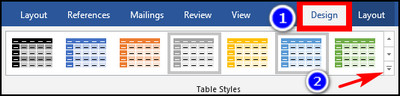
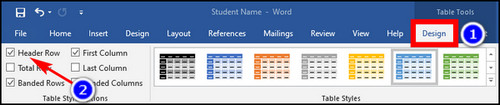
- Press the Design button under Table Tools in the ribbon menu.
- Expand Table Styles and choose a theme. I have gone with a blue theme here.
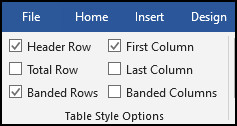
- Choose Banded Rows or Columns. This changes the alternate rows with the same color.
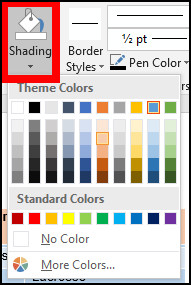
- Select rows or columns and click on Shading. Choose a color and click on it. This changes the background color of the cell. It is a good option if you want the top rows to be distinct.
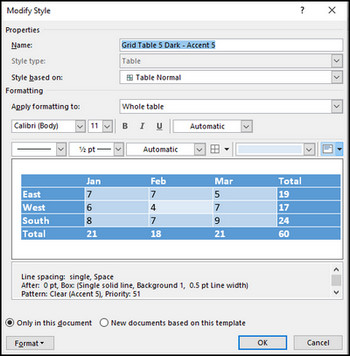
- Click on Modify Table Style under Table Style.
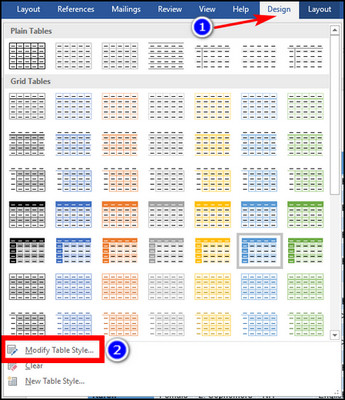
- Enter a name to save this as a custom theme. You can choose themes, fonts, and table borders from here. This will create a new table style that you can apply to any existing table on Microsoft Word.
Now the table looks much better than before. Let’s move on to customizing the table data now.
2. Align the Texts
Aligning your text is important to create a professional table, whether in docs, or MS Word. Keeping the data in the center improves the text’s readability and makes it look good. Even though, left alignment is something also used in certain situations, such as for Name or Address field.
If you only want to align a single cell, just click on it. Otherwise, select the entire table and change the orientation.
Here’s how to align the text on your table:
- Click on a cell in your table. For making changes to the entire table, select all cells.
- Press the Layout button.
- Select the alignment from the options present.

- Click on Text Direction to change how the text shows up in each cell. For large text, this occupies more space, and the cell will be longer than the rest. So, you can make the text vertical.
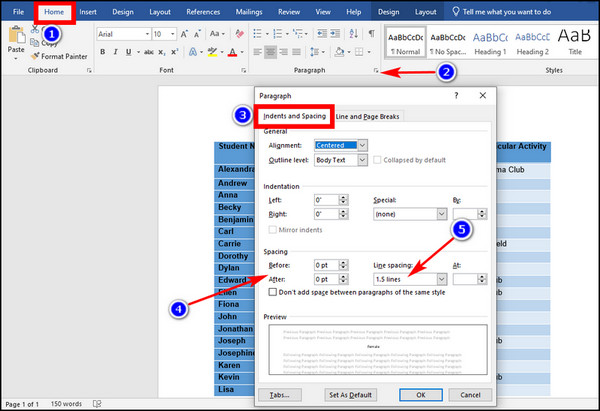
- Go to the Home tab.
- Click the indent near Paragraph to open Paragraph Settings.
- Ensure you are in the Indents and Spacing tab.
- Set Before and After Spacing to 0.
- Change Line Spacing according to your preference. This makes the table data appear less cramped.
Now, review how the entire table looks. Go ahead and change the text settings and make sure the table looks okay.
3. Adjust Cell Margins
Cell Margins give you some space on each cell where text is absent. It is padding for your cells to measure from the insides. If you want texts to appear uniformly across all sides of a table, use this option.
These steps will set up cell padding on your table in Microsoft Word:
- Click on a cell.
- Press the Layout button.
- Click on Cell Margins.
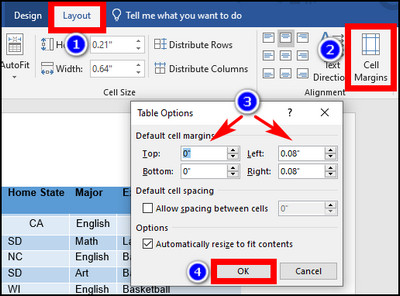
- Set the margins according to your preference.
- Click OK to save this.
Now, the texts will look better than before.
4. Change the column width and height
Even if all the cells on the table do not contain text of the same length, it is a good idea to adjust the width and height to make it uniform. This will make the table look visually pleasing.
You can drag the columns to make them smaller or bigger, but that will not make all the columns uniform. So, set a fixed width from the Table options, and then the entirety of the table will be uniform.
Follow this to change the column width and height in Microsoft Word:
- Select your Table.
- Press the Layout button.
- Enter the width and height in numbers.
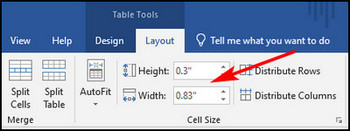
- Press the arrow icon next to the width and height field until you feel the width is sufficient.
Your table will be self-explanatory and easy to read now for the end users.
5. Use simple fonts
When discussing improving your table’s readability, the first thing that comes to mind is choosing a great font.
A good font can hook the audience to your article. Go with something that is not too hard to read and easy on the eyes. I use Calibri all the time because it really scales up well, even when the font size is large.
Add proper fonts with a properly margined and spaced table cell, and you will have a great table on your hand.
6. Add Space Between Cells
You can change the space between the cells, but this remains optional for most users. It introduces a border across all cells, giving them a unique look. Some people like it, others not so much. If this looks cool to you, go ahead and implement this.
Here’s how you can add space between cells in Microsoft Word:
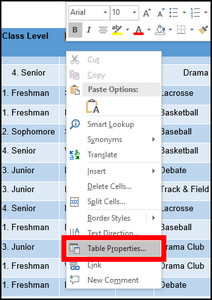
- Right-click on your table and click on Table Properties.
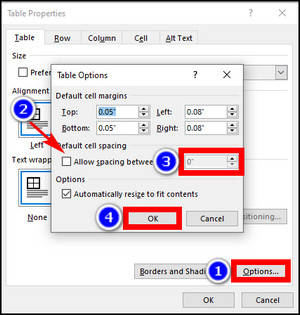
- Click on Options.
- Mark the checkbox next to Allow spacing between cells.
- Set the cell spacing value.
- Press the OK button.
See how the extra space looks on your table and make the necessary changes to the spacing.
7. Merge and Split Cells
In some cases, you may need to merge two cells together. For example, if the two cell contains the same data, keep it once and merge the cells. The same is true when you need to split a single cell.
Here is how to merge cells on Microsoft Word:
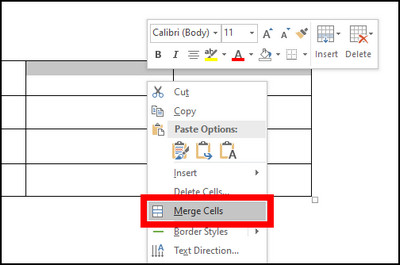
- Select the cells you want to merge.
- Right-click on the cell.
- Press the Merge button.
This is how to split cells on Microsoft Word:
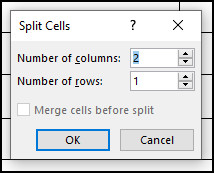
- Right-click on a cell and press Split Cells.
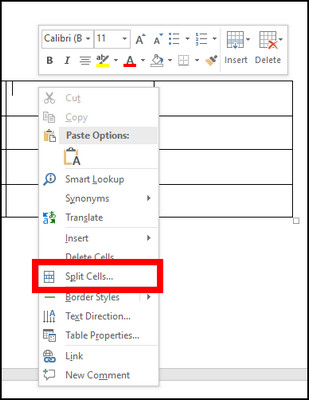
- Set the number of rows and columns.
- Press the OK button.
Now, the table should appear as you would like it to be.
8. Apply Borders
Adding borders to a table also helps it stand out. The outline around the table is what catches someone’s attention. This happens if you have texts surrounding the table.
When using borders, only set a thin outline for the table. Otherwise, it looks odd and out of place. Microsoft Word has different types of borders present inside the Border’s properties. From here, you can set the border’s thickness, color, shape, and type.
These are the steps to set a border on a table in Microsoft Word:
- Select your table by clicking the move icon at the top-left.
- Click the Design tab in the ribbon menu.
- Press on Border Styles and choose an outline that suits you.
- Choose a style by expanding the dropdown next to Border Styles.
- Set a thickness for the border.

- Click the Border button to apply the style.
Always choose a border that complements the table. Setting a lighter shade of the same color for the border is a good idea.
9. Adjust Table Width and Position
Your MS Word table does not need to cover the entirety of your document. You can adjust this by dragging the table’s edges or by setting a percentage value as the width.
Let’s see how you can do this.
Here are the steps to set the width of a table in Microsoft Word:
- Right-click on the table and open Table Properties.
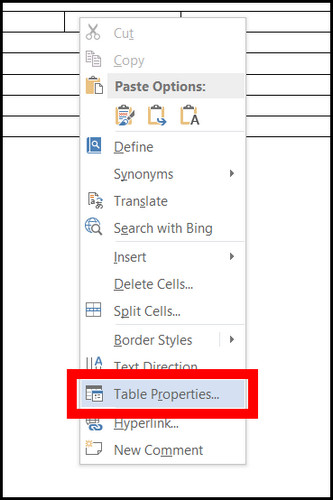
- Make sure you are on the Table tab.
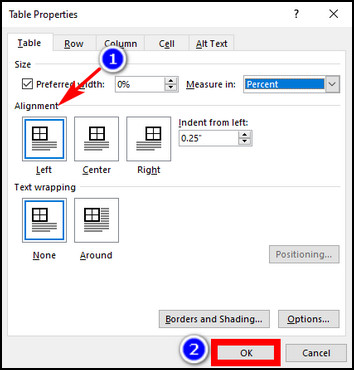
- Mark the checkbox near Preferred Width.
- Select Measure in as Percent.
- Enter a value for the width. For a small table, 50% is okay. But this can change according to your table size.

Here, you can also change the table orientation. You can set the Table on the document’s left, right, or center.
- Set your table’s alignment.
- Press the OK button.
The table should now look perfect in relation to the size of your document.
10. Split a Table
Sometimes, if a table becomes very large, its data can be too much for the viewer. Instead, dividing it into small parts can benefit the end user. If there is some text-based information between the tables, that eases the user and improves the document’s readability.
Here is how to you split a table in Microsoft Word:
- Click on the row that divides the table into two.
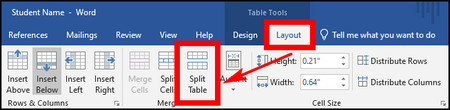
- Press the Layout button in the ribbon menu.
- Ensure you have the Header Row checkbox marked under the Design tab.
- Click the Split Table icon.
The table is divided into two parts now. Place it accordingly in your Word document to make it readable.
11. Use Table Headers
For a large table that spans across multiple pages, repeating the same table header on top of every page is a good idea. Then, anyone who looks at the data knows what the table data contains. Also, they don’t need to scroll all the way to the front page to see the table headers.
I may have said this many times in this article, but table headers also make your document much easier to read.
These are the steps to use Table Headers on Microsoft Word:
- Click on your table.
- Press the Design tab.
- Mark the checkbox near the Header Row.
Now, take a look at the same table. Even you will feel that the table looks much better now.
12. Use Text Wrapping
For documents that have multiple small tables, it is a good idea to make the text flow around the table. This formatting is used in magazines and newspapers.
Text wrapping is especially helpful when the tables are smaller. Then, it makes no sense to make the table fill up the entire document’s width.
Here are the steps to use text wrapping on Microsoft Word:
- Right-click on your table.
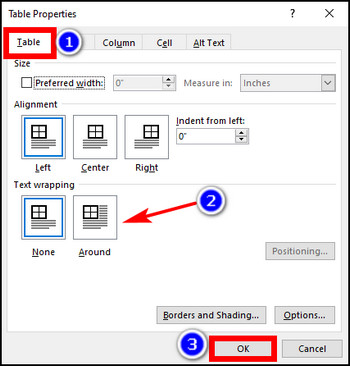
- Open Table Properties.
- Select Around next to Text Wrapping.
- Press the OK button.
See how the table looks now. If it needs changing, drag the table and reposition it anywhere in the text block.
How to Maintain a Professional-Looking Table in Microsoft Word
So, your table looks better than before. But there is another thing to worry about now. That is the data that the table contains.
If the table’s data is changing, you must update it regularly. Let’s say you have put the emergency contact and email in a document. When you switch to a different number, update it there; otherwise, the end user will feel that the table is useless.
Typos are common in any document. While you can easily get them while typing the document, a mistake present in the final draft and even the printed copies does not put you in good light. It makes the document look unprofessional, and the users who read the documents can question your work ethic. So, go through the same document and its table data twice to ensure everything is correct.
If the table contains data in the form of numbers, make sure these are correct. Double-check the data source and make corrections if needed. Data consistency is very important, especially if you are presenting this to a group of people.
Frequently Asked Questions
How do I make a large table look good in Microsoft Word?
To make a table look good, apply a style to the table. Microsft Word has many built-in themes, and you can choose any one of them. Next, change the table’s fonts. Also, change the table cell’s width and padding to make the text inside them more readable.
How to change the Table style in Word?
To change the table’s style, click on the table first. Then click on the Design tab and select the style that looks good on your table.
How do I format a table like another table?
If you want to keep the same style of a previous table in a new table, just copy the old table and delete its data. Then, change the number of rows and columns according to your requirements. After adding your data, the new table will look exactly like the old one.
Concluding Words
Creating a table is quite easy on Microsoft Word. When you start to format it, it takes some time to achieve the perfect design. But when you finish it, all the effort is validated by a final design, which is not only eye-pleasing but enhances the beauty of your document.
So, create a professional-looking table by following the design tips mentioned in this article and wow the consumers who go through your document.
With that said, it is time to say goodbye.