While a logo is one of the first things you need for your business, brand, or project, you don’t have to spend much money or time creating one.
MS Word may not be the most advanced graphics design software, but its built-in straightforward tools allow easy logo creation from scratch.
In the following article, I will show you how easily you can create a logo in Microsoft Word. Therefore, let’s start making your logo in MS Word.
Does Microsoft have a Default Logo Maker?
No, Microsoft doesn’t have any default logo maker in its environment. There are some design options in MS Word and PowerPoint that you can use to create a business logos. However, their original purpose is not logo making; thus, you can’t count them as default logo makers.
That said, what is a default logo maker?
A default logo maker is a built-in tool in a software application that lets you create a logo without using any other software or tools. Default logo makers typically offer a variety of templates, colors, and fonts to make it easy to create a logo.
For example: Canva, Wix, Adobe Illustrator, and Adobe Photoshop are just some of the apps that you can count as a logo maker.
Let’s return to the Microsoft program Ecosystem now.
There are two Microsoft applications that you can use to design logos:
- MS Word
- PowerPoint
These applications have several valuable options to help you create or design a logo. The options are located on the Insert tab, Format tab, and Design tab in the MS Word Ribbon.
Additionally, when creating a logo in Microsoft applications, you need to have a good understanding of the following options:
| MS Word Ribbon Options | Description |
|---|---|
| Insert tab | This tab contains tools for inserting images, text boxes, shapes, and other objects toward your documents. |
| Format tab | This tab contains tools for formatting the objects that you have inserted into your documents. |
| Design tab | This tool lets you change your text's font, size, color, alignment, bold, italic, underline, and spacing. |
Without these options in MS Word and PowerPoint, you can also utilize some alternatives from the Microsoft environment.
You can use Microsoft Designer, a web-based design tool that allows you to create various designs, including multi-purpose logos.
That said, more advanced third-party software does exist, but for simplicity, the tools in Microsoft Word will allow users to create decent logos without complexity. Alternative design programs within the Microsoft ecosystem include PowerPoint and Publisher.
How To Create a Logo in Word
You can easily create a business or professional logo with the built-in tools in MS Word. Also, there are some websites where you can get logo templates for MS Word. However, these are not officially supported by MS Word.
You can create your own logo with a bit of practice using the design tools in MS Word. Additionally, there are several advantages to doing so.
Foremost, when you create the logo yourself, it improves your skills and makes you confident. It helps you create a professional for the author or organization. Your self-made logo distinguishes your document from other documents.
Now, let’s see how you can create a logo in Microsoft Word with the built-in tools.
Here are the steps to create a logo in Word:
1. Select the Right Canvas
Launch Microsoft Office and open a blank document. Click on the View tab from the ribbon and put a checkmark on the Ruler and Gridlines. This will help you to position your designs. 
2. Design Your Logo
Now start with the Shape. Click on the Insert tab and select Shapes. Then, move your cursor freely to create the shape as you like, or press the Shift key while moving the cursor to create a symmetrical shape. 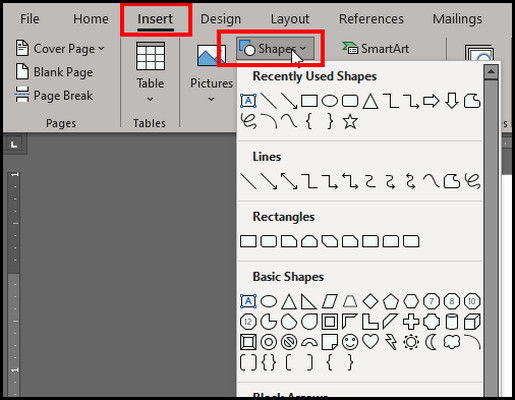
After you insert the shape, click on the shape itself, and it will take you to the Shape Format tab. You can change the Shape Fill color and Outline color from here. Also, if you can’t move the shape freely, click on the Wrap text option and choose In from of line option.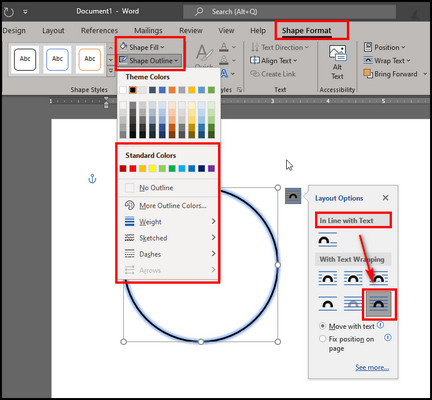
To change color, go to the Design tab and change the color from the color option. Besides, you can adjust the size with your cursor. To change symmetrically, click Shift and Ctrl together, then change the shape with your mouse.
Now, add a text box to insert text in the logo. Click on the Insert tab and choose the Text Box. You can either select a created format or draw yourself.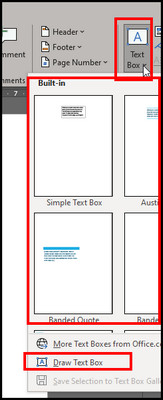
To make your design more professional, insert an icon from the MS Word gallery. Click Insert and choose Icons. Search for the icon in the gallery and insert that. Add shapes, icons, and text boxes, then position them correctly. ![]()
3. Add Special Effects
You can add effects on each component in MS Word. You can change color gradient, shadow, and for the text, you can use WordArt to make exceptional designs.
Gradient: A gradient is a gradual blend of two or more colors. It can be used to add depth and dimension to your logo. For example, you could use a gradient to create the illusion of a logo made of glass or metal.
Shadows: Adding shadows to your logo can make it look more realistic and three-dimensional. This is because shadows are a natural part of our world, and they help us to perceive the depth and shape of objects. Shadows can be used to create the illusion of depth. 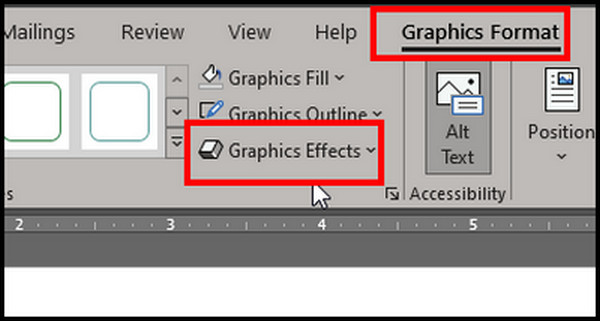
Reflections: Reflections make your logo appear as if it is being reflected on a surface. This is an excellent approach to add depth and dimension to your logo. You may alter the reflection’s opacity, blur, and distance to achieve the desired effect.
WordArt effects: WordArt effects are a group of visual effects that can be applied to text, such as beveling, embossing, and stretching. These effects can make the text more visually appealing and stand out from the rest of the document. 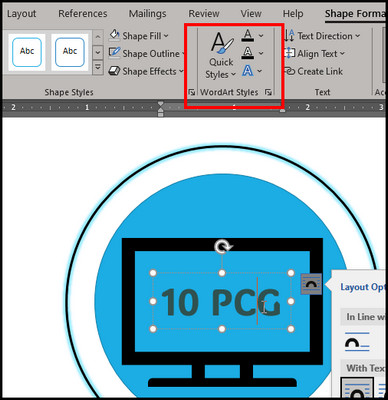
4. Review and Make Necessary Arrangements
After you finish adding all the necessary components, you must position them correctly. For my example, I need all the components to align the center. So, press Ctrl, click on each component, and select Align from the Align option under Shape Format. 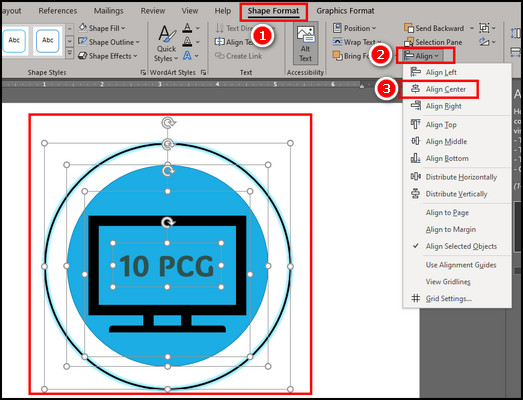
All the components will aligned in the center. Also, before you export the image, make the design an image in MS Word.
- Mark all the components and press Ctrl + V to copy it.
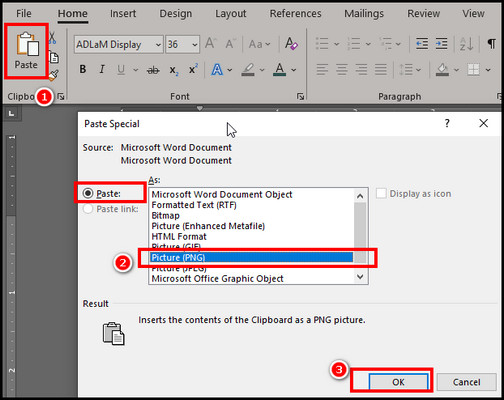
- Select Home from the ribbon, click the Paste option, and choose Paste Special.
- Choose Picture from the dialogue box and click on OK.
 5. Save and Export the Logo
Now, if the logo is ready, then you can save it. Right-click on the logo and choose Save as Picture. Provide a name on the dialogue box, select PNG format from the Save as type option, and click Save.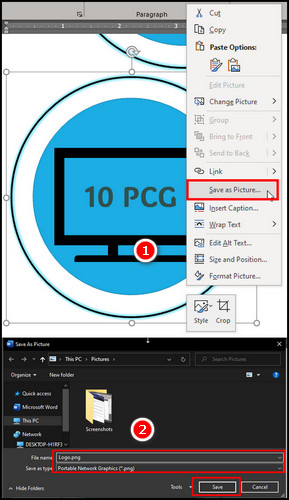
When saving a logo or image in MS Word, there are a few options available. However, PNG is the best format for logos.
So, that’s how you make a logo in Microsoft Word, and you can now Insert your logo in Microsoft Word. All the options are there. Just play with the options, and you will create some exceptional designs.
It’s not like the modern tools where creating a logo just takes a single click. However, this will enhance your skill and give you a great experience cause you are creating it yourself.
FAQs
Can you align objects in the MS Word logo?
Using the alignment tools on the Home tab bar, you can center, distribute, and align various shapes, images, or text. The alignment tools allow you to position objects on a page to each other or to the page itself.
Can logos be edited later in Word?
Yes, Word allows reopening the logo file to easily edit images, colors, layouts, or other elements later as the design changes. This is because Word is a vector graphics editor, which stores images as mathematical equations rather than as a series of pixels.
What file format should the logo be saved as?
Saving the Word logo file as a high-quality PNG or JPG image file is best for most uses. This will ensure the logo retains its crisp look across various platforms, such as websites, email, and presentations.
Wrap-Ups
Microsoft Word equips you to design quality logos without advanced graphic skills. Simple yet professional logos are possible using text effects, shapes, SmartArt, and clip art.
With the handy creation tools built into Word, you can affordably craft logos for personal and business needs.
However, if you have to create logos frequently or work on professional logo making, you can use proper graphics design tools like Canva or Adobe Photoshop.