You click on the power button of your PC, and it’s boot into the BIOS. However, instead of completing the boot process, it restarts your system and keeps doing it.
In other words, you are stuck in a BIOS loop. The BIOS loop issue can occur for many reasons, such as faulty hardware or a corrupted BIOS.
In the next part of this article, I will explain why you are experiencing this continuous BIOS loop issue and how you can quickly fix it. So, without further ado, let’s get started.
Why Computers Keep Stucking in the BIOS Loop?
You might get stuck in the BIOS for various reasons, such as a corrupted BIOS, faulty hardware that causes conflicts with other hardware, or you failed to update your firmware. These are the most common causes of getting stuck in a BIOS loop.
The BIOS (Basic Input/Output System) is a small program stored on a chip on your computer’s motherboard. It is responsible for initializing your computer’s hardware and loading the operating system.
However, when there is any issue with the hardware or software, and BIOS can’t complete the POST (power on self-test), it shows many issues. And one of them is what you are experiencing – stuck in a BIOS loop.
Here are the reasons for your computer to stalled in the BIOS loop:
Corrupted BIOS: When the BIOS becomes corrupted, it can prevent your computer from booting correctly.
Hardware Conflict: Sometimes, two or more hardware components may clash, leading to a BIOS loop. This conflict can occur when devices like graphics cards, memory modules, or expansion cards are incompatible or improperly installed.
Failed Firmware Update: When a firmware update fails, it can result in a corrupted BIOS or other firmware on your motherboard. This can trigger the BIOS loop issue, preventing your computer from booting normally.
Power Supply Problem: Inadequate power supply to the motherboard can also contribute to a BIOS loop. Insufficient power can disrupt the stable functioning of the system, causing it to get stuck in the BIOS screen.
Without these, physical damage on your motherboard can cause the issue. Let’s now jump into the below section to solve your PC stuck in the BIOS and keep restarting.
How to Fix Computer Stuck in BIOS Loop
To fix the BIOS infinite loop, you need to restore your BIOS to the default settings and check the Boot order. Furthermore, inspect your RAM properly. Clean dust from the memory slot and, if necessary, change the RAM. Repairing your PC with Windows Bootable Media also helps you to solve this issue.
That said, when you are experiencing a BIOS loop, the first thing you should do is try to turn your computer off and then on again, and if that doesn’t work, then try the following methods.
Here are the methods to fix your PC stuck in the BIOS loop:
1. Restore BIOS to Default Settings
Sometimes, tinkering with BIOS settings can lead to unexpected consequences, including the dreaded BIOS loop. One straightforward fix is to restore the BIOS to its default settings. Doing so can reset any erroneous configurations and resolve the issue.
Moreover, if you have updated your BIOS recently, revert the BIOS update.
Here are the steps to restore BIOS to Default Settings:
- Restart your PC and navigate to the BIOS setup by pressing Del, F2, or F10 during the boot process.
- Locate the option to reset the BIOS to default settings. This may be labeled as Load Optimized Defaults or a similar phrase.
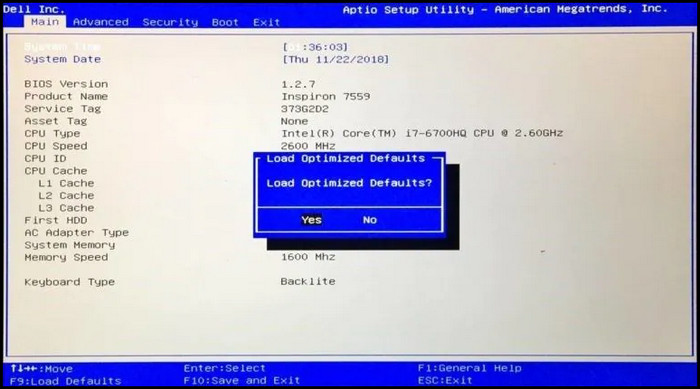
- Select Save and Exit, complete the process, and allow your computer to reboot.
The above process will take your BIOS to the default settings. So, all the changes you make on the BIOS will be turned off.
If you use an ASUS motherboard and stuck in the EZ mode, you can fix the loop issue by exiting EZ mode.
2. Change RAM/RAM Slot
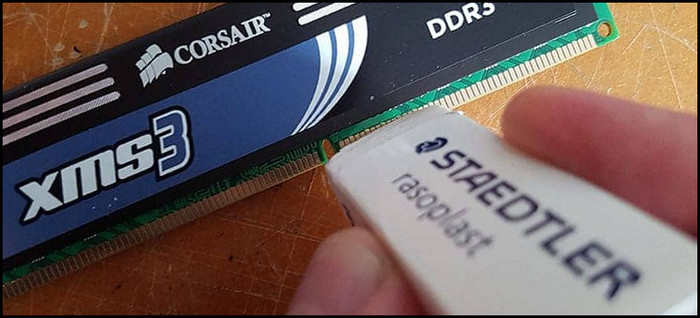
If you have faulty RAM or dusty memory slots, BIOS cannot access them. This will cause your computer to enter a BIOS loop.
Additionally, when I first experienced the problem, I tried a variety of fixes, and the issue was resolved after I cleaned the RAM slots and reseated them. There are numerous reports that the BIOS loop problem can be solved by changing the RAM or cleaning the RAM slots.
Follow the below steps to change RAM slots:
- Power off your computer and unplug it from the power source.
- Open your computer’s case and locate the RAM modules.
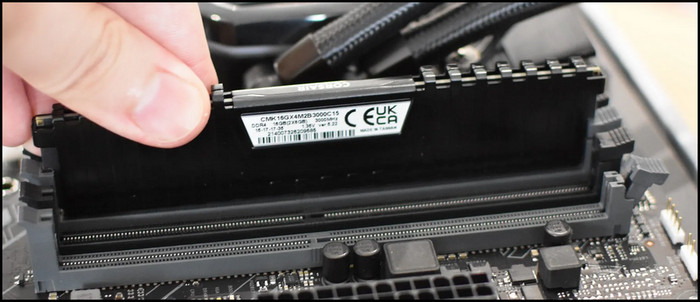
- Carefully remove the RAM module(s) from their slot(s) by pressing down on the latches on each side.
- The RAM module(s) into a different slot, ensuring they are correctly seated.
If that doesn’t work, change the RAM sticks and check how the issue behaves.
3. Inspect SSD
If you are using a Solid State Drive (SSD), it is worth checking its health and connection to solve the BIOS loop issue. A faulty or poorly connected SSD can disrupt the booting process, potentially leading to a Boot Loop With No Display Error.
Open your PC and remove the SSD carefully. Check all the connections, clean them properly, and reconnect your SSD to your system.
Now, start your system and check for the issue. If your system still restarts on the BIOS menu, follow the method below.
4. Clear the CMOS (BIOS)
The CMOS, or Complementary Metal Oxide Semiconductor, is a small chip on your motherboard that stores the BIOS settings. When you clear the CMOS, you erase all these settings and reset them to their default values.
To clear CMOS, unplug your PC from the power source and open up your PC. Find out the CMOS battery on the motherboard and detach it. Wait 5–6 minutes, then again attach the battery to the motherboard with the correct orientation.
After you complete the process, connect the power cables and turn it on. If you still encounter the BIOS loop, then try the next step.
5. Check Your Boot Order in BIOS
Wrong boot order is a fundamental matter of experiencing a BIOS loop. It’s obvious because your system tries to load your windows from the order you set, but it’s not the proper one. Thus, your system keeps repeating the process.
Follow the below steps to check the boot order in BIOS:
- Restart your system and get into the BIOS menu settings
- Navigate to the Boot or Boot Order section.
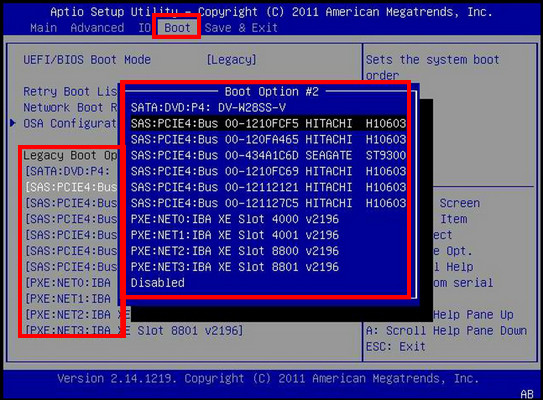
- Ensure your primary boot device, usually the SSD or HDD containing the operating system, is listed first in the boot order.
If the boot order is not correctly set before the process, then you can fix the BIOS loop issue by setting it correctly. Also, if your hard drive is not showing up in the boot priority, you need to solve that first.
6. Repair Computer Using Windows Bootable Media
If the BIOS loop persists after trying all of the above steps, you can try repairing your computer using Windows 10 bootable media. This is a process that can be used to fix a variety of problems, including a BIOS loop.
Here are the steps to repair your system with Bootable Media:
- Create a Windows bootable USB drive.
- Insert the bootable USB to your PC and restart your system.
- Boot from the Windows bootable media by pressing the designated key F12 or Esc during the boot process.
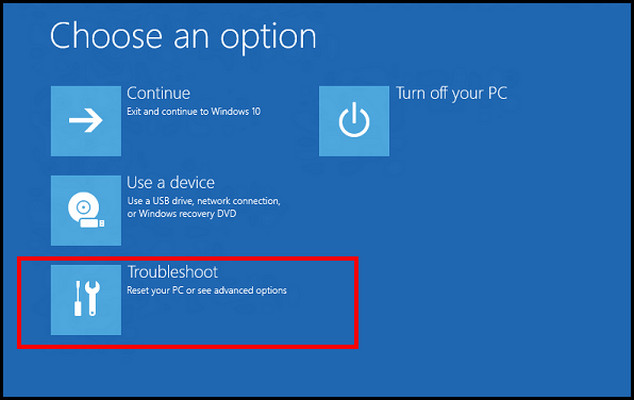
- Follow the displayed guidance to access the Windows Recovery Environment.
- Select the Troubleshoot option.
 Wait patiently for the troubleshooting process to complete, and then restart your system. Windows will run all the necessary processes to fix the issue.
Wrap-Ups
The BIOS loop is a common headache that many computer users encounter. However, armed with the shared information, you can now approach this issue with confidence and determination.
Remember, patience and caution are essential when dealing with BIOS-related issues. Don’t let the BIOS loop hold you back any longer.