Changing the default address book which is automatically set by Outlook, or searching through all the contacts to find the specific one each time you attempt to email, is annoying.
In that case, Switching the default address book is the best option to resolve this issue. Are you wondering how to modify the address book?
Be at ease. In this article, I will explain the process in detail.
So, tag along.
How to Change Default Address Book in Outlook
First, let me give you a heads-up about the Outlook address book, which you must know.
You can change your default address book only on your desktop outlook application. Unfortunately, the address book feature is unavailable on Outlook 365 or other web versions and Outlook mobile applications.
Moreover, the following steps are the same from Outlook 2010 up to the latest version. You can also use the same ways to modify the address book if you are using Outlook on your Mac device.
Let’s see how it’s done.
Here are the steps to modify the default address book in Outlook:
- Open the Outlook application.
- Select the Home tab.
- Go to the Find group from the upper ribbon and click Address Book.

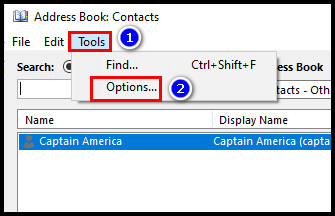
- Click on the Tools tab and select Options.
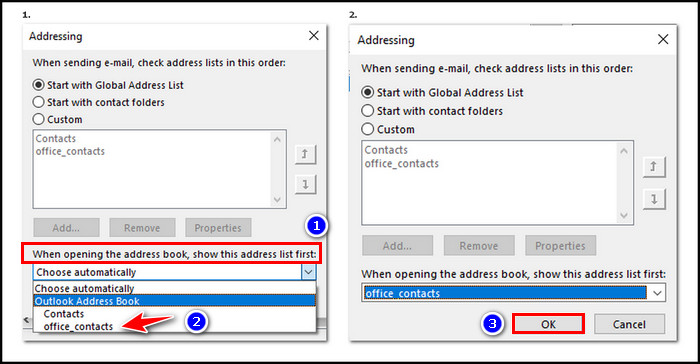
- Expand When opening the address book, show this address list first option.
- Choose the address book you want to set as default.
- Click OK to confirm.
Remember that you must have another address book to change the default. In the following section, I have explained the way to create the address book. Check that out.
Read more on why Microsoft Outlook not connecting to server.
How to Create an Address Book in Outlook
The process of creating an address book is quite simple. It’s almost the same as making a new folder on the computer.
Let’s take a look at how to do that.
Take the following way to create an address book in Outlook:
- Open the Outlook application.
- Click on the people icon from the bottom left corner.
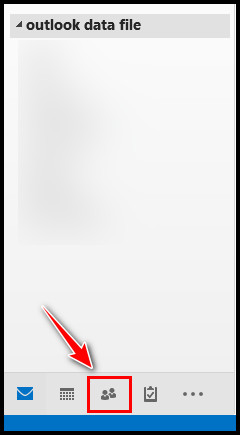
- Right-click on the Contacts option and select New folder.
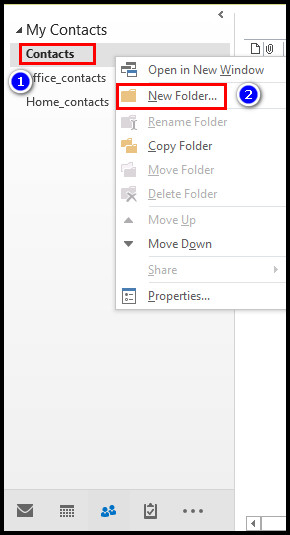
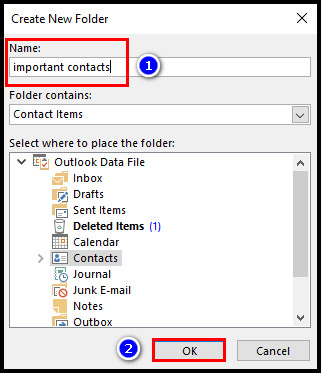
- Type the name of the address book and click OK to confirm.
To ensure the newly created contact folder is available as the address book, right-click on the folder and select Properties.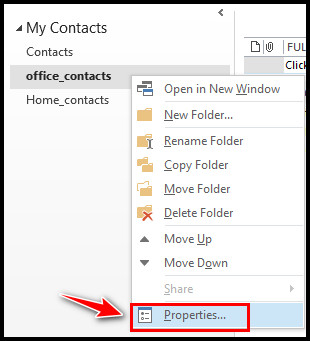
Go to the Outlook Address Book tab. If you see Show this folder as an e-mail Address Book option is checked, it means it was successfully created as the address book. In case it was unchecked, select that option and click OK.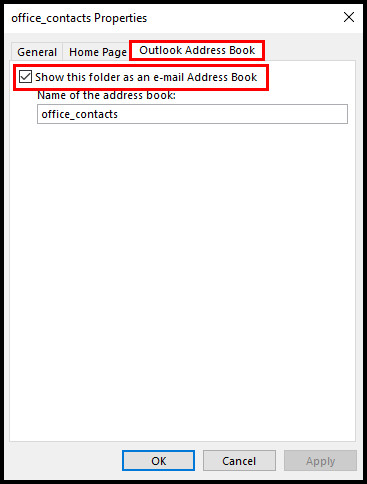
Do you know how to include a contact in the address? Go to the following section to learn how to add, copy or move any contact in the address book.
You may also like to read about can’t start Microsoft Outlook – Invalid XML error.
How to Add Contacts to Address Book in Outlook
If you want to find any regular usage contacts quickly, keeping all the important contacts in one single address book will be an excellent idea.
You either add the contact as new or copy-paste or move the contact from another contact list or address books. Below I have explained everything.
Now let’s see how to do all of that.
Here is the process of adding contacts to the address book in Outlook:
- Launch the Outlook application.
- Click the people icon from the left pan to go to the contacts.

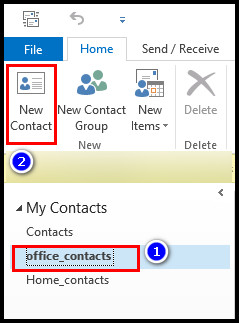
- Select the address book you want to add the contact.
- Click on New Contact.
- Type all the details of the contact and select Save & Close.
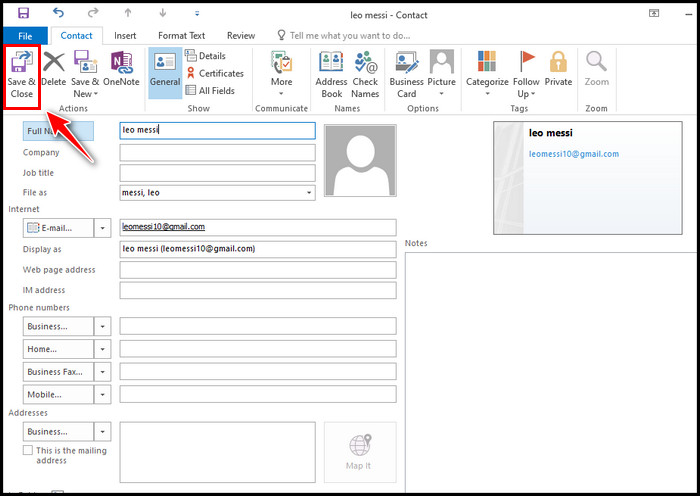
The new contact will add to the address book. You can also move your old contacts to the new address book if you want to.
For that, go to the previous address book or contacts list. Right-click on the contact. Take your cursor to the Move section and choose the address book you want to transfer.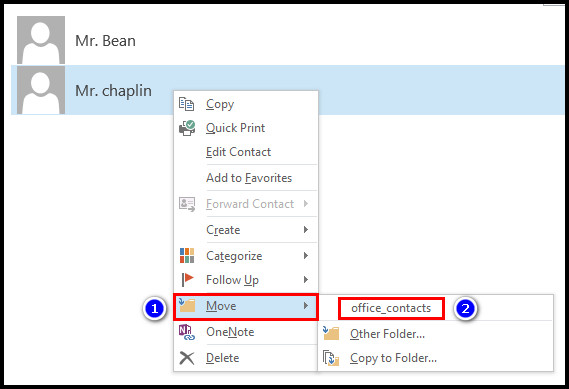
To copy the contact, press the Ctrl + C button first. Go to the address book you want to keep the file and press the Ctrl + V button to paste the contact.
Sometimes you must update the Offline Global Address Book to save your changes. And for your convenience, I have described the process in the following section.
Follow our guide to recall an email in Outlook.
How to Update Address Book in Outlook
If you want to keep up-to-date contact information in one place, save time & energy searching for contact info, and expand your network, you must update the address book from time to time.
The plus point is updating the Offline Global Address Book is pretty straightforward.
Check out the process below.
Pursue the following way to update the address book in Outlook:
- Open the Outlook application.
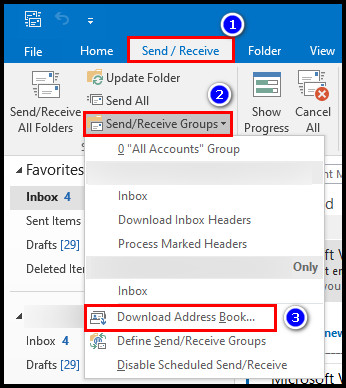
- Go to the Send / Receive tab.
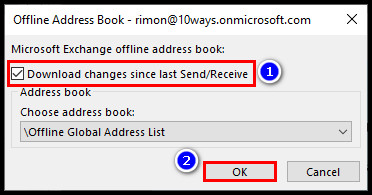
- Expand the Send/Receive Groups and select Download Address Book.
- Check the Download changes since last Send/Receive box.
- Pick the address book you want to update from the Choose address book section.
- Click OK to start the update.
It may take a while to finish the updating process. Once it’s finished, you are good to go to change your default address book. At the beginning of this article, I explained that.
Also, read which type of Outlook rules not running automatically.
FAQs
Which Address Book is the default in Outlook in a stand-alone environment?
Outlook uses the Outlook Address Book as the default in a stand-alone environment.
How do I get rid of the local address book in Outlook?
To remove the local address book in Outlook, click on File > go to the Account Settings > Account Settings > press on the Address Books tab > choose the address book you want to delete > click Remove.
Why does Outlook use an offline address book?
Outlook uses an offline address book because it is downloadable. Moreover, you can easily access it and exchange the contact list online even when Outlook is disconnected.
Final Thought
Sometimes you may see the Global Address List (GAL) in your Outlook address book if your company has it and shares the account with you. But to use this GAL, you will need a Microsoft Exchange Server account. Otherwise, you can’t.
I hope you are now using your desired address book as default in Outlook. Comment below if you have any queries.
Peace!