A hard drive consists of physical disks inside. They spin at a high rpm to read and write data.
External hard drives also harness the exact mechanism but in a compact footprint. These are great tools for storing and moving data from one system to another.
However, not everything is a fairy tale while using these drives. They often run into issues that cause users difficulties, such as restraining them from accessing data in urgent moments.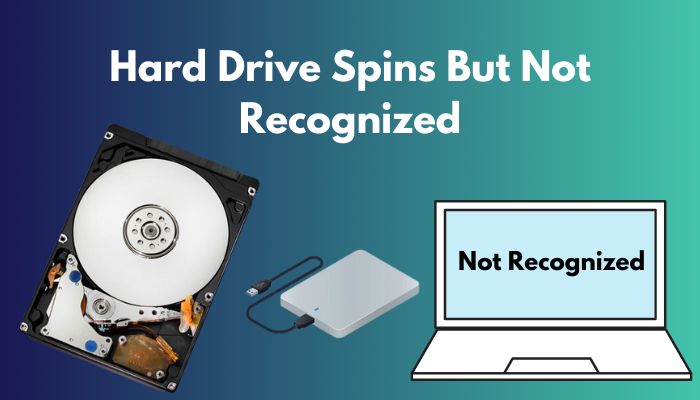
One of the most common issues is hearing the disk spin, but the system does not recognize it. It can be overwhelming to fix the issue for many users.
This article will help you narrow down the reason leading to the problem and fix it once and for all.
Why Hard Drive Spins But Not Recognized?
After connecting a drive to a computer, if it does not get recognized but starts spinning, this means it is connected to the computer correctly. But the USB port or the cable may be faulty, or the port is not compatible with the drive. The physical problem of the disk can also be a reason.
Hard drives may not get recognized for numerous reasons. It is difficult to tell what exactly causes the issue.
Here are all the possible reasons for an unrecognized hard drive:
Defective USB Port
A damaged or defective USB port is one of the most common reasons a hard drive is not recognized.
Sometimes USB port can easily detect a flash drive but not an external hard drive.
It can be due to incompatibility of the drive and the port, or the USB can not supply enough power to the drive. Hard drives require a lot more power than flash drives.
There are different versions of USB ports such as 2.0,3.0,3.1,3.2 etc. If the drive is supported by USB 3.0, then connecting it to the 2.0 port will result in an unrecognized hard drive.
Using USB hubs for connecting multiple USB drives is a common phenomenon. Third-party hubs often cause compatibility issues.
Faulty Cable
The cable that connects the drive to the computer is special. It transfers data between two devices as well as delivers necessary power to the hard drive.
Cables can be damaged at any time. Long-term usage or improper voltage encounters can impair cable. As a result, you may see your drive spinning but not recognized by the system.
Some more guides on how to will a laptop Hard drive work in a desktop.
Incorrect Partition Scheme
The first-time connection of an external hard drive needs to be partitioned correctly. The operating system file explorer does not show the storage device at first.
This happens due to incorrect file system format. Formatting to the correct scheme is done while partitioning the drive.
Invalid Drive Letter
Your hard drive does not show up due to a duplication of the drive letter. The issue is so naive that people often overlook it.
Multiple partitions of the hard drives having the same drive letter cause an unrecognized storage drive.
Device Driver Issue
Windows and other operating systems highly recommend that a user should always run on the latest software.
Updated device drivers make sure the component is delivering the best possible performance.
When the hard drive gets an update, and the user runs on old drivers, it sometimes causes issues such as being unable to detect the drive.
Infected with Malware
Malware is accountable for a lot of problems within the system. An unrecognized hard drive is one of them.
Viruses on the system may impede the detection of the external storage drive. Thus there is no visible presence of the hard disk is found.
Bad Sector on Physical Disk
Hard disk drives, whether internal or external, may not be identified by the file explorer due to bad sectors on the disk.
The sudden shutdown of the computer sometimes indicates that the drive is growing bad sectors.
The system can not write data on the sectors that are corrupted. Software issues or manufacturing defects can develop bad sectors on the hard disk.
Damaged Disks Inside Hard Drive
As we already know that a hard drive is built with physically spinning disks. If anything happens to these disks, the drive can fail.
Long-term usage can grow junk inside the disks. While spinning at a high RPM, they can get scratched. Hence the drive gets damaged, resulting in an unidentified hard drive.
Drive Not Activated in BIOS
Secondary storage drive installation sometimes requires activation from the BIOS.
Some motherboard manufacturers turn off detecting second storage devices by default. Therefore when a new hard drive is connected to the system, it may not get identified right away.
Hardware Problems
Hardware problems can occur at any time. A hard disk drive is made with different components. Power delivery chip, SATA to USB converter, logic board etc., to name a few.
If one of them gets damaged, the drive fails instantly. It does not function as per expectation.
However, for an amateur user detecting such issues is challenging. Seeking expert help in such instances is recommended.
Read more on how to fix PS5 not recognizing external Hard Drive.
How to Fix Hard Drive Spins But Not Recognized
When connected to a computer or laptop, unrecognized hard drives can be tough to figure out, let alone fix. Before attempting to solve it, testing with different parameters will make the process easy.
Here are all the possible methods to fix a spinning hard drive yet not recognized:
1. Switch USB Ports
External hard drives are connected to the computer via a USB cable. But this cable is different. It delivers power to the drive to operate and also transfers data.
Therefore these are connected to the USB port of a PC.
If the drive is getting power and spinning correctly but is not recognized after connecting to the USB port, simply switch to a different port. See whether the problem is fixed or not.
Don’t forget to connect to all the different kinds of USB ports, such as USB 2.0 / 3.0 etc. After connecting to other ports, if the issue persists, move on to the next fix.
2. Connect Drive to a Different System
When a computer does not detect the drive, there can be a possibility that the system is unable to identify the drive. Restart your system and see whether your hard drive is detected.
If there is no luck after restarting, connect the drive to a different computer. Try connecting to different PCs with different OS. 90% of the time, your hard disk will get detected.
Yet no good fortune? Follow the next fix.
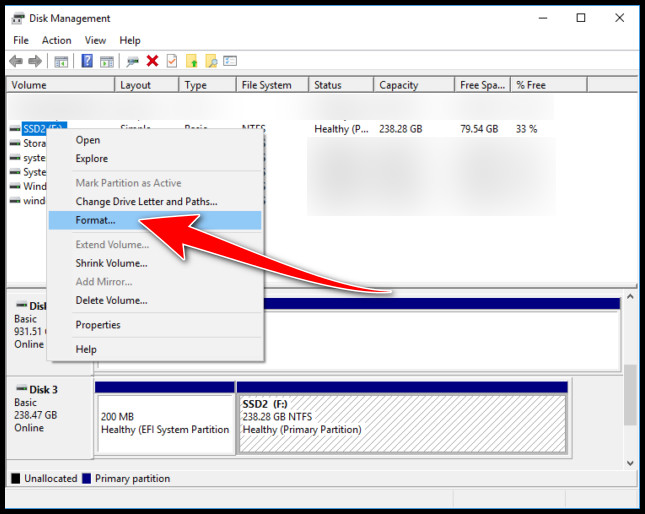
3. Format Drive Appropriately
The incorrect format of a drive is not recognizable by the system. So you need to make sure that your drive is formatted correctly.
Here is how you can format your hard drive:
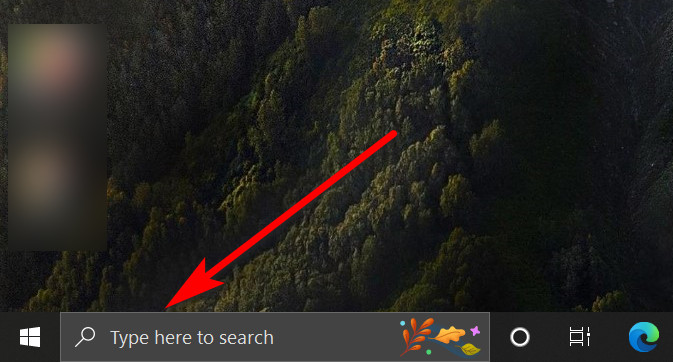
- Fire up Windows search by pressing Windows + S on your keyboard.
- Write Create and format hard disk partitions in the box. This will open the disk management window.
- Observe carefully. You will see all the storage devices connected to your system.
- Right-click on the disk you want to format.
- Select Format from the menu.
- Choose the Volume label.
- Set a name for your drive.
- Choose default settings each time a new window pops up.
- Choose the NTFS file system.
- Choose the Default allocation size.
- Select Perform a quick format.
- Click Next.
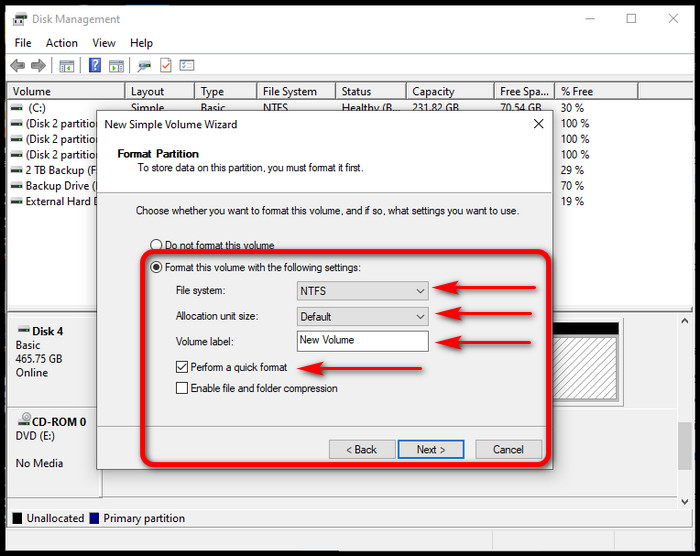
You will now see your drive in Disk Management. You can perform another format if you want. This format will take some time, so don’t panic.
4. Update Driver
An outdated driver for the drive is responsible for an undetected disk. So updating the driver is crucial.
Here is a method to update the driver:
- Click on the Windows Search box found at the left of the taskbar.
- Compose Device Manager.
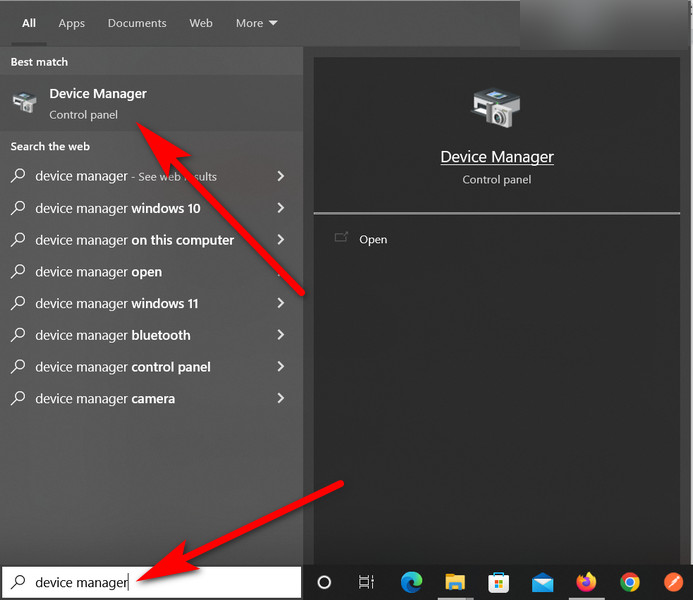
- Click or Press Enter on your keyboard. A new window for managing the device manager will pop up.
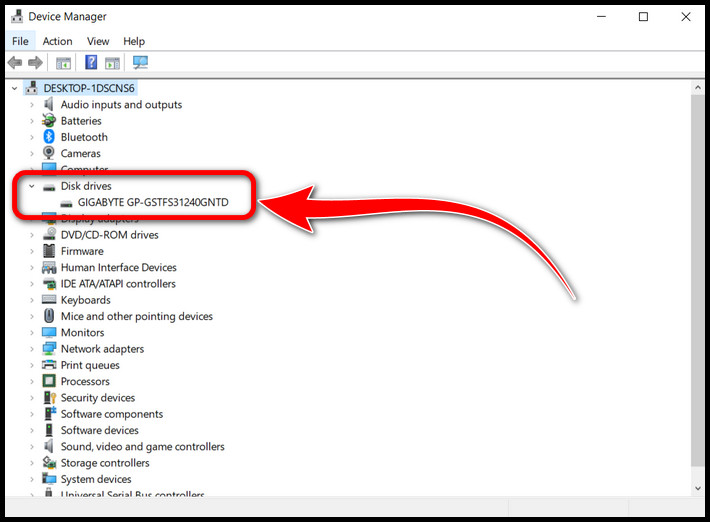
- Double-click on Disk drives to expand. You will find all your storage devices listed here.
- Right-click on the device you want to update the driver.
- Choose Update driver.
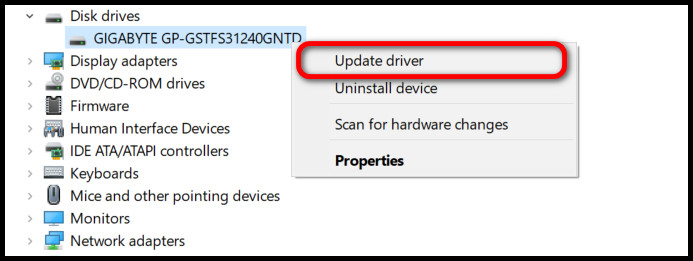
A loading window will appear, indicating Windows is looking for the best drivers for your device. When found update process will start automatically.
After the update, restart your computer and reconnect the drive. This process should fix your problem.
5. Perform Full System Scan for Virus
Virus disturbs the system with a lot of problems, including device recognition. Thereby, cleaning malware from the system is critical.
Microsoft Defender is a great tool, to begin with. However, for extra miles, a third-party antivirus is necessary.
Here is a process to clean viruses from the system:
- Download your preferred antivirus, and Install it.
- Run a full system scan. This may take some while.
- Clean all the infected files.
- Restart.
After the malware is cleaned up, try connecting your hard disk. You should see it in the file explorer.
6. Initiate Hard Drive from Disk Management
The very first time when a hard drive is connected to a computer, it needs to be initialized. Storage of the drive stays unallocated.
From the windows Disk Management window, you can easily activate it.
Here is the procedure to initiate a hard drive from Disk Management:
- Click on the file explorer icon from the taskbar.
- Right-click on This PC.
- Choose Manage.
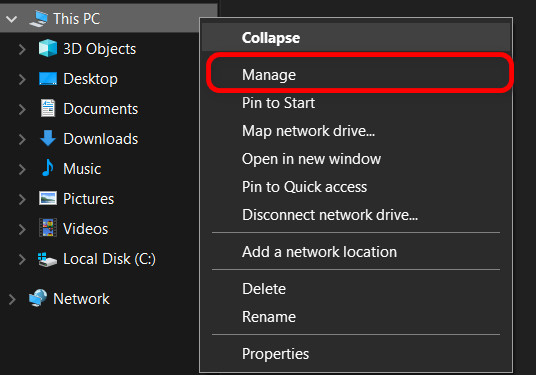
- Double-click on Storage > Disk Management. All your storage devices are listed at the bottom half of the screen.
- Look for any Offline If found, make it Online. Right-click on it and then choose Online.
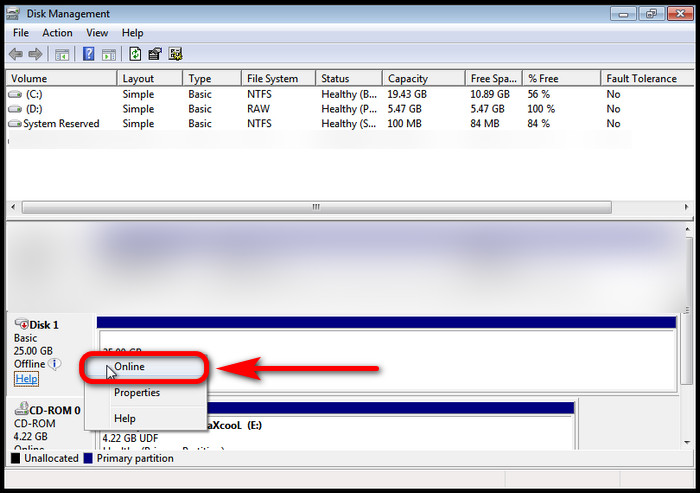
- Right-click on Unallocated storage if you install a brand-new hard drive. This will be marked with a black color top bar.
- Select New Simple Volume.
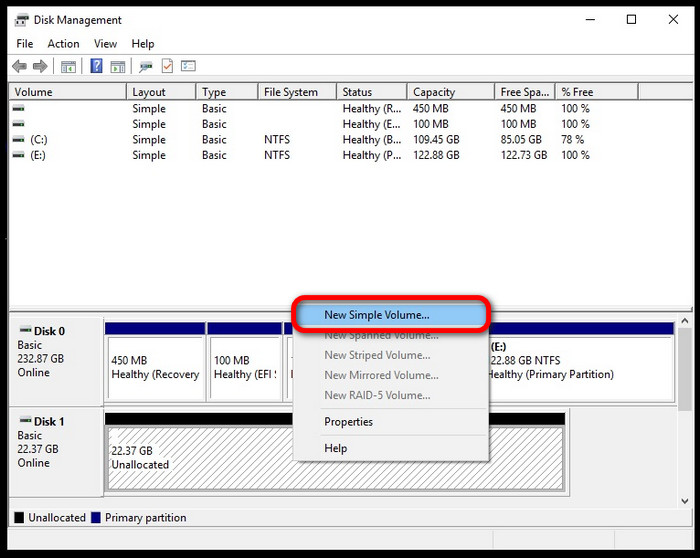
- Click on Next.
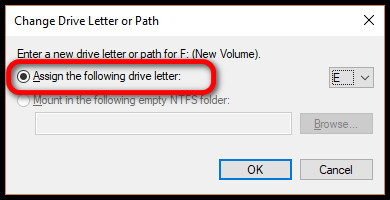
- Select Assign the following drive letter Make sure it does not duplicate any existing partition.
- Choose the format and select Perform a quick format.
A new partition will be created, and now it is visible from the file system. You can now access the drive as a regular partition and transfer data.
7. Assign or Change Drive Letter
Assigning or changing the drive to a valid letter often fixes a hard drive not recognized problem. To proceed further, make sure that the drive is online and formatted correctly.
Here are the steps to change the drive letter:
- Expand the search window by pressing Windows + S key on the keyboard.
- Write Create and format a disk partition in the box.
- Click on the search result. This will open the disk management window.
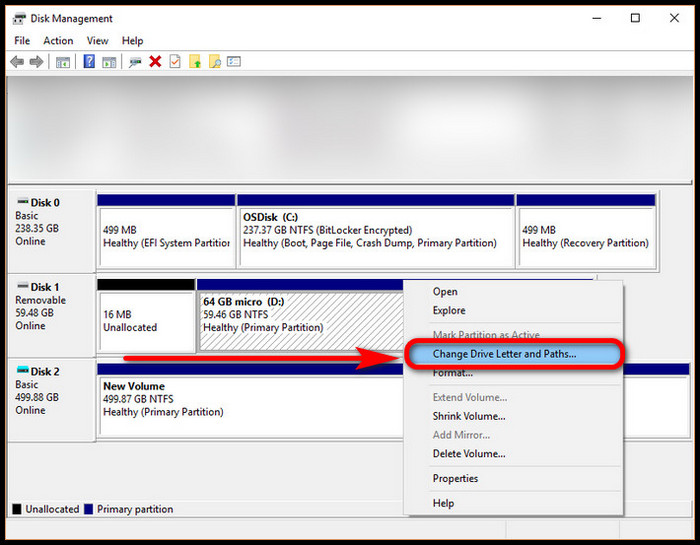
- Right-click on the drive partition you want to assign a letter. Find it at the bottom half.
- Choose Change drive letter and paths.
- Click on the Change button.
- Select letters from Assign the following drive letter option. Choose a unique letter.
- Click Ok.
- Click Yes when the prompt asks for a confirmation.
The disk drive has the path of the newly assigned letter. From the Windows file manager, you can now access the drive.
8. Fix Bad Sector
Bad sector detection and fixing processes can be overwhelming for a large number of users. Windows provides a tool called chkdsk for this purpose.
Here is a process of identifying and fixing bad sectors on the hard drive:
- Right-click on the Start icon from the taskbar. Found on the left bottom corner.
- Choose Windows PowerShell(Admin).
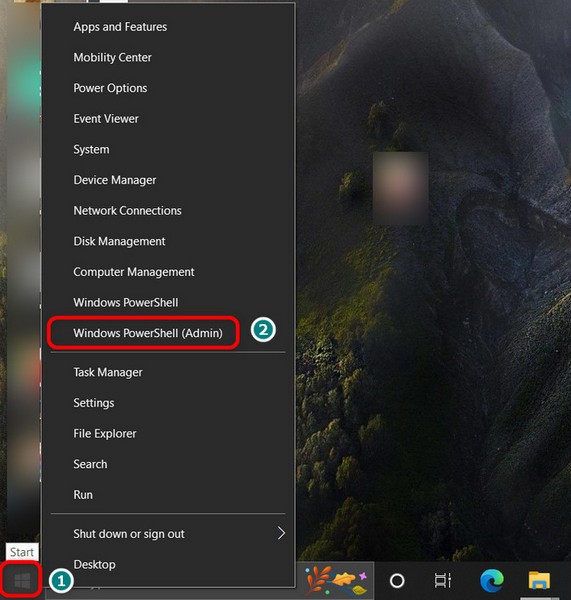
- Click Yes when User Account Control asks for permission.
- Type chkdsk drive letter (i.e /D): /x /r in the PowerShell terminal. Drive letter means the drive you want to scan. Assign it’s letter after chkdsk.
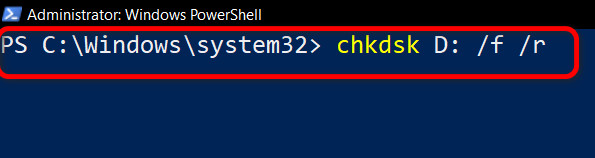
- Hit Enter on your keyboard. This will automatically scan for bad sectors, then find and repair the disk.
This process takes some time to complete. Be patient until the operation is finished.
9. Execute ‘Clean’ Command
Sometimes cleaning the disk from the command shell can help detect the hard drive.
Here are the steps to clean the disk from the command shell:
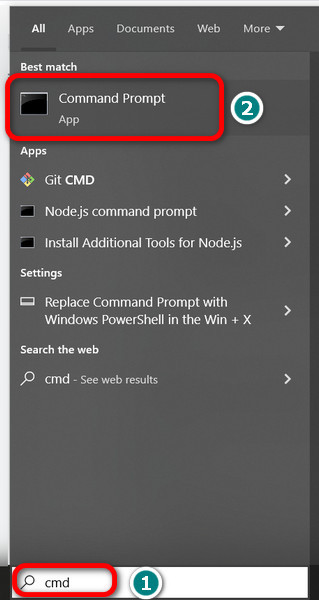
- Open up the Windows search bar (Windows key+S).
- Type cmd.
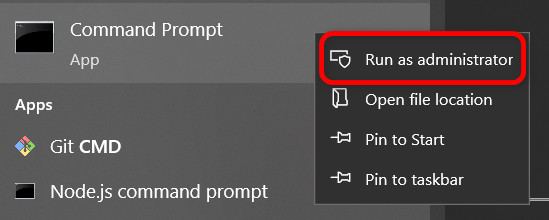
- Right-click on the command prompt and choose Run as administrator.
- Write diskpart and press Enter.
- Type list disk. You will see all the disk drives connected to your system. They start from the number 0. So keep track of the corresponding disk number.
- Type select disk X. Now the letter X refers to the disk number.
- Write clean all and press Enter. Wait for the process to complete.
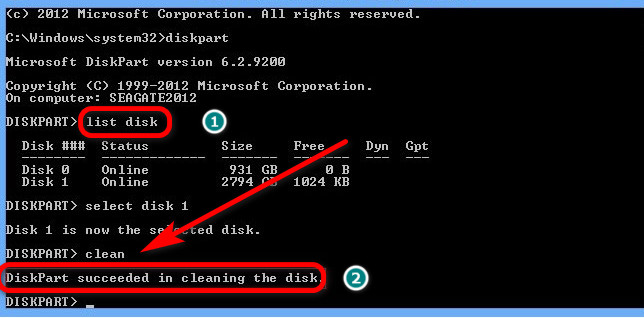
This will erase all data and partition from the disk. Now, go to Disk Management and re-initialize the disk.
10. Enable Drive in BIOS
Enabling the drive in the BIOS is reasonably straightforward. However, messing around with the wrong settings can brick the computer.
Attempt this solution only if your problem is not fixed after trying out the above-mentioned solutions.
Here is how you can enable a hard drive in the BIOS:
- Restart your PC.
- Keep pressing the BIOS button on your keyboard. This button may be different for each manufacturing brand. So read the manual carefully or search on google to know the BIOS key.
- After the boot-up, you will see the BIOS screen.
- Go to the Advanced tab. Typically hard drive-related settings are found here.
- Navigate to PCH Storage Configuration.
- Go to USB configuration.
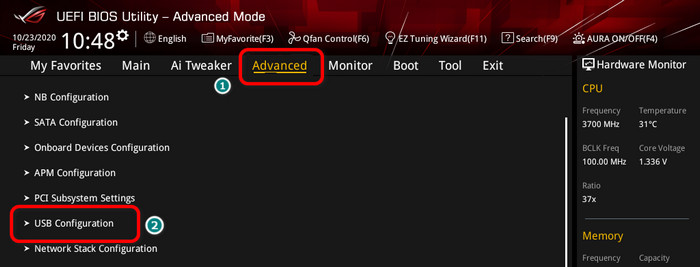
- Select your Hard Drive.
Restart the computer and try to access the drive from Disk Management. Your disk will now show up, and set it up to access it through file explorer.
Important Note: ASUS motherboard is used in the example. If your motherboard is from a different company, settings name may vary.
11. Replace Your Hard Drive
After trying out all the fixes, if the drive is still not recognized, there’s a good chance that the drive is having a hardware issue.
Fried logic board or IC, destruction of physical disk etc. can be the underlying issue. You can attempt to repair the disk, but replacing it would be much more sensible.
Usually, once a hard drive is repaired, the possibility of data loss climbs high. Therefore buying a new one is always a welcome addition.
Why is the Hard Drive Not Recognized on Mac?
A Hard drive is not recognized on Mac primarily because of the invalid disk format. MacOS does not support the NTFS file system. Drives that are previously used on Windows machine creates this issue. Apart from that, faulty cable, damaged disk, defective USB port etc. can also cause trouble.
Users frequently connect external hard drives to Mac for storing and transferring data.
A common scenario among the users often experience. The drive is connected properly, and the disk spinning is audible, yet macOS cannot recognize it.
Here is a method to fix a not recognized hard drive on Mac:
Format Disk Correctly
When connecting a new or NTFS formatted disk to the Mac, you must flash the disk to OS catalina/x/mojave extended / MS-DOS / ExFAT format.
Here’s how to format the disk:
- Search for disk utility from the search box.
- Click on Disk Utility, and a new window will open up. All of your disks are listed on the left panel.
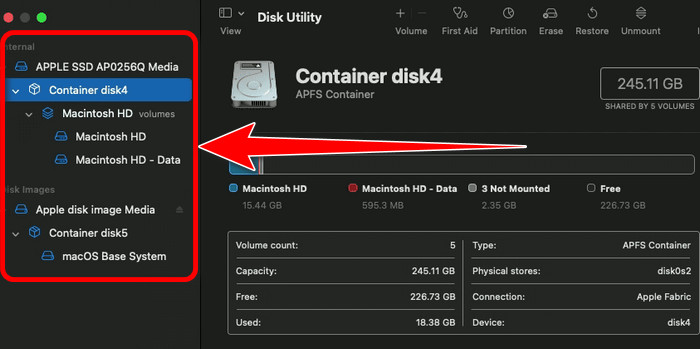
- Choose the disk and click on it to select.
- Click on Erase from the top bar.
- Give it a name and select a format from the dropdown.
- Click Erase.
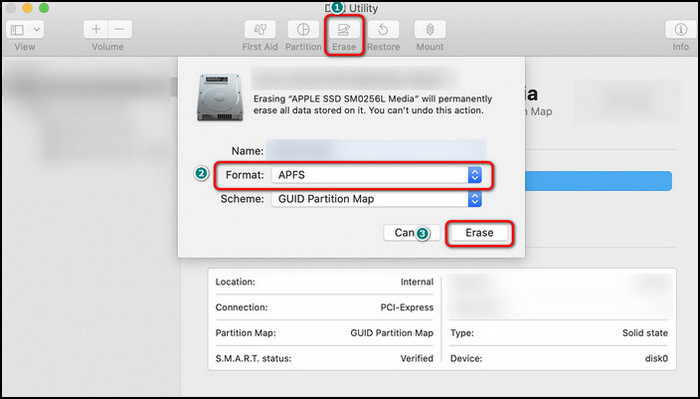
It will take some time to erase the disk. You can now access the disk from your Mac.
Why Does SATA Hard Drive Spin But Not Detected?
Usually, a defect in the SATA cable or the port on the motherboard causes the hard drive to spin, but the system can not detect the drive. A malfunctioning operating system, no initialization of the drive, damaged hardware etc., are some major reasons why your system cannot detect SATA hard drives.
SATA hard drive is connected to the motherboard with a SATA cable, and another cable comes from the PSU.
Data is transferred via the SATA cable, and the PSU cable delivers the necessary power to the hard drive to power on and spin the disk.
If your drive is spinning properly, that means it is connected to the power source correctly. But if the system cannot detect it, that means something wrong with the SATA connection. Either on the motherboard end or the drive itself.
FAQs
Why is my hard drive running but not showing up?
When a hard drive is not initialized or requires formatting, it may spin but won’t show up. Loose connection of the HDD to the motherboard via SATA cable, defective cable and port may also trigger this issue.
How do I fix a hard drive not recognized?
Step 1
Right-click on Start menu > Disk Management > Right-click Unallocated > New Simple Volume > Next > Assign the following drive letter > Format > Perform a quick format.
Step 2
Confirm a firm connection between the hard drive and the motherboard > Change SATA cables and try switching ports on the motherboard > Reconnect the drive > Restart your computer.
Final Words
For some people, the hard drive may be a backdated technology, but still, there is no feasible replacement for high-capacity storage drives.
An unidentified hard drive is scary for any user. All of the essential data for a user can vanish at a glance.
This article covers the ins and outs of why your hard drive is spinning but not recognized. I hope, in spite of being scared, you now know how to fix this terrifying issue.
Cheers!