Windows is a powerful and versatile OS, but sometimes it may cause frustration too. While running an app or installing one, the PC might crash suddenly. Even after rebooting the PC, the problem remains.
To get out of this critical system-related problem, you should boot into Safe Mode.
If you face issues with the driver or system apps, you can boot Windows to Safe Mode to sort out the problem. The primary purpose of Safe Mode is to allow you to troubleshoot Windows through the system diagnostic process.
If you are facing critical Windows system problems and don’t know how to boot into Safe Mode, read this article until the end.
So, let’s begin the journey to boot into Safe Mode without further delay.
Check out our separate post on download Boot camp drivers for Windows 11.
Why Boot into Safe Mode?
You must boot into Safe Mode to run the system without unnecessary drivers and softwares. Boot to Safe Mode to run the system with Standard VGA graphics mode instead of the normal graphics driver. Moreover, the primary purpose of booting into Safe mode is troubleshooting a system that has crashed.
Sometimes the system fails to boot correctly or experiences instability after installing the driver, updating Windows, or installing a new app. You can troubleshoot these problems quickly from Safe Mode. So, Safe Mode is the ultimate troubleshooter for Windows OS.
Safe Mode boots the system into an exceptional mode where the OS loads only a few components and disables unwanted drivers, softwares, etc. When running a system with minimal apps and drivers, it will be easy to troubleshoot the main system error.
If you are running Windows 11, you may find many issues because it’s a new OS. So, you face critical bugs and system errors while working on Windows 11. Perhaps, you need to load into Safe Mode to fix hardware issues or to sort out startup, performance, malware, or network-related problems in the PC.
There are multiple ways to boot into Safe Mode from Windows 11. So, read the below section to know all of the methods.
Here is the easiest guide to fix drag and drop not working on Windows 11.
How to Boot into Safe Mode in Windows 11
You can boot into Safe Mode in your Windows 11 using Settings or the sign-in screen and Start menu. Sign-in to the Safe Mode is also possible through system configuration settings or using some command lines in CMD. The tricky part is you can use the power button too.
I have already cleared the primary purpose to boot into Safe Mode. In Safe Mode, you won’t face any errors as in the normal mode in Windows 11. Experts worldwide suggest troubleshooting system errors or crashes by booting into Safe Mode.
So, without any delay, let’s jump into the methods by which you can log in to Safe Mode from your Windows 11 OS for fixing issues or other purposes.
Here are the methods to start Windows 11 in Safe Mode:
1. Boot from Settings
In Windows 11, you can boot to Safe Mode by going to Windows Settings. The steps are quite easy to follow.
Here are the steps to boot into Safe Mode from Settings in Windows 11:
- Press Windows Key + I to launch the Windows Settings app.
- Go to System > Recovery.
- Find the Advanced startup option and click on the Restart now button.
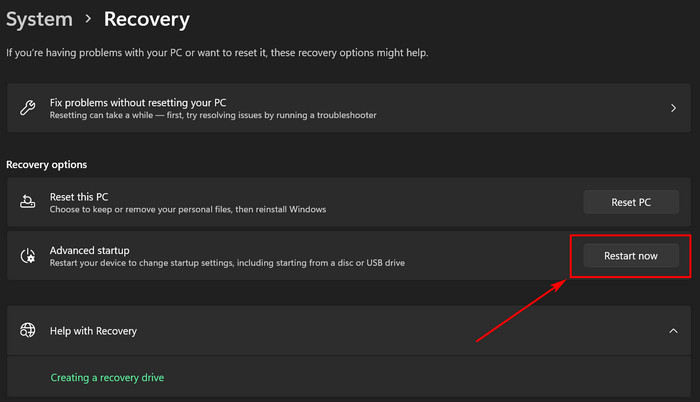
- Click on Restart now again from the popup Window.
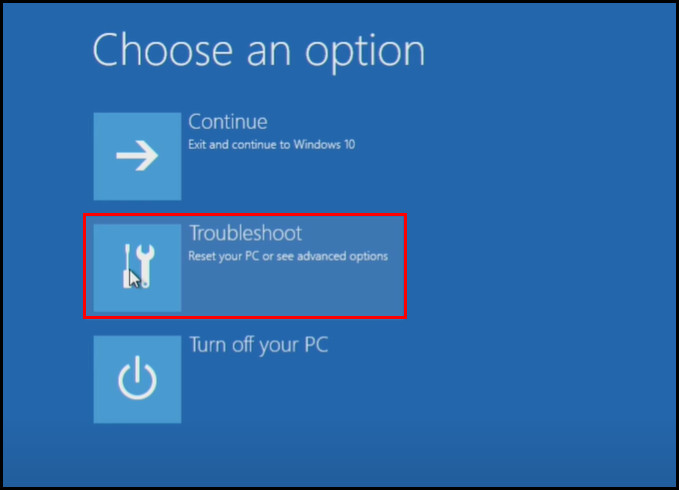
- Click on Troubleshoot from Choose an option window.
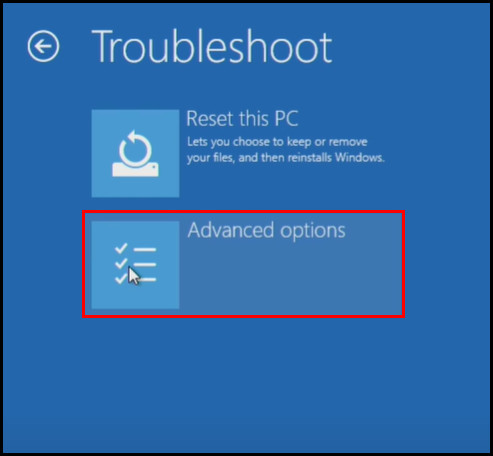
- Click on Advanced Options > Startup Settings.
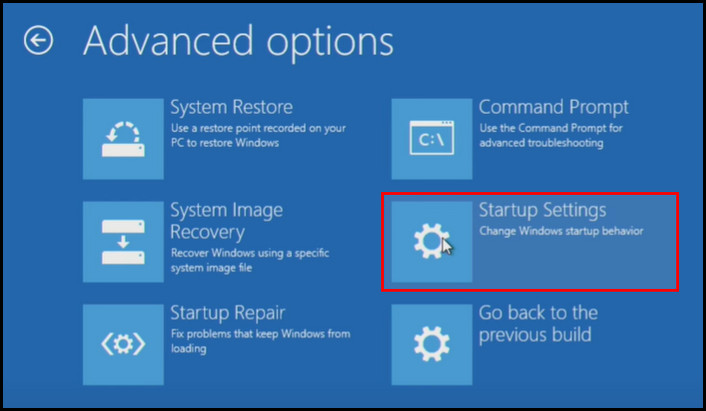
- Click on the Restart button.
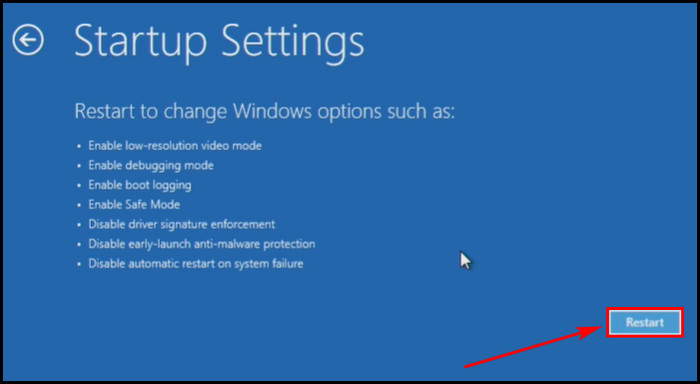
- Press F4 to boot into Safe Mode.
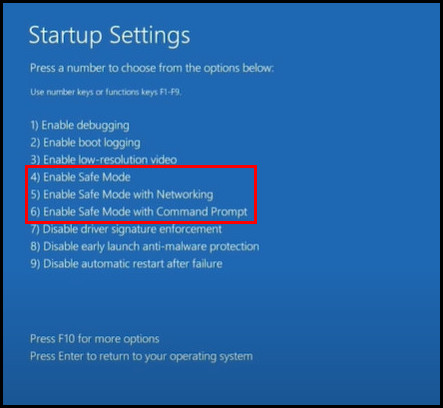
You can press F5 to Enable Safe Mode with Networking or F6 to Enable Safe Mode with Command Prompt.
Also read how to update drivers on Windows 11.
2. Safe Boot from Sign-in Screen
You can boot directly into Safe Mode if you cannot open Windows Settings. First, you must restart the system and then follow the below steps.
Here are the steps to boot into Safe Mode from the sign-in screen:
- Hold the Shift key and click on the Power > Restart option.
- Go to Troubleshoot > Advanced Options > Startup Settings from Choose an option screen after the restart.


- Select the Restart button.

- Press the F4 key from the keyboard to Enable Safe Mode.
Moreover, you can also boot into Safe Mode with Networking or Safe Mode with Command Prompt by pressing the F5 or F6 key. 
Follow our guide to fix blue screen on Windows 11.
3. Boot into Safe Mode from a Black or Blank Screen
Booting into Safe Mode while on a black or blank screen is possible through the power button. This method is also called boot into Safe Mode with the power button. If you are on a black screen, you must go to the Windows Recovery Environment (WinRE) first.
Then you can go to Safe Mode for troubleshooting purposes. So, let’s jump into the steps.
Here are the steps to boot into Safe Mode from a blank screen using the power button:
- Hold the power button for 10 seconds to turn off the PC.
- Press the power button again to turn on the system.
- Hold the power button for 10 seconds when the PC starts and show the manufacturer’s logo.
- Press the power button to turn the device again.
- Allow the device to restart into the Automatic Repair process.
- Select Advanced Options to enter Windows Recovery Environment.
Once in the WinRE, navigate to Troubleshoot > Advanced Options > Startup Settings. Then click on the Restart button. Press F4 to boot in Safe Mode. Also, press F5 or F6 according to your requirement to boot into Safe Mode. 
4. Safe Boot from the Start Menu
If you can log in to the system and still face the crashing issue, you can always start Windows 11 in Safe Mode from the Start menu.
Here are the steps to boot into Safe Mode from the start menu:
- Press the Windows logo key.
- Click on the Power icon.
- Press and hold the Shift key and click on the Restart button.

After that, the PC will restart and take you to the Choose an option screen. Then follow the below steps.
- Go to Troubleshoot > Advanced Options > Startup Settings option.

- Click the Restart button to reboot the PC.
- Press the F4 button to Enable Safe Mode after the restart from the Startup Settings Window.

Other options include Enable Safe Mode with Networking and Enable Safe Mode with Command Prompt. But you have to press F5 and F6 for that.
Also, check out our separate post on how to fix PC won’t go to sleep in Windows 11.
5. Boot into Safe Mode from System Configuration
There is a configuration system settings in Windows 11 called System Configuration. You can also boot into Safe Mode from there.
Here are the steps to boot into Safe Mode from System Configuration:
- Press the Windows logo key and click on the Search box.
- Type msconfig in the box and hit Enter.
- Click on the System Configuration app from the search result.
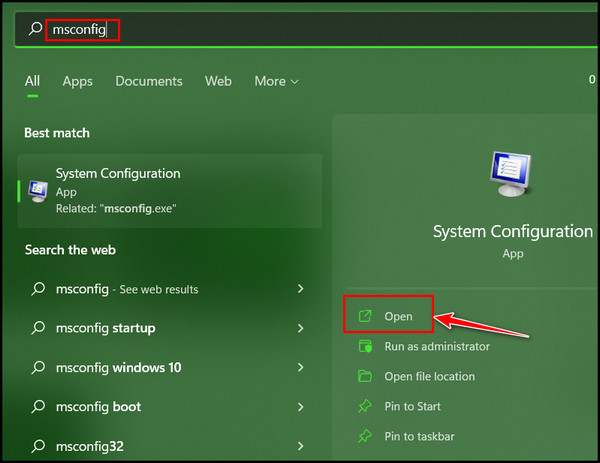
- Click on the Boot tab.
- Check the Safe boot option under the Boot options section.
- Click on the radio button for Network to Enable Safe boot with Networking.
- Hit Apply > OK button.
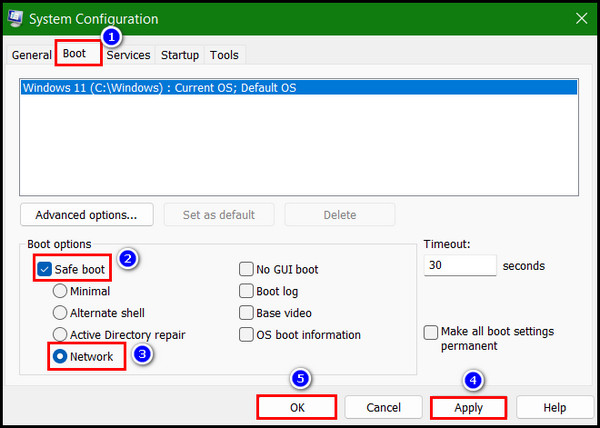
- Restart the PC after that.
After the restart, the PC will boot into Safe Mode.
Note: Please ensure to untick the box for Safe boot after troubleshooting, or else the PC will always start in Safe Mode.
But before that, go through our epic guide on adjust page file in Windows 10.
6. Boot into Safe Mode Using CMD
Using the CMD is the last thing you can go for to enable the Safe boot from Windows 11. All you have to do is to run command lines in the command prompt to boot into Safe Mode. Just follow the steps beneath.
Here are the steps to boot into Safe Mode using CMD:
- Press the Win key and click on the Search box.
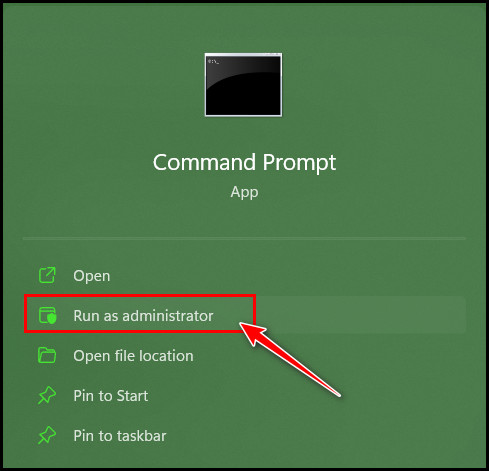
- Type CMD and click on the Run as administrator option.
- Click on the Yes button from the prompted Window by UAC for permission.
- Type the following command lines and hit the Enter key after every line:
- Bcdedit /set {bootmgr} displaybootmenu yes (To enable boot manager at startup)
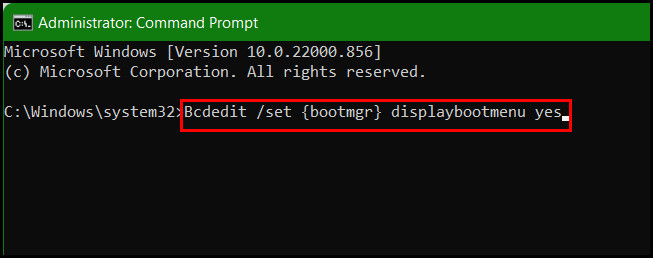
- shutdown /r /t 0 (to restart the computer)
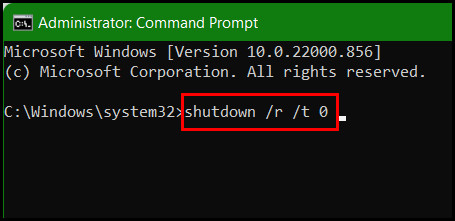
- Bcdedit /set {bootmgr} displaybootmenu yes (To enable boot manager at startup)
- Press the F8 key to go to the Startup Settings menu after the restart.
After that, press the F4 key to Enable Safe Mode and F5 to Enable Safe Mode with Networking. Also, press the F6 key if you need to Enable Safe Mode with Command Prompt. 
Note: To undo the boot into the Safe Mode process through CMD, type bcdedit /set {bootmgr} displaybootmenu no command and hit the Enter key.
I hope you get all the methods quickly to get into Safe Mode in Windows 11.
Check out the easiest way to install active directory users & computers on Windows 11.
FAQs
Which key to press while clicking on the Restart button for Safe Mode?
You’ll need to press the Shift key while clicking on the Restart button to boot into Safe Mode in Windows.
What does Safe Mode do?
Safe Mode helps you to find problems and troubleshoot them by disabling the unnecessary apps and drivers in the OS. It helps to sort out sudden crash-related issues in OS and fix critical system problems. You can also fix driver issues and unresponsive apps related problems.
Which function key do I need to press to Enable Safe Mode with Networking?
You must press the F5 key to boot into Safe Mode with networking capability. You won’t get the networking feature if you only press F4 or Enable Safe Mode.
Wrapping Up
Safe Mode is the perfect option to troubleshoot any Windows-related issue. Moreover, you can entirely rely on Safe Mode to fix crashes or unresponsive app issues.
In this article, I have shown several methods to boot into Safe Mode from Windows 11. Using the CMD, Power button, or Start menu can get you to Safe Mode within a moment.
I hope you read till the end and learn all the methods. If you are in trouble while booting into Safe Mode, let me know in the comment box.
See you in the next article. Boot Safely!