Are you someone who went on to update the BIOS of their ASRock motherboard but found out that your computer cannot detect the updated BIOS that you are trying to load?
If so, you have come to the right place for the solution to your problem. In this article, I will discuss why your ASRock motherboard might not detect the update files and its solutions.
So, let’s get started!
What is BIOS, and why does it need updating?
BIOS and its usage:
The basic input/output system (BIOS) is the boot firmware used by the CPU to initialize the operating system when a computer is turned on. It coordinates the transfer of information between the operating system (OS) and the computer’s many hardware components.
The BIOS primarily bridges the gap between operating systems and hardware. It is a go-between for the central processing unit (CPU) and the various input/output (I/O) devices.
However, in some instances, the BIOS can set up a direct data path to the RAM from devices like the video card or other external peripheral devices.
Why you need to install BIOS updates:
Regularly updating your computer’s BIOS is very important for enabling new features and improved security. Here are some reasons why you should update your BIOS:
Hardware Update
For the motherboard to properly recognize updated components like processors, RAM, and so on, it requires a newer version of its BIOS. A BIOS flash may be the solution if the system does not recognize your new processor.
Security Update
The most recent BIOS revisions include security patches that make your system more resistant to tampering and train your system to detect boot sector malware (if your motherboard supports boot sector scanning).
Enhanced reliability
As problems are discovered with motherboards, updates to the motherboard’s BIOS will be released to repair them. This can have an effect on how quickly information is processed and transferred.
Why ASRock BIOS fails to detect an updated file?
There are several reasons for which your ASRock motherboard may fail to detect the updated BIOS files. For example, if you are using an incorrect USB drive format to upgrade the BIOS, your ASRock motherboard won’t be able to read the files.
Moreover, if your Unified Extensible Firmware Interface (UEFI) configuration is incorrect, your motherboard will be unable to select the correct image file. Not unzipping the update files could also cause this issue to occur.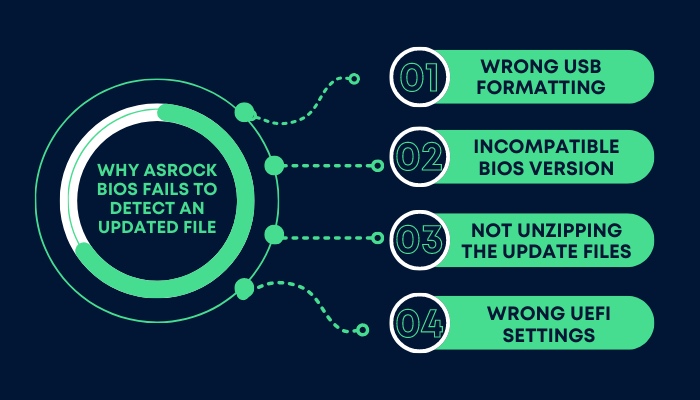
Wrong USB formatting
The official ASRock BIOS Upgrade Instruction page says, “Save the BIOS files on a FAT32 formatted USB disk”. Hence using the wrong formatting on your USB drive, which stores the BIOS upgrade files, will not work as intended.
Incompatible BIOS version
Failing to detect BIOS updates can also occur if the incorrect BIOS update file is used. When updating the BIOS, it will be unable to pick the correct image file if you haven’t specifically downloaded the exact BIOS for your motherboard. As a result, the image file you used would be incompatible with the new BIOS.
For example, if you’re trying to update your ASRock AB350M pro motherboard with the BIOS for the ASRock AB350 Pro, your motherboard would fail to detect the image file of the BIOS upgrade, as it is incompatible with your motherboard.
Therefore, the incorrect updated BIOS version won’t trigger your motherboard’s image detection system.
Not unzipping the update files
BIOS update files might not be recognized in ASRock motherboards if you do not unzip the update files, as the BIOS cannot read the zipped file in its default configuration.
Wrong UEFI settings
Your BIOS update won’t be able to choose the appropriate image files if the setting for your Unified Extensible Firmware Interface (UEFI) is incorrect.
How to fix the updated image file detection problem on ASRock motherboards?
To fix the BIOS update file not detected issue in ASRock motherboards, first, we should look at how the official ASRock BIOS Upgrade instructions. Then you could understand whether you are doing anything differently from the standard methods.
Here are some common fixes that you can utilize if your ASRock motherboard is not recognizing BIOS update files:
1. Format your USB flash drive correctly
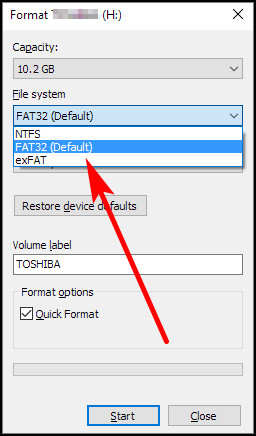
The ASRock BIOS updating process requires a flash drive formatted in FAT32 rather than NTFS. If the flash drive is not formatted appropriately, the BIOS would not be able to detect the update file from the drive.
Usually, most flash drives are formatted with NTFS by default. Hence, you should always format your USB drive in FAT32 before downloading the updated BIOS.
Here is how to format your flash drive in the FAT 32 format:
- Press Win + E to go to This PC.
- Navigate to the USB flash drive > Right-click on it.
- Click on Format from the popup menu.
- Select FAT32 from the dropdown list.
- Press Start.
After the process ends, your flash drive will be formatted into FAT32 format. After that, download the BIOS update file into the flash drive.
2. Download a compatible BIOS update file
Download the appropriate update file for your BIOS. Make sure you get the latest version. When it comes to updating your BIOS, this is a crucial step because selecting the incorrect version of the BIOS could cause damage to your system.
When downloading the BIOS updates, most users make certain mistakes since the model numbers of the motherboards are fairly comparable.
For example, Motherboards with names like AB340 and AB340M have very similar names, but their updated BIOS versions are entirely distinct.
When selecting updates for the BIOS, you need to exercise extreme caution. It is highly recommended that you get the update’s specific version corresponding to your motherboard version.
Here are the steps for downloading ASRock BIOS update:
- Visit the webpage belonging to ASRock.
- Navigate to the products area.
- Choose the specific motherboard you have from the left side of the screen.
- Once you have picked it, you must navigate to the BIOS option. A comprehensive list of available versions will be displayed on your screen.
- Pick the exact version of your motherboard from the drop-down menu.
- Click on Download.
After downloading the file, unzip it, and move it into a USB flash drive formatted in FAT32 format. Then follow the instructions given on the ASRock official BIOS update guideline.
3. Unzip the downloaded BIOS image file
Not unzipping the downloaded update file is a simple mistake, but unfortunately, this oversight will prevent your BIOS from properly updating itself.
When you download the file, it will be compressed using the .zip format. Before you put the file on the flash drive that the BIOS is using, you need to unzip it first. Otherwise, your ASRock motherboard’s current BIOS would be unable to detect and execute the updated BIOS files.
Here is how to unzip the downloaded updates on your computer:
- Pick the file you want to unzip > Right-click on it.
- Select the Extract option from the drop-down menu.
- Determine the folder location where the extracted files will be stored.
- Hit the Start button.
The file that you downloaded will be decompressed at the location that you selected while unzipping this file. Then, move all the update files to a flash drive to use for updating your BIOS.
How to update BIOS on ASRock motherboards?
There are two methods of updating ASRock BIOS using instant flash. Here we will only talk about updating the BIOS from a USB device on which the updated image file has been downloaded.
Follow these instructions to update your ASRock BIOS:
- Extract the .zip file after downloading the upgrade file from the ASRock website.
- Save the unzipped BIOS files on a FAT32 formatted USB disk.
- Restart your computer > Press F2 while the computer is booting to access the BIOS.
- Select Flash utility located under the Tool menu.
- Choose the suitable BIOS version > Click Yes to flash the BIOS.
- Click OK to reboot the system once you see the message saying Programming success > Press Enter to reboot the system.
- Press the F2 key to reaccess the BIOS configuration menu after the computer has restarted.
- Choose Load Default Settings > Press Enter from the Exit menu.
- Select Exit Saving Changes > Hit Enter to exit the BIOS setup program.
Your system will now load using the updated BIOS.
FAQs
Q1. What software can I use to update the BIOS of ASRock motherboards?
When updating the BIOS on an ASRock motherboard, you must utilize ASRock’s Flash utility program. Using other, non-certified BIOS flashing tools can damage the motherboard.
DO NOT switch off your system if you face problems while updating the new BIOS. A faulty BIOS could prevent your system from starting up, causing you to lose all of your data.
Q2. How do I find my ASRock BIOS version?
You may determine the BIOS version of your motherboard using the F2 key during the boot process to access the BIOS setup utility and then check the BIOS version from the program’s Main menu. Larger numbers indicate a more recent version of the BIOS file.
Conclusion
A computer’s boot firmware, when getting powered on, is known as the BIOS. Regularly updating your computer’s BIOS is crucial if you want to enable new features and improve your system’s security.
It is usual for the Asrock BIOS update process to fail because the image file wasn’t recognized. Several potential causes include an incompatible BIOS version, a poorly formatted USB, etc.
In this post, I have outlined the reasons for this condition and provided complete solutions for fixing this issue. I hope that by reading this post, you’ll have a clearer picture of the problem and how to fix it so that your Asrock motherboard BIOS update goes smoothly.