Whether it’s your login screen or BIOS, setting up a password is always a good idea, as you never know who might be snooping around your devices. On the flip side, forgetting passwords is a dilemma that we’re all very familiar with.
And when it comes to BIOS screens, we don’t get the option to click on Forgot Password like we do on Facebook or Windows login. Creating or deleting a BIOS password requires a different approach for obvious reasons, which I’m going to discuss in this article.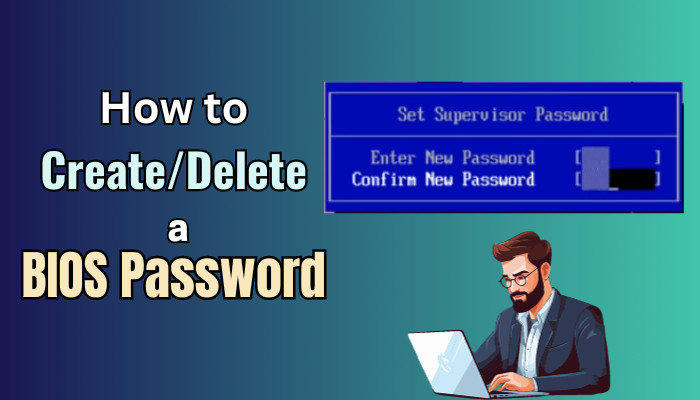
So, without wasting any more time, let’s get started.
How to Create a BIOS Password on Any Computer/Laptop
It goes without saying that different motherboards and laptops have different UI and options in their BIOS screen. Hence, it’s impossible to come up with instructions that will fully match with all BIOS.
Furthermore, you might have a legacy or UEFI BIOS with fewer or more options, depending on how old or new your device/motherboard is. Nonetheless, this write-up should give you a general idea of what the subsequent options might look like in your computer’s BIOS.
Follow these steps to create a BIOS password on laptop/PC:
Step 1: Disable Fast Startup
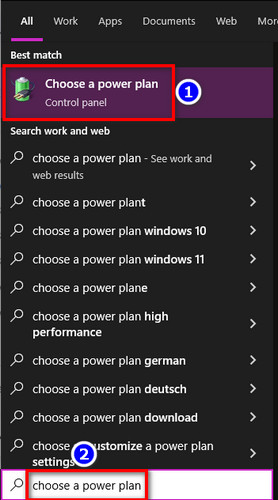
- Search for Choose a power plan from the Windows search bar and select it.
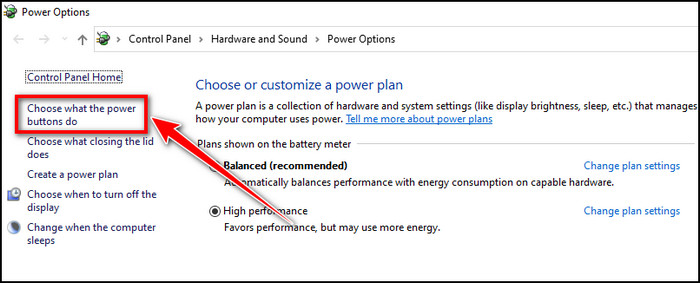
- Click on Choose what the power buttons do from the left-side corner.
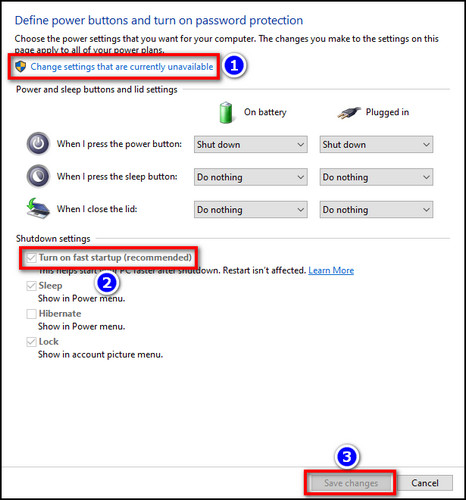
- Select Change settings that are currently unavailable.
- Uncheck the box for Turn on fast startup(recommended) and hit Save changes.
Step 2: Enter the BIOS
- Completely shut down your PC/laptop.
- Press the power button and start spamming the BIOS key until you see the BIOS screen. Although different motherboards have different BIOS keys, the most common one is F1, F2, F10, F12, Esc, or Delete.
Note: To definitively know what your computer’s BIOS button might be, search on Google for the BIOS button based on your laptop/computer’s motherboard manufacturer. For example, if you have a Dell laptop, search for “Dell laptop bios key”.
Step 3: Add a Password
- Go to the Security tab and select the Admin Password or Set Supervisor Password option.
- Type your password in the Enter new password field and re-type it in the Confirm new password section.
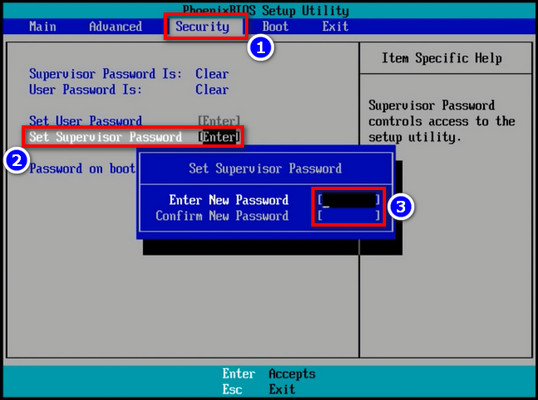
- Press F10 to save the changes and exit the BIOS screen.
- Click Yes if you get a prompt.
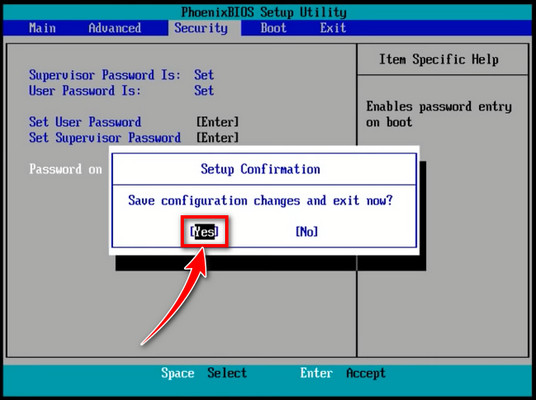
Done! Some BIOS might offer an option to require password on boot option, which would ask the users to enter the BIOS password every time they boot up the computer. But by default, the BIOS password is not required to boot up/log in to your Windows OS.
If your PC won’t boot to BIOS, refer to the embedded article.
How to Remove a BIOS Password
Similar to every other system where you can change the password, you need to input the old password first. Recovering the BIOS password is simply not possible, hence, remembering the existing password to remove or change it is crucial. That being said:
Here are the steps to delete a BIOS password on a laptop/PC:
- Disable fast startup from the Control Panel and turn off your computer.
- Press the power button and start spamming the BIOS button until you get into the BIOS screen.
Note: Some devices might briefly show the BIOS key on the bootup screen, like F2 or F10. Search the web to know what your laptop’s/motherboard’s BIOS button is.
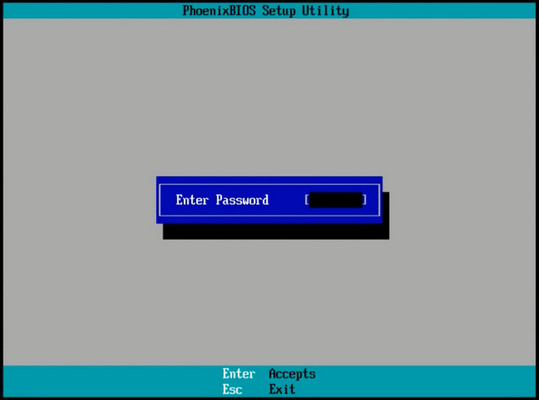
- Input the existing password to enter the BIOS.
- Select the Security tab and click on Set Supervisor Password or Admin Password.
- Type the old password in its designated box and keep the Enter new password & Confirm new password fields empty/blank.
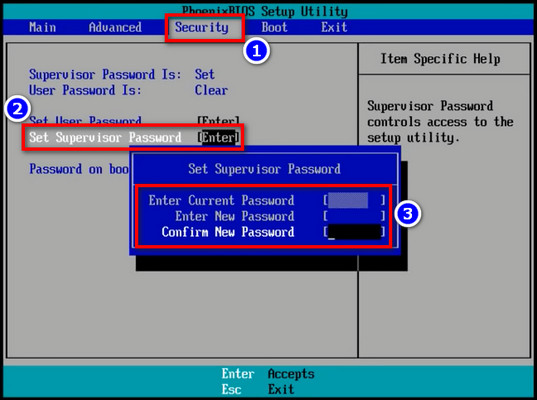
- Press F10 to save the changes and exit the BIOS.

Voila! Now, you can enter your computer’s BIOS without having to insert a password. Bear in mind, deleting the admin/supervisor password can delete the system/user password on some devices.
How to Reset a Forgotten BIOS Password
There’s no shame in forgetting the BIOS password, it happens to the best of us. I mean, how many times do you need to enter the UEFI setup? May be once or twice a year for most users.
Anyway, if you don’t remember the admin/supervisor password, there’s no way to recover or change/delete it from the BIOS anymore. In such cases, you’ll need to rely on a few workarounds to get the job done.
On a similar note, check out how to boot into BIOS without restarting.
Now, different devices have drastically different motherboards. So, these workarounds may not work for all, or you might need to add or subtract one or two steps from these methods. With that in mind, let’s see how to remove the BIOS password if you’ve forgotten it:
1. Reset CMOS Settings Using Command Prompt
If you are able to get into the Windows OS system, you can use the CMD prompt to clear the BIOS password without having to enter the BIOS in the first place. Here’s how:
- Reboot your PC into MS-DOS mode from the boot menu.
- Search for Command Prompt in the Windows search box and right-click on it.
- Select Run as administrator.
- Type the following commands one by one and hit Enter:
debug
070 2E
071 FF
quit- Exit the command prompt window after you’ve executed all those commands successfully.
That’s it. Now, restart your computer and it will reset the CMOS settings without any issues.
2. Bypass the BIOS Password from Motherboard
Most motherboards nowadays have a jumper block or button to clear the CMOS NVRAM and reset the BIOS settings on Windows. So, if you’re wondering what to do if you forget BIOS password, this is one of the best options.
It is usually located beneath the keyboard for laptop motherboards and next to the CMOS battery for desktop motherboards. Furthermore, it can be labeled as CLR_CMOS, PSWD, CLRPWD, etc.
Once you’ve opened up your device and located this password reset jumper, remove the jumper plug from the pin and reassemble your PC. Now, turn on your computer and check if the password has been cleared. If so, plug in the password jumper pin and restart your device.
For laptops, this pin is most likely a DIP switch. So, all you have to do is flip it on or off. On the other hand, the CLR_CMOS for server racks is mostly a button that you need to press & hold for a few seconds to reset the BIOS.
Although it’s highly unlikely, some users might notice a BIOS password even though they’ve never set one on their PC. This can happen if you’re using your company’s device or bought a pre-owned laptop.
To clear an unknown BIOS or CMOS password, you can follow either one of the above-listed methods or seek help from the manufacturers.
Now, you might see some instructions on the internet to remove the CMOS battery to remove/clear CMOS password on laptops/PCs. Unfortunately, it doesn’t work. It will just reset the BIOS clock, it doesn’t delete the admin password or reset the settings.
Speaking of resetting the clock, check out how to change the date and time in BIOS.
Final Statement
For the latest Dell, Lenovo, or Asus ROG laptop users, removing or adding a BIOS password is super easy as these devices have the latest UEFI BIOS utility. The same goes for desktop users as well with the latest motherboards. But that doesn’t mean old device users will be left out.
Following this write-up should give you a broader idea of creating or removing CMOS password on Windows 10 desktop setups.
For further assistance on other PC-related issues, check out our website. Have a good day!