Although Sharepoint is a great way for corporate collaboration, some technical issues are bound to arise. Today we’re going to discuss such an error.
Some users had reported that when they tried to download a shared Word document and view it on their desktop app, it wasn’t showing the whole document.
If an issue like this has occurred on your end, go through this article, as I’ve mentioned the most precise solutions to resolve half-loaded Word document issues.
Before we start our troubleshooting method, first, let’s properly understand the issue on hand. Suppose you’ve downloaded a Word document that has been shared by your organization on a Sharepoint server.
In a few instances, the said document may not show all of its contents/pages after downloading and opening it on the Word app. But when you view the document from your browser, all the pages are accounted for. Strange right?
You might also think that the browser isn’t downloading the full file. Well, not really. There are a few reasons why such an issue might occur. Below, I’ve mentioned pretty much all the probable causes for Word documents not showing all the contents, along with their proper solutions.
Here are the steps to fix Sharepoint not showing the whole Word document issue:
1. Change File Extension to .docx
In the majority of cases, Word doesn’t show all pages of a shared document due to document format. Meaning, if the Sharepoint document is in .doc format, it might have compatibility issues with your MS Word app.
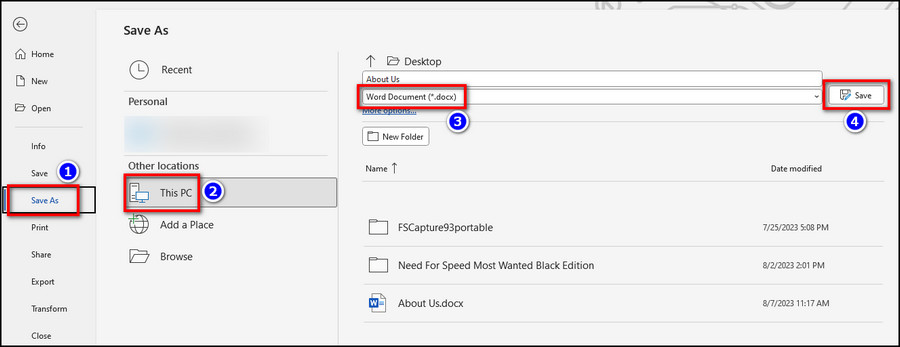
As a result, some content, like graphs and images, might not show up even though they are available in the file or in the online version. The easiest way to resolve this problem is to save the document in .docx format instead of .doc using Microsoft Word. Here’s how:
- Open the saved Word document with the MS Word app.
- Select File > Save As > This PC.
- Click on the drop-down menu for file format located below the file name.
- Select Word Document(*.docx) and hit Save.

- Close the Word app and open the document again to see if it shows all the pages.
This method works for both Windows and Mac devices, and it’s most useful when the Word document isn’t rendering correctly on Sharepoint. You can also try renaming the doc file from File Explorer to change the extension from .doc to .docx.
If it still doesn’t show all the contents, contact the owner of the doc file and tell them to save the document in .docx format and upload it again on Sharepoint.
Related article: how to fix docx files not showing Word icon.
2. Update Microsoft Word
Another probable reason for half-loaded documents is version incompatibility. If you open a doc file on your outdated Word app, it might not render the document properly, especially if the document was created/edited using the latest version of Microsoft Office.
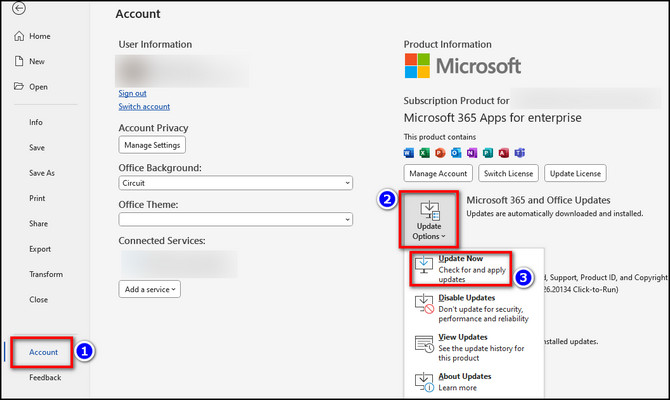
The only way to fix this issue is to update the MS Word app on your device. To do that:
- Launch Microsoft Word on your PC.
- Select Account from the left side pane.
- Click on Update Options > Update Now.

After the updating process is complete, open the problematic Word document again to see if the issue persists. If it does, move on to the next method.
3. Remove Markup Info
Although it’s quite rare, sometimes using the Track Changes feature can cause issues with document formatting due to the stored markup info.
This is what happened in my case. And after removing all the markup info from the original doc file, I could see all the pages of the document.
Follow these steps to remove markup info from a Sharepoint Word document:
- Open the doc file using the latest version of the MS Word app on your device.
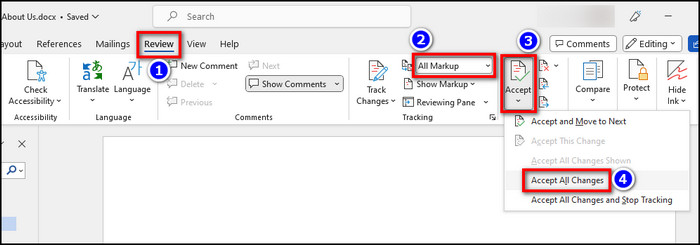
- Click on the Review tab from the top ribbon.
- Select All Markup from the Track Changes section of the navigation bar.
- Click on the drop-down menu for Accept or Reject.
- Select Accept All Changes or Reject All Changes based on your preference.

- Save the file as .docx using the first method shown in this article.
Done! Now open the document again and see if you can view all of the pages and contents of it.
4. Copy and Paste to Another File
Last but not least, the good old copy-pasting technique. If you can correctly view the document in Word Online when you open it directly from Sharepoint, you can copy-paste the entire document to a blank Word document on your device.
To do that, go to your Sharepoint account and find the document from My Content. Click on the shared document to open it in Word Online. Press Ctrl+A to select the whole document, and press Ctrl+C to copy it.
After that, launch the Microsoft Word app on your device and select a blank page. Press Ctrl+V to paste all the content of the shared document into this new file. Now you should be able to view all the pages and contents of the original Sharepoint document.
Frequently Asked Questions
How to upload Word documents in Sharepoint?
If you want to upload Word documents to your Sharepoint account, go to Sharepoint from your browser and select My Content from the left side pane. Then scroll down and select Upload from the Locations section of the left-side ribbon.
Why are some headings not showing up in a shared Word file?
Some headings might not show up properly for a shared Word document if that file has been created/edited via a much older Microsoft Word app (like MS Word 2007). Version compatibility is a big deal when it comes to document formatting.
What to do when a Word document isn’t rendering correctly on Sharepoint?
In case a Word document isn’t rendering correctly on Sharepoint, make sure to save the Word document in DOCX format instead of DOC before you upload it to Sharepoint. If you’re not the author, ask the original owner of the doc file to change the format and upload it again.
Wrapping Up
That’s about it. Hopefully, this write-up has enabled you to correctly view all the pages of a shared document without any issues.
Feel free to share your thoughts in the comment section if you need further assistance.
Have a good one!