Windows 11 comes integrated with a low-power profile that you can set on your computer.
This is useful when you do not want to shut down your computer and lose access to the opened documents. When you resume working, all your files are present in the same state as before.
Wondering how to turn on hibernation? Follow along as I explain the methods you can use to both enable and disable this power-sipping state on Windows 11.
So, let’s start.
Also read how to update drivers on Windows 11.
How to Enable/Disable Hibernate on Windows 11
By default, Microsoft does not provide hibernation with the stock install of Windows. Click on the power button on the Start Menu, and you will find Shut down, Restart and Sleep. But how do we bring back this option?
To enable it, you need to go to the power settings present in the Control Panel and enable it from there.
But you are not limited to a single solution for enabling Hibernation. You can also achieve the same result by changing some registry entries.
There is also an option to switch the hibernation state by using commands that give the same output if you like to dabble using the command prompt.
With every possible means to bring back hibernation out of our way, let’s start with the easiest method first.
Here are the methods to enable or disable Hibernate on Windows 11:
1. From the Control Panel
Your desktop computer may not have a hibernation option available. This feature is better suited for laptops and portable devices. For desktop users, sleep mode is a better option.
Here are the steps to enable Hibernation using Control Panel:
- Click on the Start Menu and search for Control Panel to open it.
- Search for Power in the search bar.
- Go to Power Options and click on Choose what the power button does.
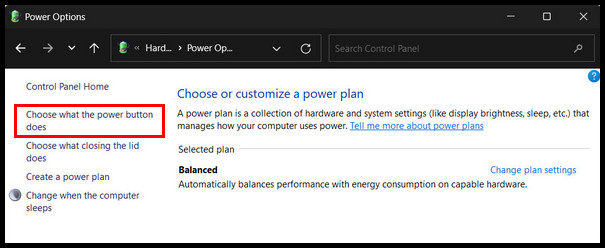
- Press on Change settings that are unavailable.
- Tick the box next to Hibernate and click Save changes.
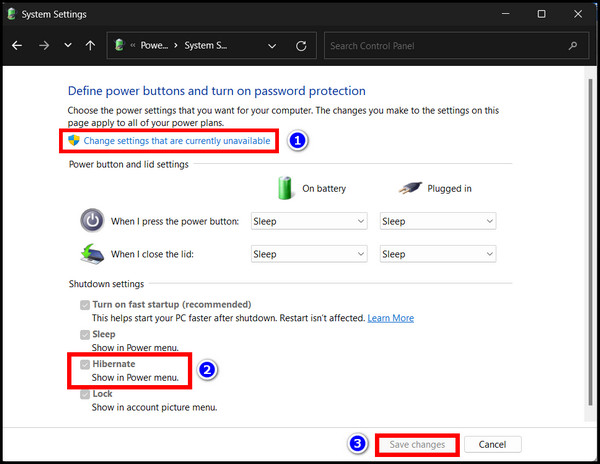
Now the next time you press the power button on the Start Menu, you will find the hibernate option present.
Did you change your mind and want to disable hibernation now? No worries. Just follow the steps mentioned above, uncheck the tick next to Hibernate, and press Save changes. And hibernation is disabled, just like that.
Let’s move on to the more advanced ways to change the default hibernation settings in Windows 11.
Follow our guide to fix blue screen on Windows 11.
2. From Group Policy Editor
You need to create a new entry in the group policy to enable the hibernation button to appear in Windows 11. Just go to the directory mentioned in the steps to create a new policy and set its value.
Let’s look at how you can do that.
These are the easy steps to enable Hibernation from Group Policy Editor:
- Press Win + R and type gpedit.msc.
- Navigate to Computer Configuration > Administrative Templates > Windows Components > File Explorer.
- Right-click on Show Hibernate in the power options menu and select Edit.
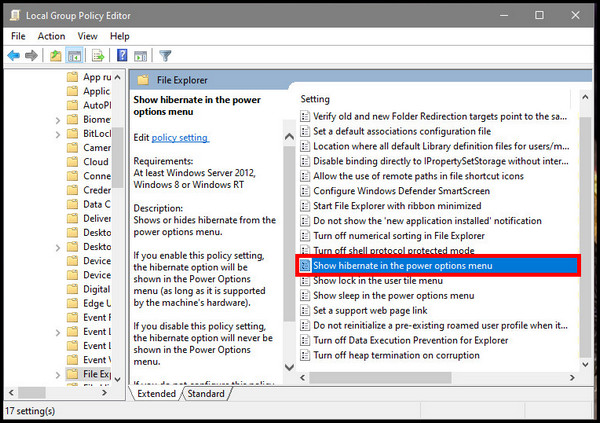
- Click on Enabled and press Apply.
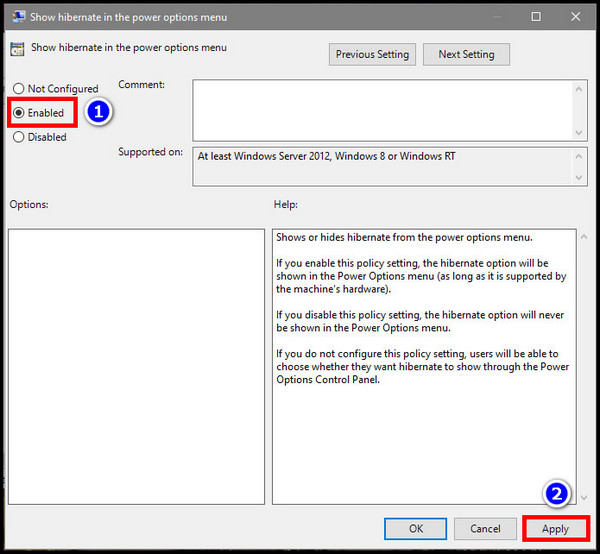
Now, you need to restart the computer to see the changes taking place. Once the computer restarts, you will see the Hibernate option on the Start Menu.
Similarly, disabling Hibernation is just as easy. Navigate to the location from the Group Policy Editor that is stated earlier in the step. Once you are there, choose Not Configured from Show hibernate from the power options menu.
Here is the easiest guide to fix drag and drop not working on Windows 11.
3. Using Command Prompt
You can also enable the hibernate button using the Command Prompt. But to that, you need to run cmd as an administrator, or the command will fail to work.
Follow the steps to enable Hibernation using the command prompt:
- Write cmd on the Start M and click Ok.
- Type powercfg.exe/ hibernate on and press enter.
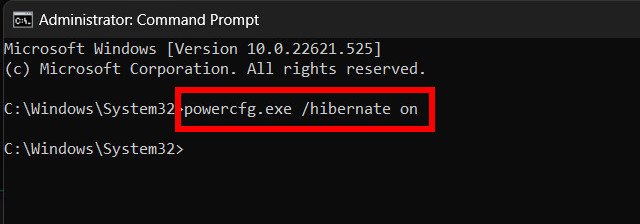
Hibernation will now be active on your computer.
To disable Hibernation, you need to enter this on cmd and press enter:
powercfg.exe/ hibernate off
This is the same command as earlier, but we replace the on with off. It will disable hibernation on your computer.
Check out the easiest way to install active directory users & computers on Windows 11.
4. Using the Registry Editor
You can also bring back the hibernation button using the Registry Editor. Just navigate to the stated location and change the value of an entry.
However, as a safe practice, always back up your registry before making any changes.
These are the steps to enable Hibernation from the Registry Editor:
- Write regedit on the Start Menu and Press on Run as Administrator.
- Navigate to the following location from the left pane:
Computer\HKEY_LOCAL_MACHINE\SYSTEM\CurrentControlSet\Control\Power - Double-click on HibernateEnabledDefault and set the value to 1.
- Click Ok to close the dialog box.
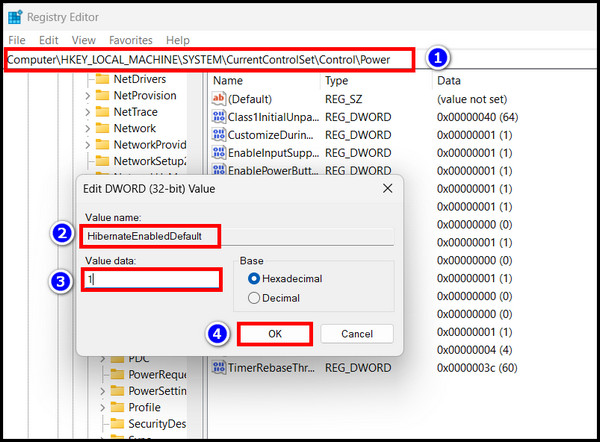
Now you need to restart your computer. Once rebooted, the hibernate button will pop up.
If you want to disable hibernation, just set the value of HibernateEnabledDefault to 0 on the Registry Editor. It will disable Hibernation on your PC.
Follow our guide to fix Windows can’t access network drive on Windows 11.
Frequently Asked Questions
How do I disable hibernate in Windows 11?
To disable hibernation, go to Control Panel > Power Options > Choose what the power button does, remove the tick next to Hibernation, and select Save Changes.
How do I enable hibernate in Windows 11?
To disable hibernation, type the following in cmd and press enter: powercfg.exe/ hibernate off.
Final Words
Hibernation is a great way to reduce electricity bills without turning off your computer. You can resume work from the same place without losing any saved files.
The next time you take a coffee break, ensure you keep the computer in hibernation. Even the small savings count too.
That’s all for today.
Until next time it’s goodbye.