Email is an essential part of our professional life. It helps us build connections and gather clients.
A perfectly formatted and beautifully typed email goes a long way.
So we need to make sure our email looks the same across multiple email clients.
But more often than not, you would see the same email look different across multiple email clients.
The inconsistent styling across the different email clients like Microsoft Outlook desktop and Gmail web causes all the trouble in the first place.
What are the solutions? This post will give you the answer to these questions.
After going through the entire post, you will be able to write a perfectly formatted email that looks the same on all email clients.
So keep reading the post till the end.
How To Add Bullets Or Numbered Lists In Outlook
A bulleted list or numbered list is a great way to highlight the key takeaways in your message. You can also use it to list steps or other items.
If you need an ordered list, use the numbered list. Otherwise, the bulleted list will do the job.
There are two ways to add bullets or numbered lists in Outlook. They are as follows:
1. Use the toolbar
When you are typing an email in Outlook, you will notice the Microsoft Word-like toolbar at the top of the screen.
The toolbar will contain different options to format the email, like options to Bold the text, set the Font and sich.
If you cannot find the toolbar, go to the Message tab from the top.
Then click on Bullets or Numbering to get a bulleted list or numbered list, respectively. 
2. Use the shortcuts
Using the shortcuts is relatively easy as you do not have to memorize a long sequence of keypresses.
To get the bulleted list, type * (asterisk), then press Spacebar or the Tab key.
To get numbered list, type 1. (1 followed by a dot), then press Spacebar or the Tab key.
After applying bullets or numbered list in your email, you might see that they are not aligned perfectly as you would expect.
Keep reading to know the reason behind it and the solution.
Follow our guide to fix Outlook zoom add-in not working.
Why Are My Bullet Points Not Aligned?
Different email clients like Microsoft Outlook and Gmail output the same email differently. Though the email comes from the same source and has the same source code, HTML and styling, it does not look the same.
The reason is that different email clients use different types of padding, margin and spacings on the same HTML list tag: <ul> (unordered list) and <ol> (ordered list).
Microsoft Outlook does not work correctly with the <ul> and <ol> margins. The older clients did not have this issue, but the 2007 and onward Outlook clients faced the problem.
On the other hand, the Gmail web client adds a left margin on the <li> (list item) tag.
The result is you do not get the same output opening the email on different clients.
The same email will look different, with varying bullet alignments on Outlook and various email clients and platforms. So the styling needs to be reset and replaced with a consistent styling that works the same across all email clients.
How Do I Fix Alignment In Outlook?
Microsoft Outlook desktop client has a problem dealing with bullet alignment. Microsoft Outlook does not align the bullets correctly when the HTML <ul> (unordered list) and <li> (list item) tags are used.
There are different fixes that aim to correct the styling or replace it with a more compatible one.
Follow the methods below to align bullets in Outlook email correctly:
1. Use the code template
The first solution is to use a workaround involving a fixed template. You need to copy and paste the template every time there is an unordered list in your email.
There are two different code templates: one for the Microsoft Outlook versions 2007, 2010, 2013 and 2016. The other template is for all other email clients.
The code template for Outlook 2007, 2010, 2013, and 2016:
<style>
li {text-align:-webkit-match-parent; display:list-item;text-indent: -1em;}
</style>
<![endif]–>
The code template for any other email clients:
li {text-align:-webkit-match-parent; display:list-item;}
You will get the same output across all email clients using the above code templates.
Also read how to add new Mailbox in Outlook easily.
2. Use an online tool
There are a few online tools available for formatting emails to look the same across all email clients. Some of the online tools focus on aligning the bullets correctly.
One such online tool is (www.lists.cm). You can quickly get the required code template to align bullets correctly using the online tool.
As an added advantage, you can specify the different spacing and indents as you please.
Here are the steps to use the online tool to align bullets correctly:
- Open your web browser.
- Go to the link: www.lists.cm.
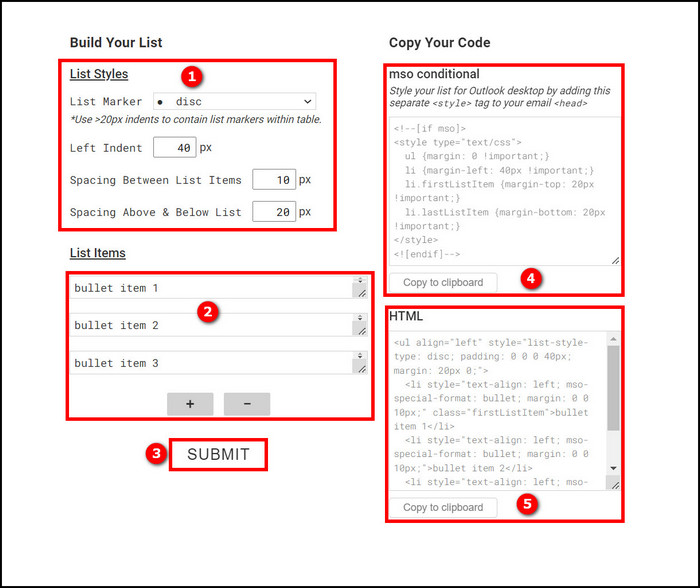
- Choose the list marker. By default, the disc is selected.
- Enter the left indent in the pixel unit. You can use the suggested 40px if you are unsure what value to use.
- Enter the spacing between list items and spacing above and below the list. These two parameters also use the pixel unit.
- Enter the list items text one by one. By default, two list item boxes are present. Use the + button to add more list items.
- Click on the SUBMIT button. You will see two code templates on two boxes on the right. The two boxes will contain the required styling and spacing as well as the list of items in them.
- Click on the “Copy to clipboard” button under the first box on the right. It will contain the styling code template for the Microsoft Outlook client. You need to paste the code template inside the <head> tag in the email.
- Click on the “Copy to clipboard” button under the second box on the right. It will contain the code template for HTML unordered list. You need to paste the code template inside the body of the email.

Now, bullet lists will appear perfectly aligned on the Microsoft Outlook desktop client.
Read more on Outlook rules not running automatically on shared mailbox.
3. Use the table tag
Using table and table data tags is another workaround for the bullet align issue in Outlook.
When you use the table tag instead of the unordered list tag, you will lose accessibility points. Screenreaders will be unable to provide the correct intent.
The screen readers will read the email incorrectly, bringing a negative experience for people with special needs.
The workaround is to replace the unordered list <ul> tag with the table <table> tag. Then you would use a <tr> tag for each row.
To add bullet points before the list text, use <td> • </td>.
Then you would write each list text with the table data <td> tag.
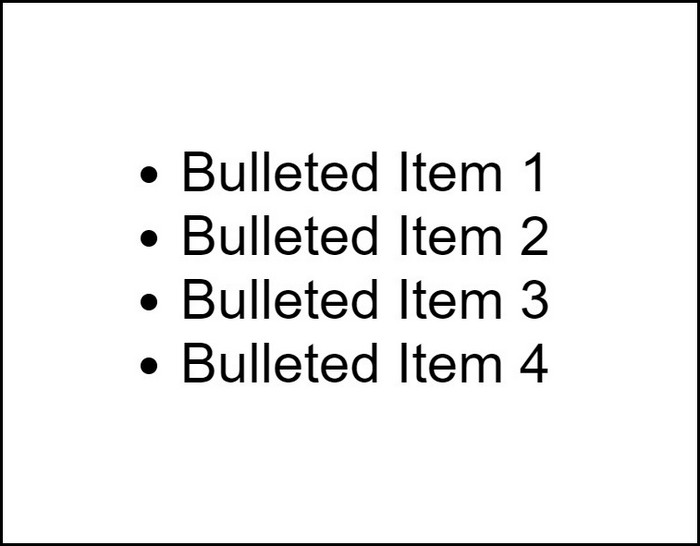
The method would look to replace an unordered list like the one below:
<li> Bulleted Item 1 </li>
<li> Bulleted Item 2 </li>
<li> Bulleted Item 3 </li>
<li> Bulleted Item 4 </li>
</ul>
Into a table as follows: 
<tr>
<td> • </td>
<td> Bulleted Item 1 </td>
</tr>
<tr>
<td> • </td>
<td> Bulleted Item 2 </td>
</tr>
<tr>
<td> • </td>
<td> Bulleted Item 3 </td>
</tr>
<tr>
<td> • </td>
<td> Bulleted Item 4 </td>
</tr>
</table>
Since table and table data tags have consistent margins and padding across different email clients, they provide a correct bullet alignment.
Also read how to fix Outlook junk mail rules not working.
Final Thoughts
The bullet aligns issue in Outlook is a significant headache for those using lists on email all the time.
To align bullets in Outlook email, one needs to change the default styling and replace it with a better one.
Online tools provide the required styling code template and the unordered list HTML template.
Another approach is to use an HTML table instead of the unordered or ordered list tags. HTML table tag has more consistent padding and margin on different email clients.