On July 31, 2012, the Hotmail program from the Microsoft product line became Outlook. From then on, this application gained a reputation among users for its slick mail management features.
However, this Outlook app can crash when your Mail storage is full. Moreover, your mailbox can look crowded when you deal with many emails daily.
In those specific scenarios, you can archive your Outlook emails to make the interface eye-cache again. You can use several procedures on different versions of Outlook to archive emails, but the easiest and most functioning ones are displayed in this article.
So follow this content without skipping to learn about the archiving process of Outlook.
Let’s roll our sleeves and start!
What is the Purpose of Archiving Outlook Emails?
The primary purpose of archiving Outlook emails is to make your Outlook interface clear and easy to read. When your Outlook is full of emails, you can archive the ones you acted upon. Outlook archive is mainly a folder in which all the archived items are stored for future use.
Remember that archiving some emails and items will not free up space. It will just move those items to a specific archive folder.
You can store emails that no longer have a use for you but can come in handy in the future in the Archive folder. But if you want to free up some space from Outlook, you must use the Delete option.
If you want to archive emails in Outlook, you can follow the manual or the automatic procedures. Both are displayed in this content for your aid, so track down the remaining segments.
How to Archive Emails in MS Outlook Manually
In order to archive emails manually on Outlook, you first need to Launch the app, select a specific email, right-click on it, and choose the Archive option. Also, you can click on the Archive option from the Ribbon after selecting some particular emails to archive them.
Additionally, you can use the Clean Up Old Items Archive option to archive emails if you want to twitch some settings while archiving an item. Read on to learn about the brief procedures to complete those actions.
Note: All the methods displayed in this segment are applicable to Outlook 365, 2016, 2019, 2021, and newer versions.
Here are the methods to archive emails manually in Outlook:
1. Right-Click and Select the Archive Option
The Right-click Archive option is the most straightforward way to archive an email in MS Outlook. Let’s find out how you can accomplish that operation without hassle.
Here are the ways to archive emails and items with Right click archive option:
- Launch the Outlook application.
- Select the email that you want to archive. Also, you can press and hold the CTRL key while selecting multiple items.
- Right-click and choose the Archive option.
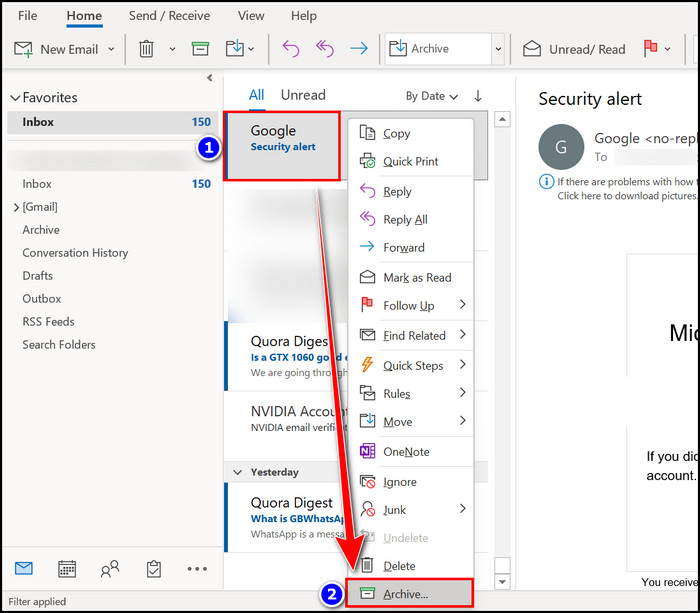
The selected items will be in the archive folder immediately.
Also, check out our separate post on how to add meeting to Outlook calendar easily.
2. Use the Archive Ribbon or Backspace Button
An Archive button is available on the Outlook ribbon. You can use this button to archive your selected emails quickly. The entire process is demonstrated below.
Here are the processes to archive emails in Outlook with the Archive ribbon button:
- Open the Microsoft Outlook program.
- Select specific emails by holding the CTRL key.
- Click on the Move to Archive Folder (Backspace) Also, after selecting the Mails, you can press the Backspace button to archive it.
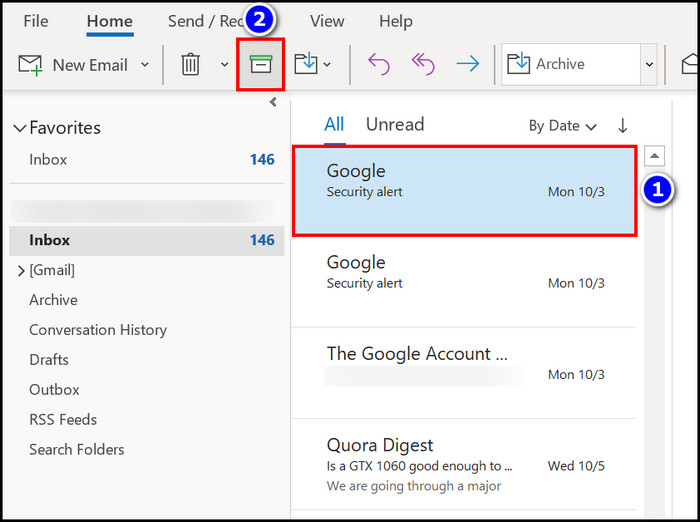
With these simple steps, you can archive your Outlook emails whenever possible.
3. Apply the Clean Up Old Items Archive Option
Clean Up Old Items Archive Option is a standard method to archive your Outlook emails. This archiving option will come in handy if you want to modify the archive emails to some extent. Follow through the steps to complete that operation.
Here are the steps to apply the Clean Up Old Items Archive Option to archive emails:
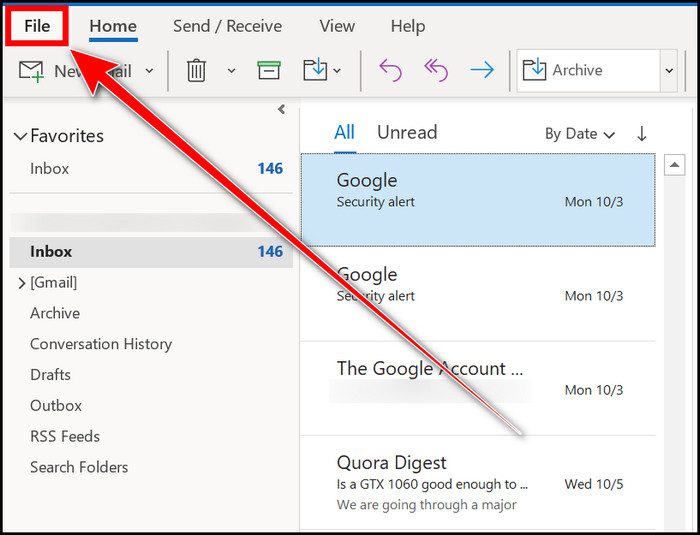
- Move to the File section while you are using the Outlook app.
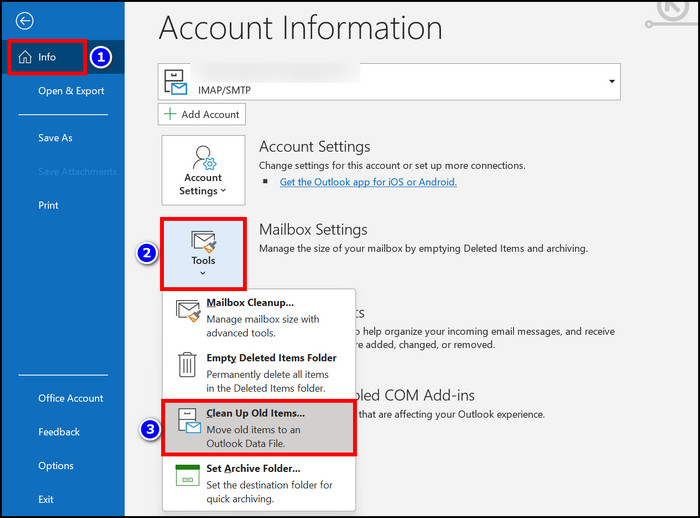
- Select the Info section.
- Click on the Tools box and choose the Clean Up Old Items option.
- Select the folders you want to archive from the Archive this folder and all subfolders checkbox.
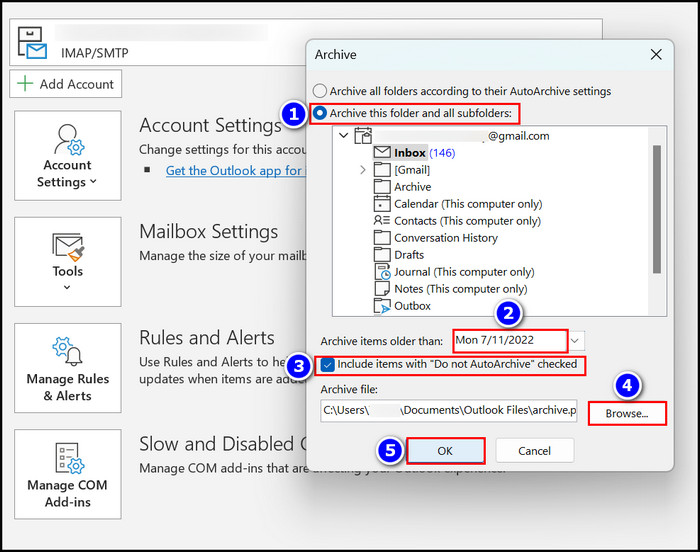
- Choose a time from the Archive items older than box to archive emails before that date.
- Check the Include items with “Do not AutoArchive” checked box if you don’t want those selected folders to archive automatically.
- Hit the Browse option to select a folder for your archived emails and items.
- Press the OK button to complete the mail archiving process.
With the help of these simple twitching, you can successfully archive your desired emails from your Outlook.
Also read how to add new Mailbox in Outlook easily.
How to Archive Outlook Emails Automatically
To archive emails automatically in Microsoft Outlook, you should move into the File section. After that, navigate to the Options section and click on the Advanced tab when the options window pops up. Choose the AutoArchive Settings option and set an auto-archive date.
Follow the instructions given below, where I visually represented the process.
Here are the steps to archive Outlook emails automatically:
- Open the MS Outlook app.
- Navigate to the File section.

- Choose the Options segment.
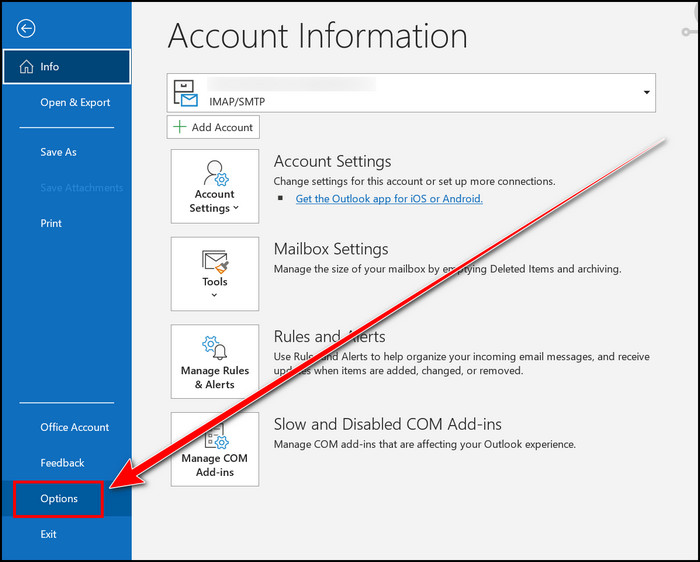
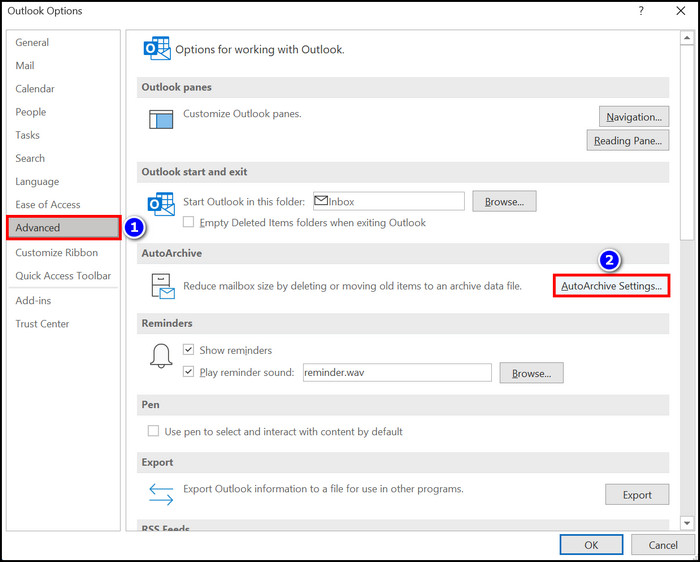
- Move to the Advanced tab.
- Click on the AutoArchive Settings box.
- Enable the Run AutoArchive every N days option.
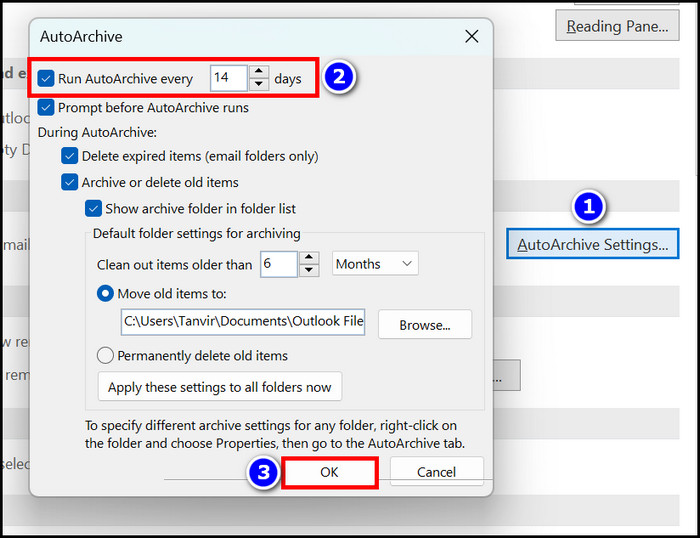
- Select your desired time.
- Hit the OK key when you are all set.
When you complete the process, your Outlook emails and items will move into the archive folder after your specified days.
How to Archive Outlook Emails on Outlook Web
You can quickly access your MS Outlook with its Web version. The email archive feature is also available on the Web version as well. With the help of the Outlook web archive Ribbon, select right-click attributes and customize the single-click option; you can easily archive emails on Outlook Web.
All those procedures are displayed preciously in the following segments.
Here are the methods to archive Outlook emails on Outlook Web:
1. Use the Outlook Ribbon
With the help of the Outlook ribbon, you can easily archive emails on Outlook Web. Follow through if you want to know how to archive emails and items with that option.
Here are the procedures for using the Outlook Archive ribbon:
- Navigate to the Outlook Web website and log in to your account.
- Select your desired emails by pressing the Ctrl button on the keyboard.
- Click on the Archive button from the ribbon.
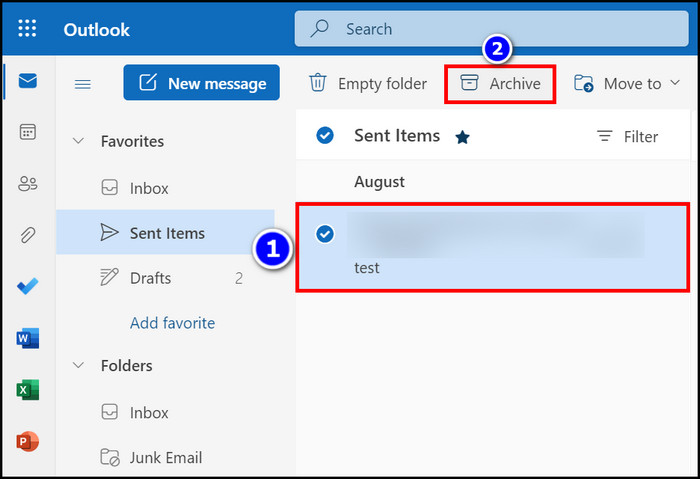
That’s it; your email archiving process is complete.
Follow our guide to fix Outlook zoom add-in not working.
2. Right-Click and Choose the Archive Option
Upon right-clicking on the Outlook emails, it will open the context menu, and you will find the Archive option from that menu.
Here are the ways to right-click on Outlook emails and choose the archive option:
- Open the Outlook Web application.
- Select your specific emails.
- Right-click on it and choose the Archive option.
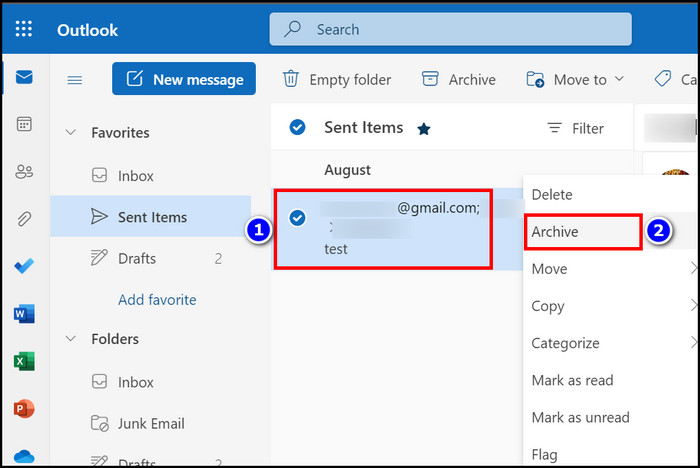
Your selected emails are in the archive folder now.
3. Archive Emails in Outlook with a Single Click
You can customize your Outlook Web account in such a manner that will help you archive emails with a single click. Read the following steps to find out how to complete that action.
Here are the steps to archive emails in Outlook with a single click:
- Launch the MS Outlook Web program.
- Click on the Settings (Gear) icon.
- Choose the View all Outlook settings option.
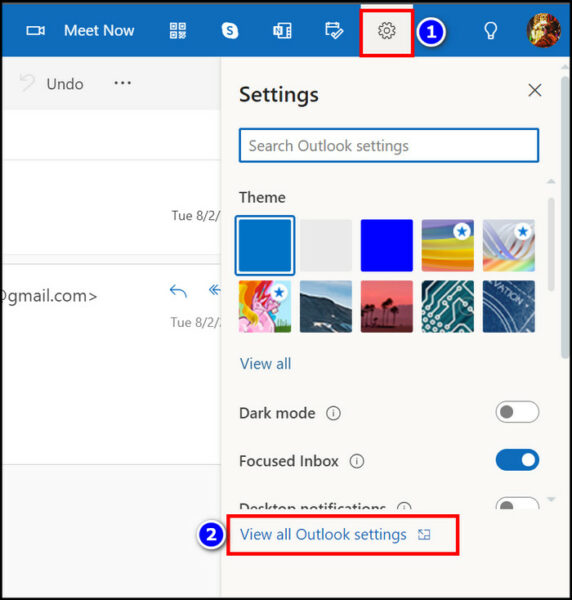
- Select the Mail section.
- Move to the Customize actions tab.
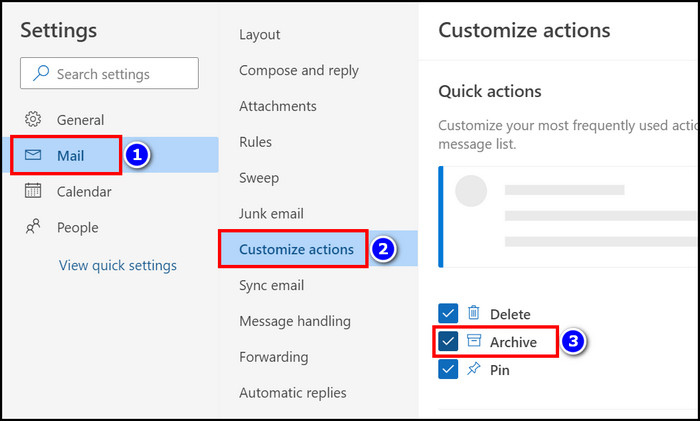
- Enable the Archive checkbox.
- Close the window.
- Select an email from Outlook, and you will see the One-click archive button beside it.
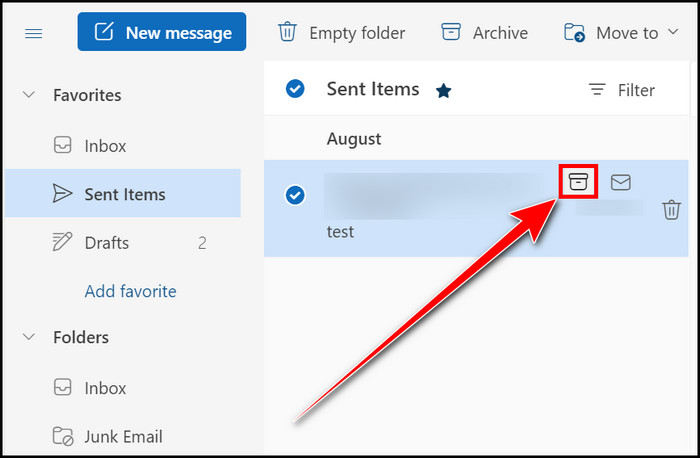
- Hit the Archive button to complete the process.
Immediately the selected email will be stored in the archive folder.
Check out our separate post on how do I know if my email was recalled in Outlook.
How to Archive Emails and Items on Different Versions of Outlook
The Microsoft Outlook program became more futuristic and easy to use as the days passed. But all those versions always contain the Archive feature in them. Let’s head out and see how you can archive emails on different versions of Outlook.
Here are the ways to archive emails and items on different versions of Outlook:
On Outlook 2013
- Move to the File option.
- Click on the Info section.
- Select the Cleanup tools option.
- Choose the Archive option.
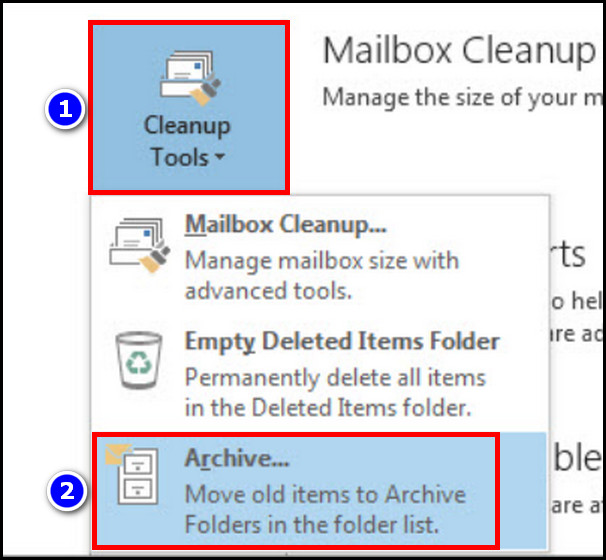
- Select the desired folders from the Archive this folder and all subfolders option.
- Set date from the Archive items older than box.
- Uncheck or check the Include items with “Do not AutoArchive” checked option.
- Press the OK key.
On Outlook 2010
- Navigate to the File section.
- Choose the Cleanup tools box.
- Select the Archive option.
- Choose the specific folders from the Archive this folder and all subfolders checkbox.
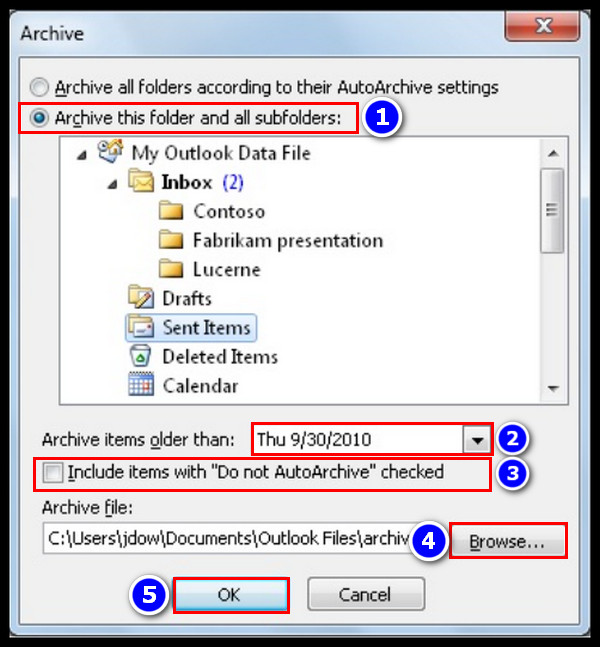
- Select a date from the Archive items older than box.
- Enable or disable the Include items with “Do not AutoArchive” checked option.
- Hit the OK button.
On Outlook 2007
- Move into the File option from the Outlook program.
- Select the Archive option.
- Choose the particular folders for archiving from the Archive this folder and all subfolders option.
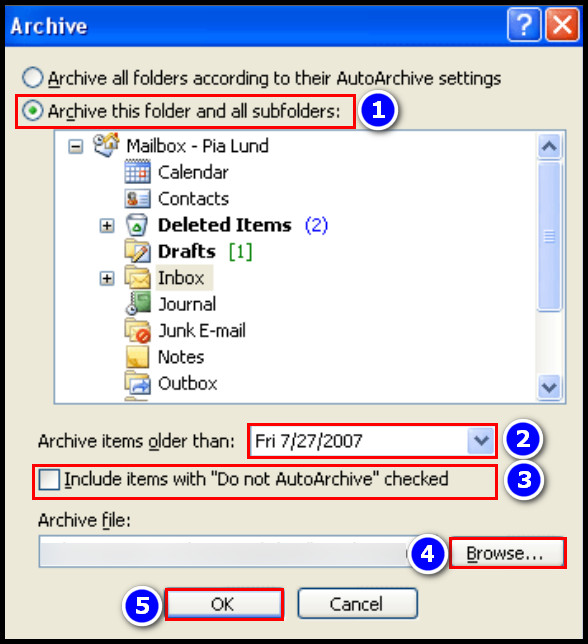
- Set up an archive time from the Archive items older than box.
- Check the Include items with “Do not AutoArchive” checked option if you do not want your selected files to auto-archive.
- Hit the OK key.
See how convenient it is to archive emails and items on different versions of Outlook.
How to View Archived Emails and Items on MS Outlook
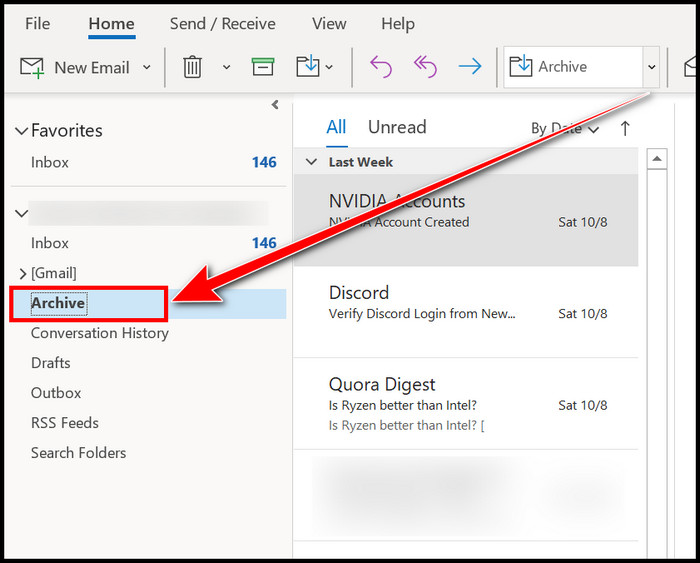
If you want to see the archived emails on MS Outlook, you should just hop into the Archive folder from the Navigation pane. However, when you enable the Auto-Archive feature that will save the archive emails as .PST files, you need to perform some operations to view them in Outlook.
Don’t worry; both of the processes are stated below.
Here are the methods to view archived emails and items on Outlook:
See Standard Archived Emails on Outlook
- Launch the Microsoft Outlook application.
- Move into the Archive folder from the Navigation pane.
View PST Archived Files on Outlook
- Navigate into the File section.

- Select the Open & Export tab.
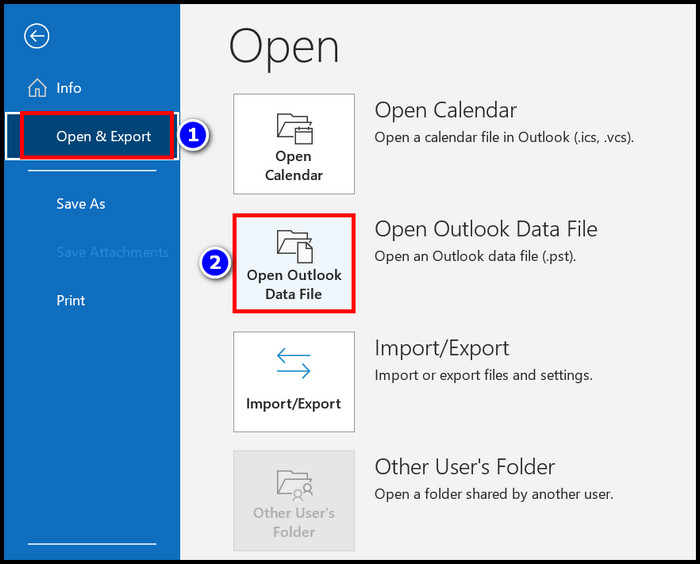
- Click on the Open Outlook Data File box.
- Browse and select your specific PST files from the popup window.
- Press the OK button and instantly see those specified files in Outlook.
I hope you understand how easy it is to see archived emails on Outlook from the above steps.
FAQs
What happens when you archive emails in Outlook?
When you manually archive emails in Outlook, the emails will be stored in the archive data folder. But when you enable the Auto-Archive feature, the email will save as a .PST file which is hard to find and seems to have disappeared from the server.
How long do archived emails stay in Outlook?
The received archived emails will stay in Outlook for 6 months by default, and the sent items will remain for 3 months. However, you can change these settings from Outlook Advanced > AutoArchived Settings option.
How do I archive emails in MS Outlook?
To archive emails in MS Outlook, follow the instruction below:
- Navigate to the File tab.
- Move into the Info section.
- Choose the Tools box.
- Click on the Clean Up Old Items option.
- Select your specific emails from the Archive this folder and all subfolders box.
- Choose an appropriate date from the Archive items older than option.
- Hit the OK key when you are all set to complete the archive process.
Conclusion
This content demonstrates the easiest and working methods to archive emails in Outlook.
You can take two steps to finish the archiving process, automatic and manual. The manual archiving method consists of the Archive ribbon, Right-click and Clean Up Old Items options.
On the contrary, you must move into the Options > Advanced > Auto Archive Settings options to set up the automatic archiving process. You will also find the procedures for archiving emails on different versions of Outlook from this article, so read and follow them accordingly.
Let me know your afterthoughts in the comment about this topic.