If you need to press the power button multiple times to turn on the PC, you are not the only one.
Many PC users have experienced the same issue. Some users needed to press the power button two times, while others needed to push it more than twice.
The issue is also seen on laptops besides the PC.
Why does it occur, and how to fix it? This post will give you the answer to these questions.
Keep reading the post till the end to clear your doubts.
Why Does My PC Take Multiple Times To Start?
Your PC will start with a single press of the power button. You do not need to press the power button multiple times to start your PC.
However, if your PC or laptop takes multiple presses to start, there is some issue.
The most common reason is a faulty power button. After prolonged usage, the power button might get damaged or loose. Dirt getting inside the button can also make it defective.
The power button is connected to the motherboard via a cable. If the connection is loose, you will face the error.
Next, the PSU could be at fault here. If the PSU capacitors are damaged or cannot hold enough charge, it will take multiple presses to start the PC.
In the next section, the fixes to the problem are discussed.
Related contents you should read about how many bytes in a Gigabyte?
How To Fix Your PC Takes Multiple Presses To Start
It is mostly a hardware defect when you have to press the power button multiple times to start the PC. Either the power button or the PSU is broken.
You can perform some easy diagnoses to detect the problem and fix it. In case of a more advanced diagnosis, which involves PSU capacitors or disassembly of the laptop, you have to send the computer to warranty or to a technician.
Follow the methods below to fix your PC taking multiple presses to turn on:
The power button on the PC case is connected via a wire to the two pins on the motherboard. If the connection is loose, the issue occurs.
You can check the motherboard manual. Every motherboard has a location where all the PC case front panel connectors (power, reset, USB, etc.) get connected.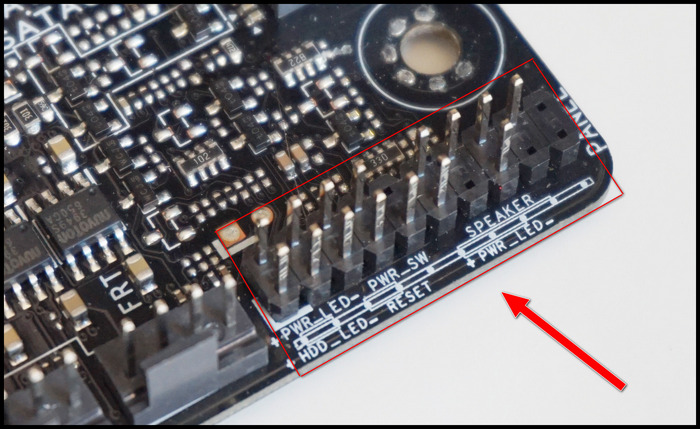
Inside the specified location, you will find two pins responsible for turning on the PC. The wire from the power button connects to these two pins. Your task is to ensure the connection is tight and proper.
Here are the steps to whether the power button is functional:
- Unplug the PC power cord on the wall. You will access the internals of the PC, so it’s better to stop the power supply to the PC.
- Open the side panel of the PC case.
- Find the specified two pins on the front panel connectors area on the motherboard. The motherboard manual and the motherboard itself will label the two pins for the power button.
- Check if the connection is tight or not. You can unplug and then plug the connectors back in. The orientation does not matter. You are good to go if you are connecting the power button wire to the two pins for power.
Now plug in the PC power cord to the wall and press the power button. See if the PC turns on in one go.
If it does not, maybe the power button is faulty. Head over to the following method.
The primary reason you need to press the power button many times to start the PC is a faulty power button.
If you turn on the PC multiple times a day, then the power button could get damaged over the years.
Also, most PC power buttons are located at the top of the PC case, allowing them to get covered in dust. Dust build-up can enter the small gaps around the power button and damage the power button.
You can clean the power button using alcohol on a microfiber or soft cloth. Use a toothpick or something similar to bring out dust and debris from the small gap around the power button. Ensure to turn off the PC before cleaning the power button.
Then check if the PC turns on with one press. If it does not, you need to check if the power button is broken. You can do that by jumping the two pins for the power button on the motherboard.
Here is the procedure to check the power button:
- Ensure the PC is plugged into the wall and the switch is turned on.
- Ensure you are correctly grounded. You will be accessing the internals of the PC while the power is turned on, so be careful.
- Open the side panel of the PC case.
- Locate the two pins where the power button is connected to the motherboard. Refer to the motherboard manual if you are unsure.
- Unplug the power button wire from the two pins on the motherboard.
- Take a screwdriver.
- Touch the two pins together with the tip of the screwdriver. This way, you are shorting the two pins for the power button. It will start the PC.
If the PC turns on, everything is okay with the PC, and your power button is broken. You need to replace the power button.
Talk with warranty support (if you still have a warranty) or take it to a PC repair shop to change the power button.
Alternatively, connect the reset button (or any other button on the front panel of the case) wire to the power button pins on the motherboard. Then you can use that button to turn the PC on.
Check out the easiest way how many years should a desktop computer last?
3. Swap the PSU
The two pins on the motherboard (connected to the power button) get shorted when you press the power button. Then the PSU activates and sends power to all the PC components.
PSU is directly connected to the motherboard, GPU and storage. The other components like RAM, CPU and AIO get power through the motherboard.
The PSU uses more current to start the PC than it uses while running it. So the PSU stores the extra charge on the capacitors.
If the capacitors are not working correctly, enough charge is not stored on them. It results in the PSU taking extra time to boot the PC. So you are pressing the power button multiple times.
You have checked if the power button works fine in the previous method. So the next step is to check the PSU.
Though there are many tests to check the PSU, they are not recommended to be conducted at home. You need to seek professional help to check your PSU.
Instead, you can replace your PSU with a spare one (or borrow a PSU from your friend) and check if it solves the issue.
Follow the steps below to replace the PSU:
- Ensure the spare PSU has enough wattage to power your PC.
- Ensure to disconnect the power cord from the wall and turn off the PSU switch.
- Discharge the PC circuits by holding down the power button for around 20s.
- Remove both side panels on the PC case.
- If the PSU is modular, unplug all the cables from it and connect them to the spare PSU. Then power on the PC.
- If the PSU is semi-modular or non-modular, you need to unplug the cables from the motherboard. Then plug in the wires of the spare PSU.
- Turn on the PSU switch and plug the PC power cord into the wall.
If the PC starts with a single power button press using the spare PSU, your PSU is causing the error. You need to buy a new PSU.
4. Check the laptop battery
If your laptop turns on after pressing the power button multiple times, it could be a defective battery.
Older laptops had easily swappable batteries. If you have a laptop where you can disconnect the battery quickly, you can try some methods.
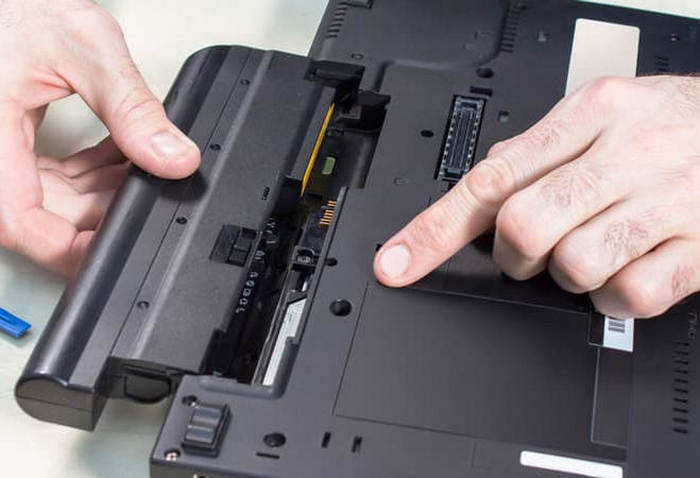
First, take out the battery and plug in the charger. Then press the power button to start the laptop. If it starts with one press, the battery is at fault. You need to replace the battery.
But if it still needs multiple presses to start the laptop, the problem might be with the power button connection.
Sadly, the process of checking the laptop power connection and shorting the pins is a bit more involved than on a PC. You need to seek professional help in this regard.
But before going to a technician or sending to warranty, you can perform some extra steps.
Check if the power button is dirty. If it is, you can wipe it with a soft cloth soaked in alcohol.
Next, you can perform a hard reset.
But before that, go through our epic guide on Check How Many Warnings Have Been Given to Someone.
Follow the steps below to check the laptop battery:
- Power off the laptop.
- Unplug the charger.
- Remove the battery.
- Hold down the power button for around 20 seconds to discharge the static charge.
- Connect the battery and charger.
- Press the power button once.
If the laptop turns on, you have solved the problem. If it does not, send the laptop to warranty.
If you are out of warranty, a technician can replace the button with a new one or check the power button connections.
Final Thoughts
If your need to press the power button many times to start the PC, it could be due to a defective power button.
You can swap out the cables of the power button and reset buttons’ cables. Then you will be able to use the reset button to start the PC.
If the PSU is at fault, you need to buy a new one.
For a laptop, diagnosing the issue is challenging since you need to disassemble the laptop. So it’s best to give it to warranty or consult a technician.