SharePoint groups are a powerful tool for managing permissions and access to content, allowing you to create specific teams and assign unique roles within your organization.
Creating SharePoint groups will grant or restrict access to sites, libraries, and other resources based on the needs of your team.

In this article, I’ll explain the simple steps for creating SharePoint groups.
Let’s dive into the world of SharePoint groups and discover how to create and manage them.
To create a new SharePoint group on your site, click Site settings and choose Advanced permissions settings. Next, go to the Permissions tab and click on Create Group. Enter a name and description for your new SharePoint group in the Name and About me boxes. Then click on Create.
Follow the instructions below to create a new group on a SharePoint site:
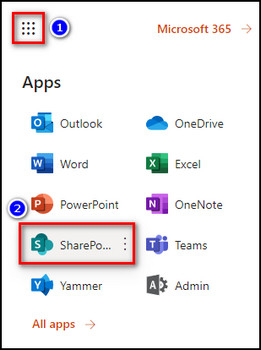
- Open your browser and go to Microsoft 365.
- Click on the App launcher on the upper right and select SharePoint.
- Open the SharePoint site where you want to create a new group.
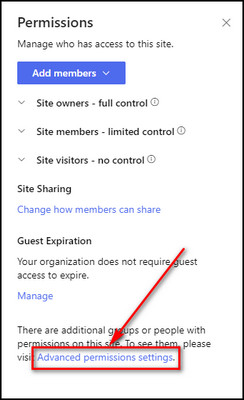
- Click the Gear icon on the top right corner and choose Site permissions.
![sharepoint-site-permissions]](https://10pcg.com/wp-content/uploads/sharepoint-site-permissions-2.jpg)
- Select Advanced permissions settings.
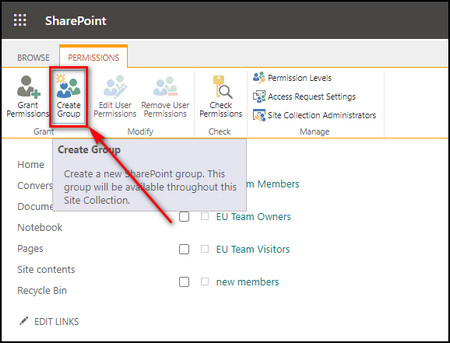
- Move to the Permissions tab, click on the Create Group option and. It will take you to the Create Group page.
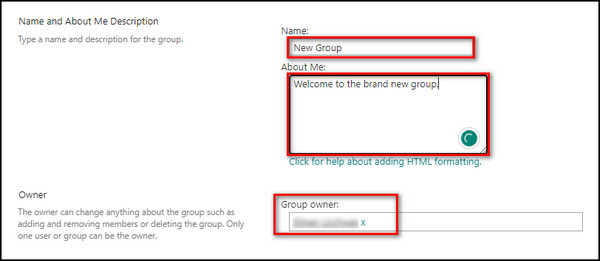
- Provide a name and description for the SharePoint group in the respective Name and About me boxes. In the Owner’s box, you can add multiple users to be the group’s owners.
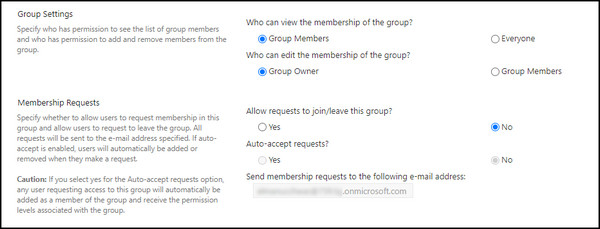
- Choose who can view & edit the membership of this group in the Group Settings section. The Membership Requests section allows you to select settings for requests to join or leave the group. You can also enter email addresses to send a request to join the group.
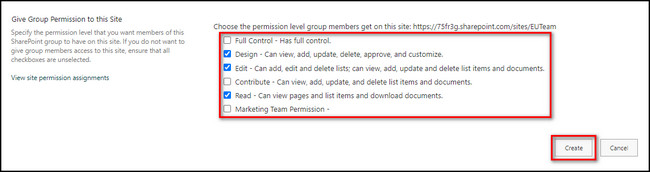
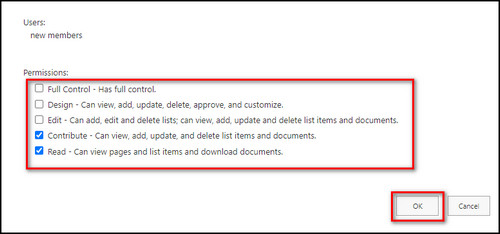
- Choose the permission levels for this group under Give Group Permissions to this Site.
- Click on the Create button to create the group.
Now that you know the steps of creating groups in SharePoint, I’ve explained everything you need to know to manage them in the following section.
After creating different groups in your SharePoint site, you can manage them by adding & removing users, assigning site access, and adding new permission levels. You can also add & remove multiple SharePoint site administrators and remove unnecessary groups.
Below I’ve provided the methods to manage SharePoint groups:
1. Add Users to a Group
When you add a user to a SharePoint group, you give the user access to the resources and content associated with that group. The user will inherit the same permissions as the group.
Here are the steps to add users to a group in SharePoint:
- Open the SharePoint site where you want to add a new user.
- Click the Gear icon on the upper right and select Site permissions.
- Choose Advanced permissions settings.
- Select the group to which you want to add a user.
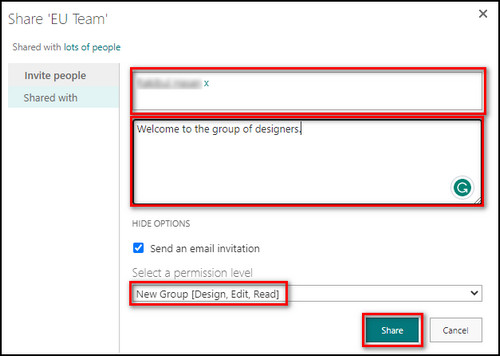
- Click on New and choose Add Users.

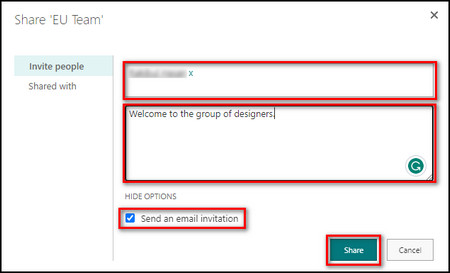
- Enter the name or email address of the individual you want to invite. You can also include a personal message if you wish.
- Click Show Options.
- Ensure Send an email invitation is checked, and click the Share button.
2. Remove Users from a Group
When you remove users from a SharePoint group, their permissions will be revoked, and they will no longer be able to access the content and resources associated with that group.
Here’s how to remove users from a group:
- Open the SharePoint site where the group resides from which you want to delete users.
- Click the Gear icon and choose Site permissions.
- Select Advanced permissions settings.
- Choose the group from which you want to remove users.
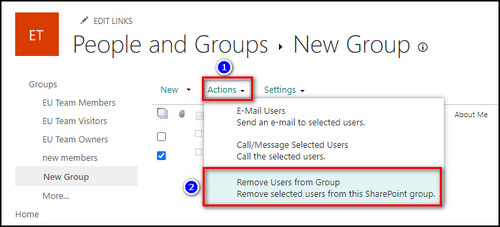
- Put checkmarks on the users you want to remove, click on Actions, and choose Remove Users from Group.
- Click OK in the confirmation window to complete the process.
3. Allow Site Access to a Group
By granting site access to a SharePoint group, all users who are members of the group will automatically inherit the same permissions to the site or subsite.
Below I’ve provided the steps to allow site access to a group:
- Click on the Settings icon and select Site permissions.
- Select Advanced Permissions Settings on the Permissions page.
- Choose Grant Permissions.
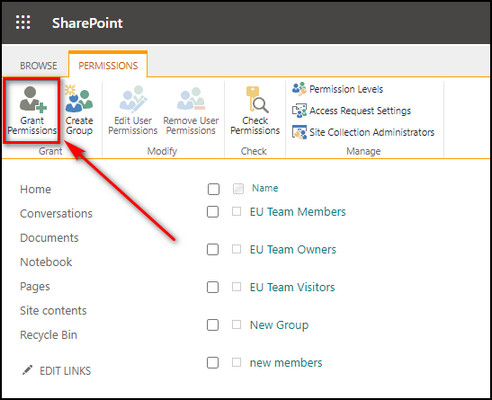
- Provide the name of the SharePoint group you want to grant permission.
- Click Show Options, select a different SharePoint group or permission level under Select a permission level and click Share.
4. Remove a Group
When a SharePoint group becomes obsolete, you should delete it. Removing a group in SharePoint revokes all permissions & access that were associated with it and deletes the group metadata from the SharePoint site collection.
Here’s the process to remove a group:
- Open the SharePoint site from which you want to delete a group.
- Click on the Settings icon and choose Site permissions.
- Select Advanced Permissions Settings.
- Select the group you want to delete.
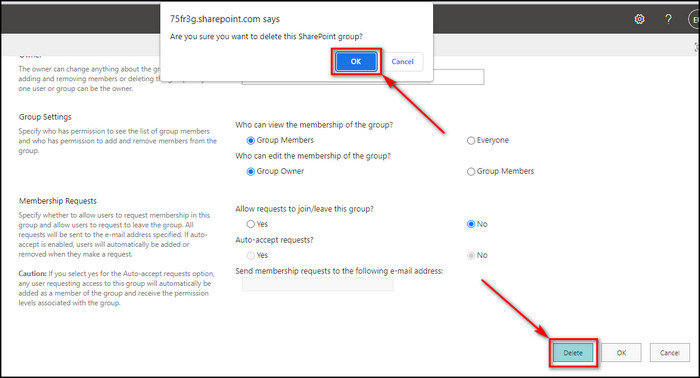
- Choose Settings and select Group Settings.

- Click on the Delete button from the bottom of the Change Group Settings page.
- Select OK to confirm the deletion process.
5. Assign a New Permission Level to a Group
By assigning a new permission level to a SharePoint group, you grant the group a specific set of permissions that can be used to access and interact with resources within a SharePoint site collection.
Follow the steps below to assign a new permission level to a group:
- Open the SharePoint site where you want to allocate a new permission level to a group.
- Click on the Gear icon from the top right and choose Site permissions.
- Select Advanced permissions settings.
- Move to the Permissions tab, select the group you want to assign a permission level and choose Edit User Permissions.
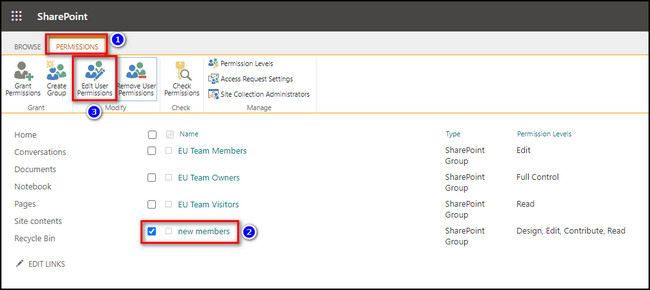
- Pick the Permission levels you want to allocate to the group and click OK.
6. Add, Modify & Delete a Site Collection Administrator from Group
In a SharePoint site group, you can add & remove multiple SharePoint site administrators and remove unnecessary groups.
Here’s how to add, modify & delete a site collection Administrator from a group:
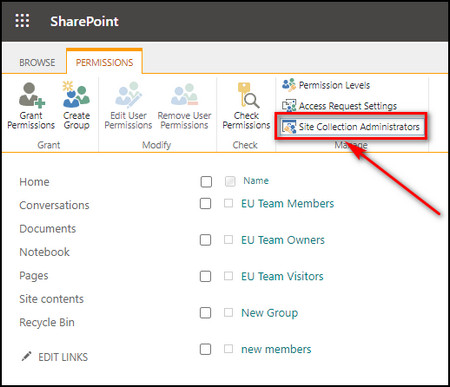
- Open your SharePoint site, click the Gear icon from the top right and select Site permissions.
- Click on Advanced permissions settings.
- Select Site Collection Administrators.
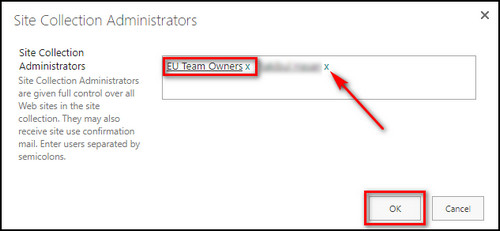
- Enter usernames to make them admins to the SharePoint site, and to remove admins, click on the cross icons next to their names.
- Select OK when you are done modifying the administrator list.
FAQs
Can you add groups to SharePoint?
Yes, you can add groups to SharePoint. To do that, open your SharePoint site, select Site permissions > Advanced Permissions Settings > Grant Permissions, enter the SharePoint group name you want to grant permission and click Share.
Who can create groups in SharePoint?
SharePoint site owners create groups to efficiently manage access and organize site members. These groups can help you restrict users’ access to specific folders and files by setting permissions based on the group’s membership.
How do I manage groups in SharePoint?
To manage groups in SharePoint, you can add & remove users from the group, grant site access to the group as needed, and delete the group if it is no longer required. You can also allocate a new permission level to the group and add, change, or remove site admins.
Final Thoughts
Creating and managing SharePoint groups is an effective way to simplify permission management for your organization. By grouping users with similar access needs and assigning permissions at the group level, you can save time and reduce the risk of errors.
Here, I’ve provided the steps to help you create, manage, and utilize SharePoint groups to improve the overall efficiency of your SharePoint site.
Comment below if you have further questions, and we’ll get back to you.