Intel Software Guard Extensions is a hardware-level security technology that comes with the Intel processors. This mechanism assists programs to run into private memory space.
Intel embedded this hardware-based encryption into their sixth-gen Core and Xeon E3 v6 server processors. However, by default, this feature is disabled from the BIOS.
In this article, I will explain why Intel preferred to disable SGX by default and how to enable it from the BIOS settings.
So, let’s begin!
Why is the SGX Disabled by BIOS?
Software Guard Extensions, aka SGX, is a security feature of Intel processors that safeguard valuable data while in use. This unique security feature is turned off by default to prevent security vulnerabilities, reduce privacy-related consequences, and improve the system stability.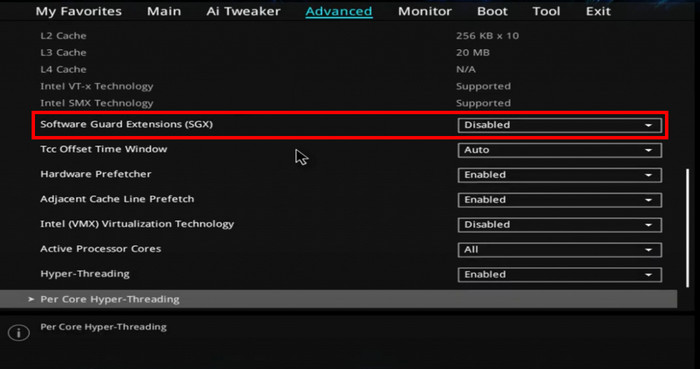
SGX is a set of instructions that comes with the processor, which assists software in protecting passwords and encryption keys from unauthorized access.
If you’re an Ubuntu user and getting the ‘Software Guard Extensions disabled by BIOS’ message during the boot, you should ignore the message cause it is completely harmless.
Following are the reasons why the BIOS disables the SGX:
Prevent Security Vulnerabilities
Primarily, Intel BIOS automatically turns off the SGX security feature to prevent software security vulnerabilities.
As the SGX instructions are directly embedded in the processor, it can reduce cybersecurity threats. However, once the system is compromised, attackers can use the SGX to destroy the system by injecting malicious software without being noticed.
Intel is aware of these security vulnerabilities, and that’s a vital reason that encourages them to disable the SGX feature by default.
Improve System Stability
When the Intel Software Guard Extensions is enabled, it may cause system instability due to the hardware level instructions. That’s why the feature is disabled.
Concern about Privacy Implications
Another common reason that encourages manufacturers or organizations to turn off this option is the concern about the privacy consequences.
Someone can use the SGX security feature to develop malicious software that is extremely hard to detect and nearly impossible to remove. That forces the organizations or motherboard producers to disable SGX from BIOS.
Corrupted NVMe drive
Sometimes, a corrupted NVMe drive can disable the Software Guard Extensions from BIOS to protect you from possible consequences.
Contrarily, if you’re using Ubuntu, you may encounter this issue because of corrupted initramfs.
Ubuntu uses the initramfs as the first root filesystem that the CPU needs to access during the boot. When the initramfs gets corrupted, the system could disable the SGX option from BIOS to prevent consequences.
How to Fix SGX Disabled by BIOS
To fix the SGX disabled message, you must enable the Intel SGX or Software Guard Extensions option from the BIOS. However, if you don’t find the option in BIOS, you can use the ‘SGX Software Enable’ app to turn on the Intel SGX. If that doesn’t help, perform a complete reinstallation of your OS.
Here are the methods to fix Software Guard Extensions disabled by BIOS:
1. Enable Intel SGX
You can enable the SGX from BIOS if you have the appropriate Intel drivers. There are three options for SGX: Enabled, Disabled, and Software Controlled.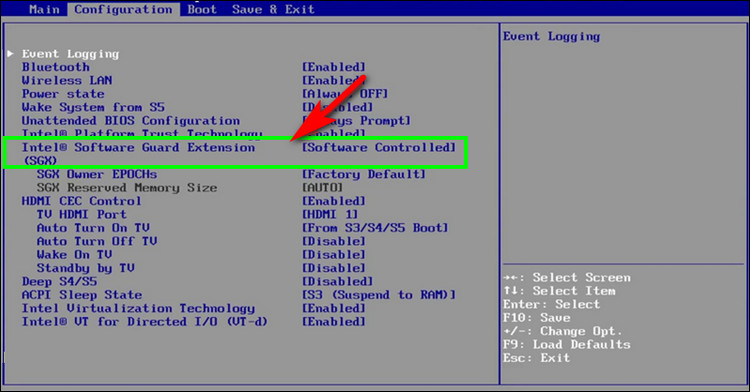
By default, Disabled is selected for Intel SGX. However, you can quickly enable this option from the BIOS settings.
Here are the steps to enable SGX from BIOS:
- Restart your PC and keep pressing DEL or F2 during the boot. It will take you to the BIOS.
- Search for the SGX settings under Security or Processor Configuration.
- Select Enable for the Intel SGX or Software Guard Extensions option.
- Choose Software Controlled if you need to configure Intel drivers.
- Press F10 to save and exit the BIOS.
Once you enable the SGX from the BIOS, you will no longer see the SGX disabled error. However, if you don’t find any settings for SGX, you should update or downgrade the BIOS to resolve the issue.
You should stop forced BIOS updates on Windows 11 if the system automatically updates the BIOS after installing an older version.
2. Use an App to Enable SGX
Working with the BIOS settings is always risky because the entire system can crash if you do something inappropriate.
If you want to play safe and don’t want to take the risk of possible consequences, you can use an app to enable the SGX feature. The best option is to use the sgx software enable from GitHub Intel Repositories.
3. Reinstall Operating System
Another workaround that resolved the issue for several Ubuntu users is reinstalling the operating system.
While installing the OS, you must choose the Minimal installation option instead of Normal. Moreover, don’t download the available updates even if the system notifies you about the updates.
Also, don’t install any third-party applications after installing the OS. When the reinstallation is completed, you will no longer face the SGX disabled message during the boot.
Wrap Up
Intel’s SGX security technology can protect sensitive data and intellectual property using SGX-enabled software.
However, enabling this feature may lead to security vulnerabilities, and programmers can push malicious software without being noticed.
So, be careful while enabling Intel Software Guard Extensions (SGX) on your machine.