Microsoft Outlook, one of the most widely used email clients, offers a powerful feature — the Send on behalf option to simplify your communication by sending emails on behalf of someone else.
Whether you’re a team leader, assistant, or simply managing multiple accounts, knowing how to send emails on others’ behalf can clarify communication and make your work much more manageable.
In this article, I’ve explained how to set up delegation and send emails on behalf of others in Outlook.
How to Send an Email On Behalf of Someone in Outlook
To send an email on behalf of another user, open Outlook, select New Email from the Home tab, choose Options, and click on From in the Show Fields section. Now, provide the username on whose behalf you are sending the email. Add the recipient, compose the mail, and hit Send.
But before you allow others to send mail on your behalf in Outlook, you need to give delegate access. Then, the user needs to add your mailbox to their profile. After that, you’ll be able to send emails on their behalf.
Here are the methods to send an email on behalf of someone in Outlook:
1. Enable Delegate Access to Another User
If you are an assistant and part of your job is sending an email on behalf of your boss, in that case, your boss needs to give you delegate access to their mailbox.
Here are the steps to enable delegate access to another user:
On Outlook 365
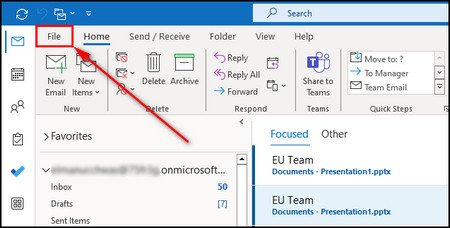
- Launch Outlook on your desktop.
- Select File from the top left corner.
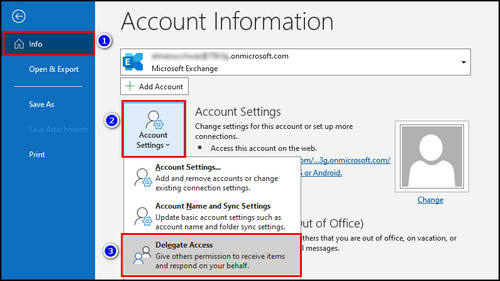
- Select Account Settings > Delegate Access in the Info tab.
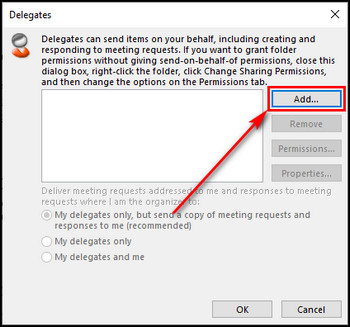
- Click the Add button.
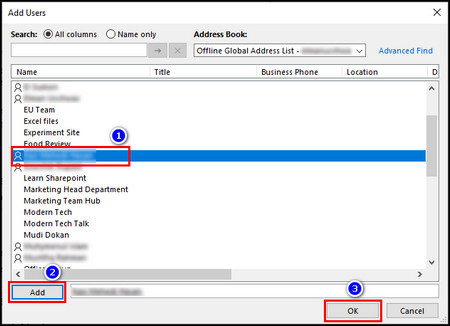
- Choose the user you want to grant delegate permission to, select Add, and then OK.
- Set the delegate permission level as Author or Editor so the selected individual can send emails on behalf of you, and click OK.
On Outlook on the Web
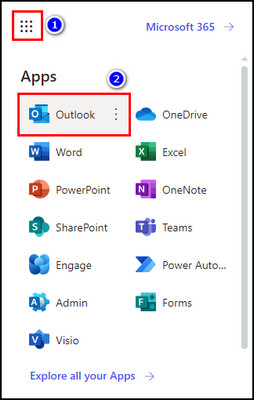
- Open Office 365, click on the App launcher, and choose Outlook.
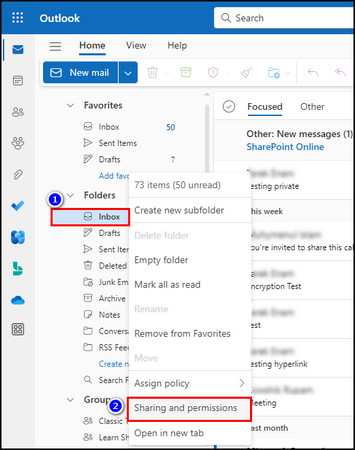
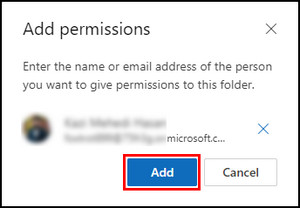
- Right-click on the Inbox folder and choose Sharing and permissions.
- Select Add permission.
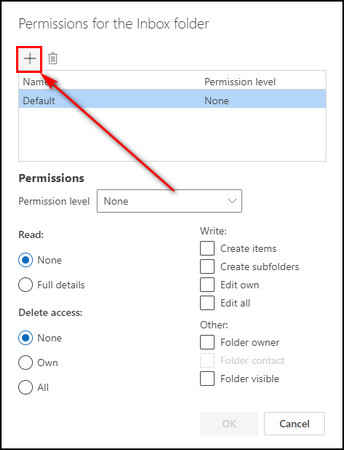
- Provide the email address or the name of the person you wish to give delegate access to and click Add.
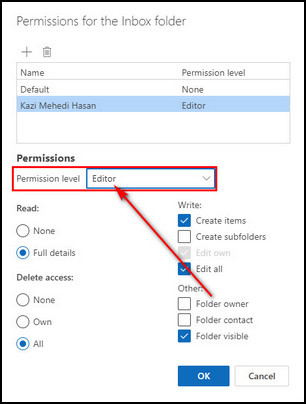
- Choose the newly added user, set the Permission level to Editor or Author, and click OK.
On Outlook for Mac
- Open Outlook on your macOS.
- Click on Tools from the top bar and choose Accounts.
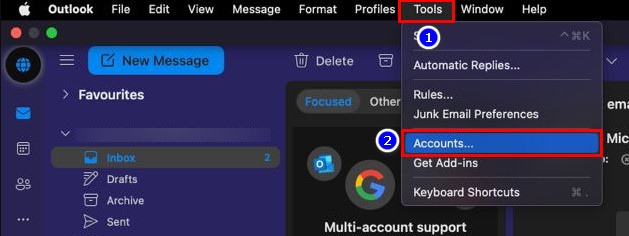
- Select the Delegation and Sharing option.
- Click on the Plus icon in the My Delegates tab.
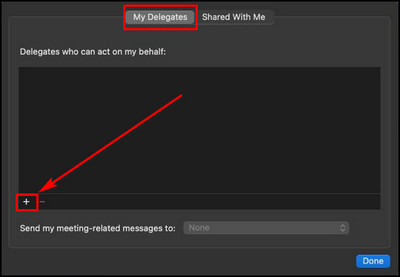
- Enter the username of the individual you want to add as your delegate and click Add.
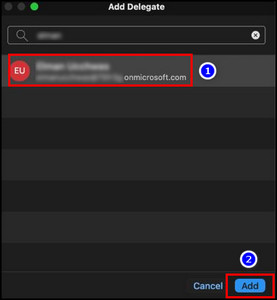
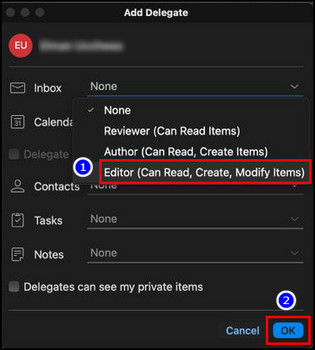
- Set Author or Editor for the Permission level, click the OK button.
2. Add Another User’s Mailbox to Your Profile
After you’ve given someone delegate access, the person needs to include your mailbox in their profile.
Here’s how to add another user’s mailbox to your profile:
- Open Outlook and click on File.
- Select Account Settings > Account Settings.

- Click the Change button in the Email tab.

- Select More Settings.
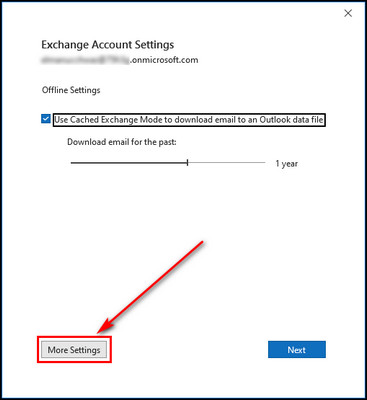
- Proceed to the Advanced tab and click Add.
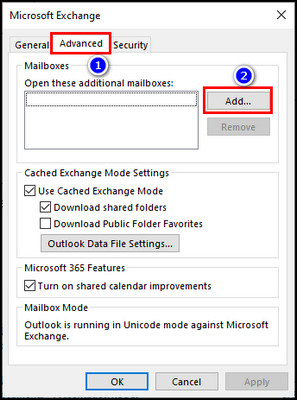
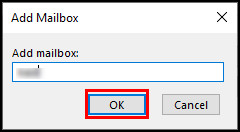
- Enter the name whose mailbox you want to add and click OK.
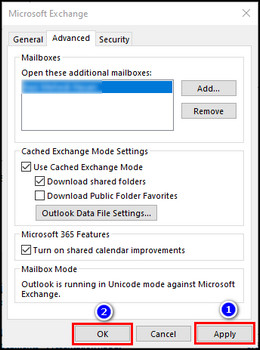
- Select Apply to confirm the addition of the mailbox, then click OK to close the Microsoft Exchange dialog box.
3. Grant Send on Behalf Permission from the Exchange Admin Center
In case you have Microsoft 365 admin privileges, you can easily add and manage your Outlook delegations from the admin center so they can send emails on your behalf.
To grant Send on behalf permission from the Exchange Admin Center:
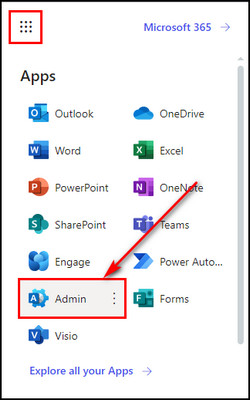
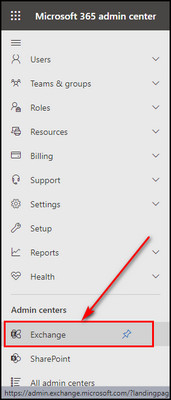
- Open Microsoft 365 and sign in to your admin account.
- Click on the App launcher from the top left and choose Admin.
- Select Show all to expand the left menu.
- Choose Exchange from the Admin Center section.
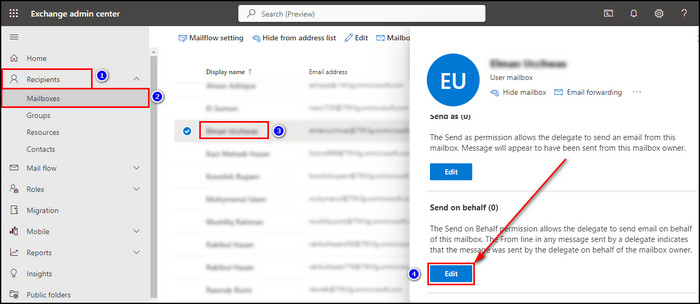
- Expand the Recipients option and choose Mailboxes.
- Select your mailbox, go to the Delegation tab, and click the Edit button under Send on behalf.
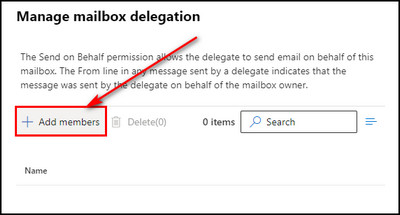
- Choose the Add members option.
- Select the user on whose behalf you want to send emails and click the Save button.
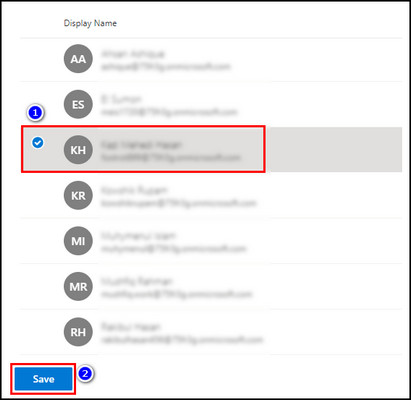
- Click on Confirm to add the user as your delegation.
4. Send an Email on Behalf of the Other Person
Now that you’ve added someone to your Outlook delegation list and the user has inserted your additional mailboxes into their profile, they can forward emails to other people on your behalf.
Here’s the process to send an email on behalf of the other person:
In Outlook
- Open Outlook on your desktop.
- Select New Email from the Home tab.
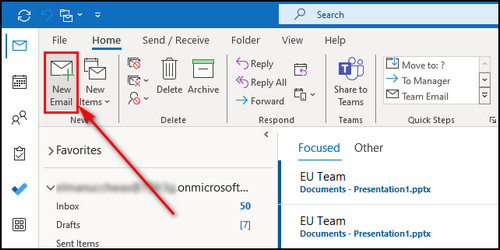
- Expand the From field and choose Other Email Address.
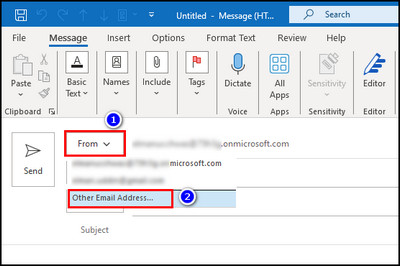
- Click the From button.
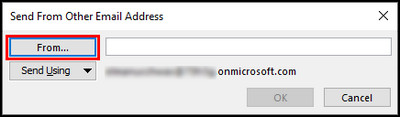
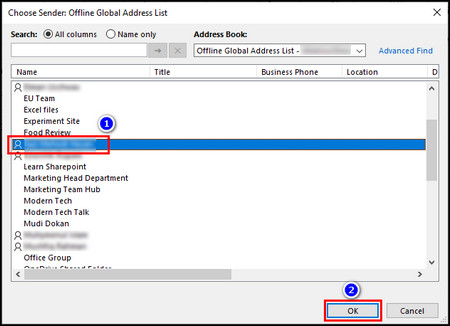
- Choose the user on whose behalf you are sending the email, and click OK.
- Compose your email and hit Send.
In OWA
- Visit Outlook on the Web and log into your account.
- Select New mail from the top left or just press the N key on the keyboard.
- Go to the Options tab and select Show From.
- Expand the From field and select Other email address.
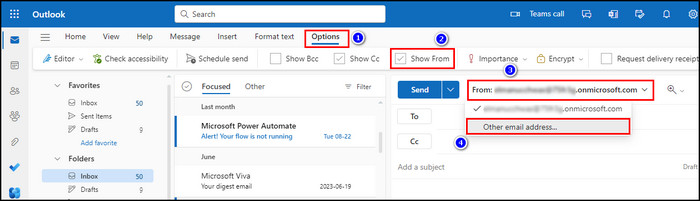
- Choose the user on whose behalf you are sending the email.
- Enter the email recipient in the To field, compose the mail, and click Send.
Now, the recipient will get your email on behalf of your chosen user.
You can do a lot more than just send emails on someone’s behalf. Once you get delegation permission, you’ll be able to open other’s folders, manage their meeting requests, and send emails on behalf of a group, which I’ve explained in the following section.
How to Manage Other User’s Mail in Outlook
As a manager, you can allow your delegate to open your Outlook folders to manage them on your behalf. For that, right-click on your folder and select Properties > Permissions. Enable the Folder visible option, and click OK. Now, your delegate can manage your mailbox.
Follow the methods below to manage other user’s mail in Outlook:
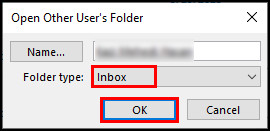
Open Another Person’s Folders
- Launch the Outlook app.
- Select File from the upper left corner.
- Go to the Open & Export tab and select Other User’s Folder.
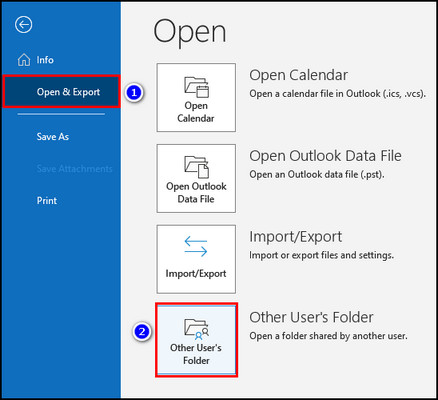
- Click the Name button.
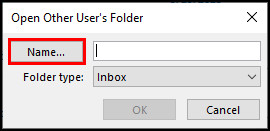
- Choose the user whose folder you want to open, and click OK.
- Select the Folder type, and click OK.
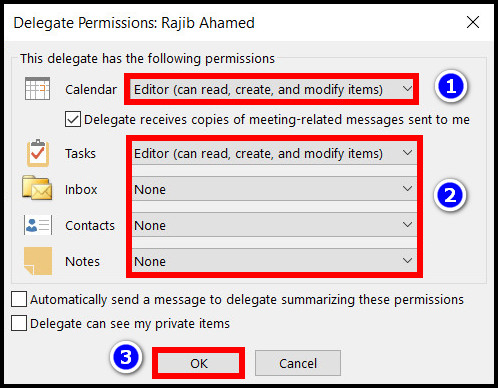
Add Calendar Delegate to Respond to Meeting Requests
When you give someone delegate access to your calendar, they can create & receive your meeting requests and respond to them on your behalf. To grant delegate permissions for the calendar:
- Open Outlook on your desktop.
- Select File > Account Settings > Delegate Access.
- Click the Add button.
- Choose the person you want to delegate, select Add, and click OK.
- Select Editor for the Calendar option, enable the option that allows your delegate to receive meeting-related emails on your behalf, and click OK.
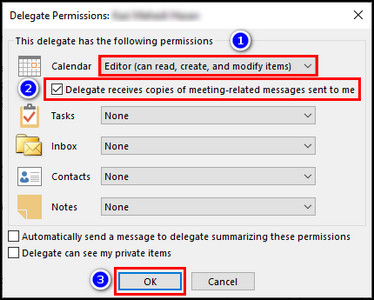
Now, the individual you’ve chosen as your delegate will be able to send meeting requests and respond to requests on your behalf.
Reply to an Email on Behalf of Another Person
- Open the other user’s mailbox in Outlook.
- Select the email you want to reply to.
- Choose either the Reply, Reply All, or Forward option.
- Extend the From field and select Other Email Address.
- Click on From.
- Select the user on whose behalf you are sending the email, and OK.
- Finish your email and click Send.
Send an Email on Behalf of a Group
- Launch the Outlook app on your desktop.
- Select the New Email option from the Home tab.
- Extend the From field and select Other Email Address.
- Click on From.
- Select the Office 365 group on whose behalf you want to send the email, and click OK.
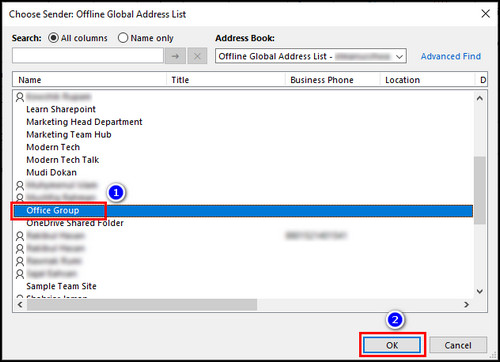
- Write your email and click the Send button.
So, if you have the required delegate permissions, you can do pretty much everything on someone else’s behalf in Outlook.
FAQs
What is the difference between send as and send on behalf in Outlook?
Send as permissions enable the sender to dispatch emails as if another user truly wrote the email. On the other hand, using Send on behalf permissions, a user can send emails with the sender identified as on behalf of another user.
How to remove on behalf of in Outlook?
To remove on behalf of in Outlook, select File > Account Settings > Delegate Access. Select the user you want to erase from the delegate list and click the Remove button.
How do you turn on Send as in Outlook?
To add a user to Send as permission in Outlook, sign in to your Exchange Admin Center. Select Recipients > Mailboxes from the left. Choose your mailbox, go to the Delegation tab, and click the Edit button under Send as. Choose Add members, select the user on whose behalf you want to send emails, and click on Save. Click on Confirm to add the user as your delegation.
Final Thoughts
Sending emails on behalf of another person in Outlook is a valuable feature that can enhance communication and collaboration within organizations.
By following the steps provided in this article, you can easily set up delegation access and ensure that your messages are sent accurately to maintain proper communication.
Comment below if you have further questions, and we’ll get back to you.