At random periods, your monitor becomes dark, and instantly it turns back on again. While some users claim to be able to see the mouse pointer during the error, others claim to have a totally dark monitor.
Some claim that the LED on their monitor begins to strobe, while others claim that everything—including the monitor lamp—turns deadly dark.
I can feel the pain. The most irritative part is it shows no error codes that might help you identify the issue.
But as a technology geek and solving a lot of troubleshooting issues, I have figured out all the winning solutions for you. Try one by one simple method. You will get relief, I can assure you.
Why Is Your Screen Going Black on Windows 10?
Here is a brief description of those issues-
- Loose cable connection: If your monitor cable can’t hold tight to the port, then this issue is very much common. Check the cable connection with the port first.
- Faulty display driver: Malicious programs are highly responsible for affecting your computer drivers. It’s better to update and recheck the drivers. Especially, in this case, take care of your display drivers.
- GPU problem: If your GPU is older and for a long time frame, it is out of regular maintenance, then your display may stop operating unexpectedly. Upgrade your GPU and keep them clean from dust.
- Active virus: Any kind of virus always try to take control over your computer settings and feature. It always creates such kind of trouble for the users.
- Power supply issue: A faulty power supply machine is unable to provide the proper power to it’s system. A monitor needs a good amount of power to operate smoothly. If the power supply gets weak, then you might face this black display trouble.
There may also be some reasons that can cause your monitor blackout problem. I know it is so much confusing and irritative to find out the specific issue and a perfect solution.
But I promised that I would provide you with the best and easiest solution. So please read the information and follow my step-by-step procedure.
Follow our guide step-by-step to get Windows 10 for free as a student.
How to Fix Your Computer Black Screen Problem
Unexpected black screen issues are so troublesome because there are so many possible potential causes for them.
There is nothing to alert them to the issue because Windows 10 doesn’t display a warning message along with the black screen.
Here are the steps to fix screen going black for a second on Windows 10:
1. Use Windows Safe Mode
Although it’s not a permanent fix, this method might be used as a screening one to identify the source of your issue.
Safe Mode is a reboot setting that loads the OS in its default configuration by removing any non-essential settings, programs, and widgets.
Follow these steps,
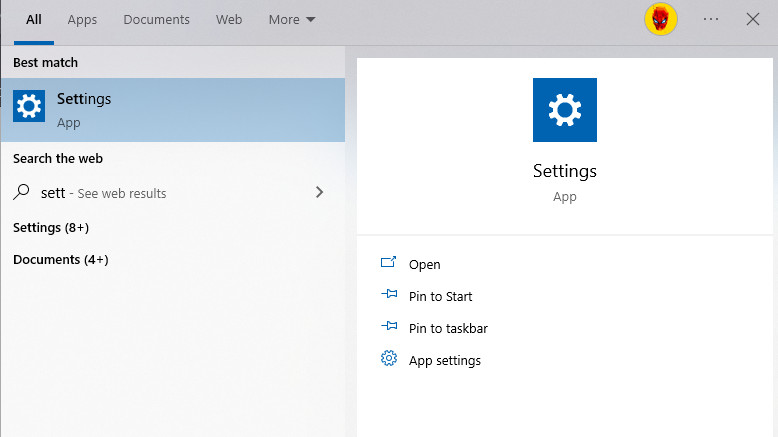
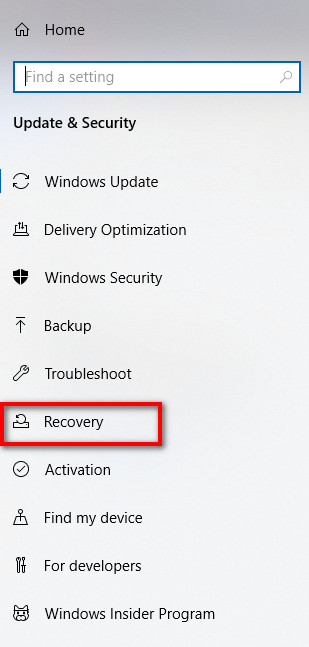
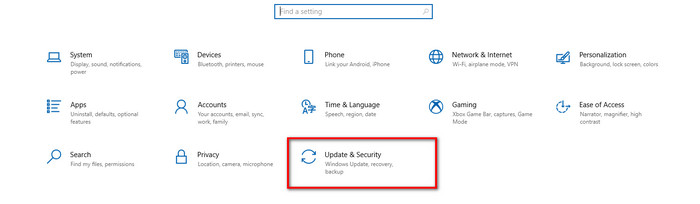
- Open the Settings option.
- Select the option named Update & Security.

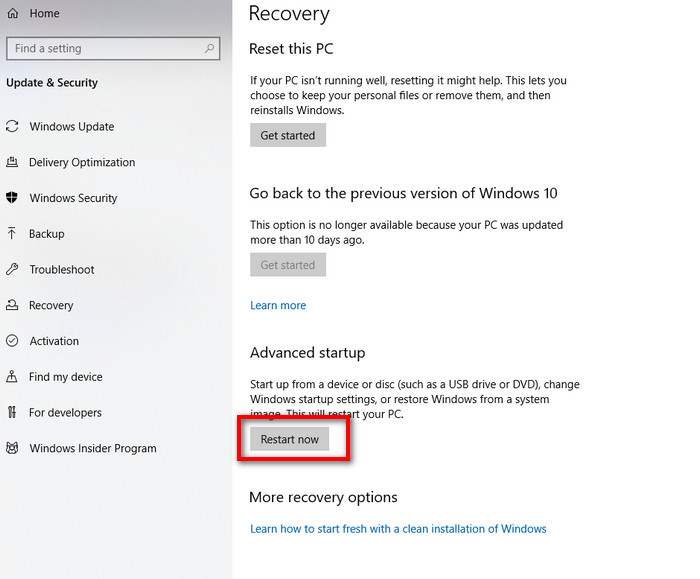
- Click on the recovery option.
- Click on the Restart Now button.
- Select a startup mode from the blue-colored screen.
- Enter the F4 key to start the safe mode.
- Wait for the PC to restart.
Now check whether your issue has been resolved or not. If it didn’t work for you, then try the next method.
2. Fix Your Power Plan
If your dark screen turns back on in a split second, it can be because you lifted the mouse, tapped a keyboard, or did something else that caused it to wake up. If this is the case, it may have been turned off simply as a power-saving measure.
To disable it, go to the next steps.
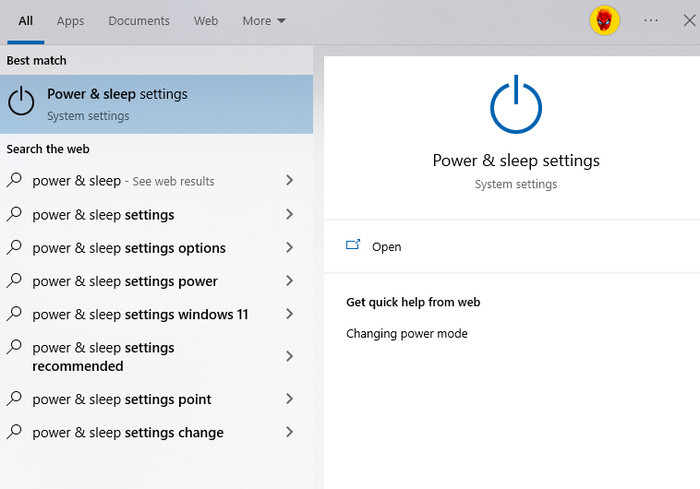
- Search Power & sleep Settings from your windows search option.
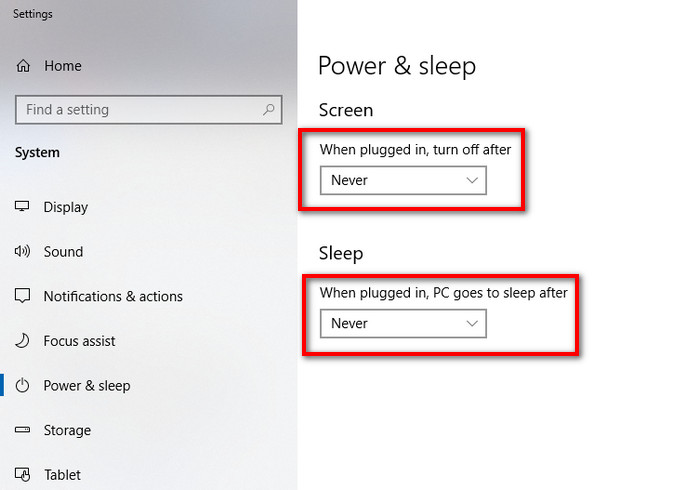
- Set the option Never for Screen Also, set the Never option for the Sleep section.
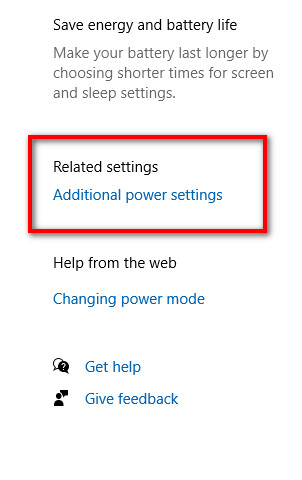
- Select the Additional power settings option from your right side of the screen.
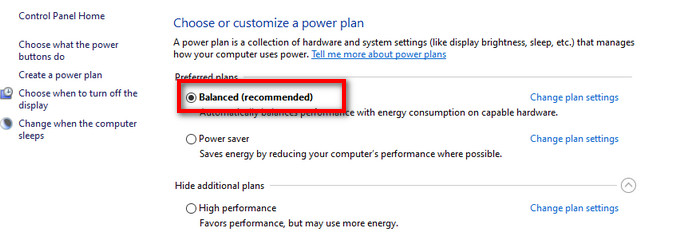
- Set the option Balanced.
Now check your issue. It was the most common solution that worked for a huge group of people. If it still exists, then follow the next method.
See our most recent post on adjust page file in Windows 10.
3. Update Windows OS System
A Windows update fixes system flaws, inconsistencies, and errors. Take advantage of the opportunity to upgrade Windows if that is what is causing your problem.
Follow these steps,
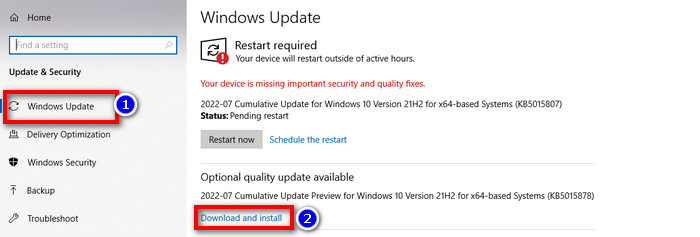
- Open the Settings option.
- Select the option named Update & Security.
- Click on the Windows Update option.
- Click on the Download and install option if you can see any. Otherwise, your OS is updated.
- Restart your system to apply the updates and system changes.
Now check whether your issue has been resolved or not. If it didn’t work for you, then try the next method.
4. Remove the Unwanted and Conflicting Apps from Your System
Some external programs conflict with your GPU drivers, which occasionally results in a black screen.
Among the most prevalent examples are driver updaters, app cleaners, antivirus programs, and graphics-based programs. To test whether the bug goes away, try deactivating each one separately.
Follow these enlisted steps,
- Search for the Apps and Features option from your windows search option.
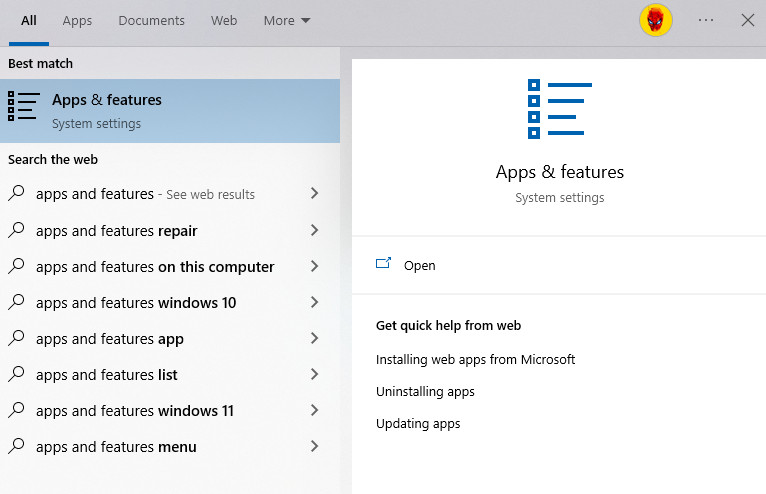
- Select the apps you should remove from your system.
- Click on the Uninstall Here you have to remove those apps from your system.
Now check whether your issue has been resolved or not. If it didn’t work for you, then try the next method.
Follow our guide to fix HDR washed out Windows 10.
5. Test the GPU
GPU is an advanced computer processor that is utilized to accelerate the production and display of pictures. It can have stopped working after years of use, or it could just be loosely attached to your display.
In any event, to make sure this circuit is the root of the problem, you must first turn it off in the system. Follow the steps below.
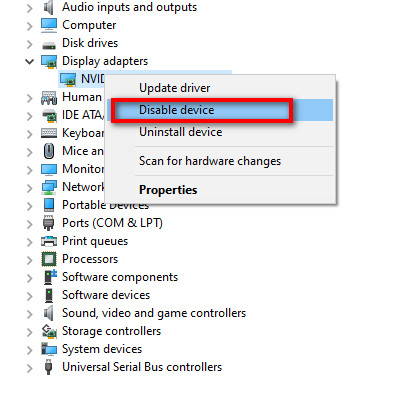
- Search for the Device Manager option from your windows search option.

- Find the option named Display adapter and click on it to expand.
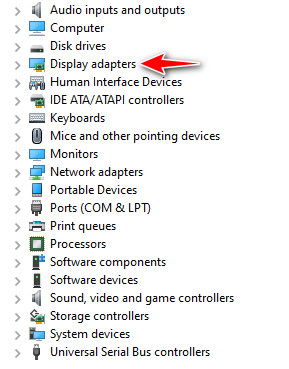
- Select the device and click on the Disable device option.
Now restart your PC and check whether your issue has been resolved or not. If your issue has been solved, then try to fix your GPU device. Follow these steps to apply a solution for your GPU.
- Reset Overclock of your GPU
- Clean the fan’s interior components by vacuuming.
- Include a second cooling system.
- Renew the thermal paste.
- Bring your Graphics card to the shop for repairs.
- Buy a fresh product.
Still no improvement? Don’t worry. Try out this method. This helps a lot of people to get out of this problem.
Follow our guide step-by-step to activate Windows 10 auto login.
6. Restart Windows Explorer
You may already be aware of Windows Explorer, a graphical operating system interface that allows you to control your files and directories.
Its visual features, however, might tax your CPU and processing speed because they are somewhat resource-intensive. In the end, your PC could become extremely slow and behave strangely when displaying information.
Follow these steps.
- Enter Ctrl + Alt + Delete to start your Task manager option.
- Find the Windows Explorer option.
- Click on the Restart option.

Check to see if your problem has been fixed now. Try the following strategy if the previous one didn’t work for you.
7. Fix Your GPU Driver
Your graphic card driver is one of the typical causes of an unexpected dark screen.
If they’ve been updated lately, you could be using corrupt files.
If they haven’t been updated in a while, your drivers are likely out of date. In both situations, the driver lacks responsiveness to the monitor, periodically turning off the display.
Follow these steps to fix your GPU Driver.
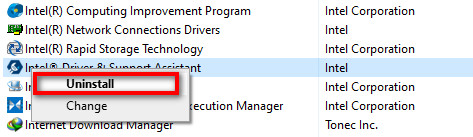
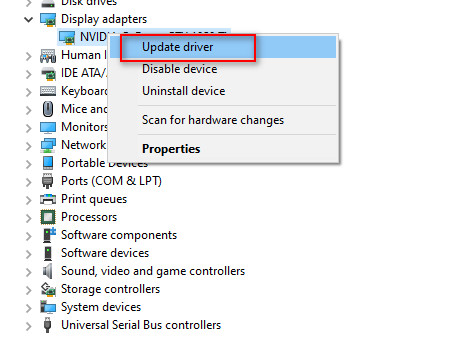
- Search for the Device Manager option from your windows search option.
- Find the option named Display adapter and click on it to expand.
- Select the device and click on the Update option.
Now check if your issue has been resolved or not. If you are still on the negative side, then again, follow the process below.
- Search for the Device Manager option from your windows search option.
- Find the option named Display adapter and click on it to expand.
- Click on the Properties option.
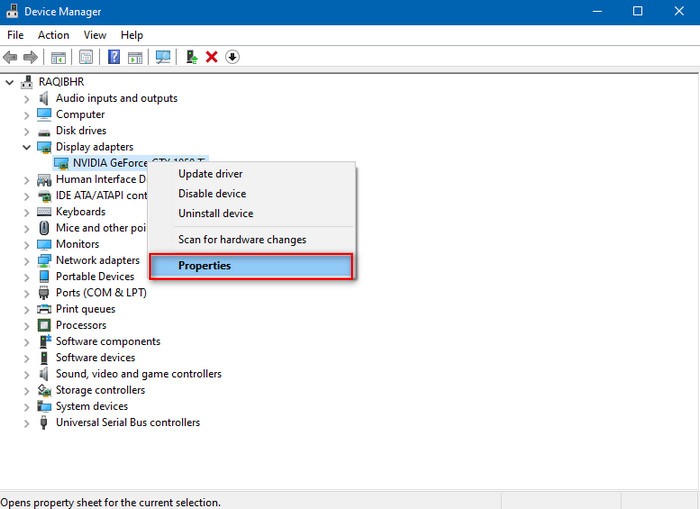
- Select the Driver section.
- Click on the Roll Back Driver button.
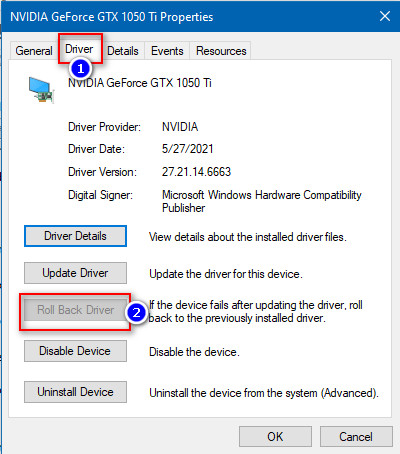
- Wait for the changes applied to your computer.
Restart your computer and check whether the issue has been gone or not. If it is not solved yet, then try the next technique.
8. Test Your Cable Connection
If you’re lucky, a loose connection is what’s causing the black screen issue. Pull out the cords and begin checking them after turning off the PC. Check the cables for any obvious cuts, bends, corrosions, or other damage-related indicators.
Ensure the plastic cover is covered and tightly fitting. You may also try your regular cable with a different computer or port to check if any of it changes, or you can replace your wires with a new pair.
If that’s an issue, using a different type of connection may also work. For reference, if you are currently using VGA, connect your display using an HDMI connection.
You can then send your device to a service center to swap its ports or purchase a new cable, depending on the problem.
If this method doesn’t help, then check the next method. It is very easy and a common issue for computer users.
9. Test Your Monitor
To determine whether your monitor functionalities stop working, consider reducing the brightness of your display. Your display may occasionally be too old, underpowered, or inefficient to operate for lengthy periods of time.
When you overstress it, it gets overwhelmed. The solution to this problem is to reduce brightness.
If this method doesn’t help, then check the next method.
10. Review Your Monitor Cables
Video display converters such as HDMI, VGA, DP, and others transmit video signals. If these signals are unable to reach the monitor, then your monitor can’t run smoothly.
You might be using a converter, a cable that is too thin or lengthy, or just a poor one for this reason. Increase the cable’s AWG size and make sure it doesn’t exceed seven feet in length to rule out those possibilities.
Try the following approach if the previous one doesn’t work.
11. Reset Your Monitor
Another potential issue you should investigate is that although your display is in good physical condition, the settings need to be adjusted.
If this is the case, a straightforward factory reset will do well to solve the problem.
Different displays may require various procedures to return to their factory settings, depending on the manufacturer.
If you don’t feel improvement after resetting your monitor, then try out my next instruction.
12. Scan for Viruses and Remove Them
Every computer is vulnerable to dangers like viruses, malware, and trojan horses, which are often to blame for unexpected circumstances like accidental screen shutdowns.
You have a choice of using third-party software or Windows Defender antivirus. Install a strong security application, then check your system for any viruses.
If your PC is free from any kind of virus and your issue has not been resolved, then follow the next method.
Check out our recent article on Windows 10 Education VS Pro.
13. Check Your Power Supply Unit
A little box called the PSU, or power supply unit, transforms the main electricity into an appropriate voltage and distributes it to various PC components.
This component fails to send the proper power to your display if it is damaged. Your display could flicker, turn off, or go black briefly as a result of this.
Remove the component and start your Desktop computer without it. Check to verify whether the problem has disappeared and that the PSU is not overheated. Next, look for any physical flaws like rust or fractures.
If nothing changes, swap out the related cables and send the entire unit in for repair.
Additionally, the expert could advise purchasing a new PSU, so be prepared for that possibility.
If your PSU is free from any kind of technical problem and your issue has not been resolved, then follow the next method.
14. Check Your Power Source
The hardware of the power supply and energy-saving settings are just two examples of power problems. They might occasionally be caused by an outside influence, like a power outage, local or residential wiring, etc.
To find out whether there is an electrical issue in your area, contact your local power provider. As an alternative, you might utilize a UPS to see whether the problem still exists while using the emergency power.
This device maintains your connection while providing an adequate voltage level that is error-free.
If the problem persists, you can simply rule out the potential of power interference.
To determine if the black screen remains visible, try turning off the lighting system, household appliances, and other power-hungry gadgets.
If your power source station is free from any kind of technical problem and your issue has not been resolved, then follow the next method.
15. Get Help from Third-Party Assistance Tools
When it comes to repairing a problem that is unusual to a given system, external repair tools might be your strongest supporters.
They may locate and remove duplicate data, fix damaged databases, get rid of irritating bugs, and generally give your system a clean state.
Just be sure to choose a strong forum that doesn’t cause more problems than it fixes.
This is because these settings might render your PC entirely unworkable if they are not adjusted appropriately.
Conclusion
I have enlisted all the winning and possible solutions for you to get out of the irritative display blackout problem. Exactly follow my process one by one and try to figure out your issue.
Most of cases, this issue occurs from software or virus-related issues. So without wasting time, try to update drivers with proper settings and remove viruses from your system. Try to use all fresh computer gadgets if you feel that is a hardware issue.
Also, ensure that your computer components are getting the proper voltage supply.
Now tell me which method works for your monitor blackout problem.