There are times when you might encounter the ‘unexpected error’ message on Twitch.
The error message says: ‘Oops! We encountered an unexpected error – please try again. It’s pretty vague as it doesn’t elaborate on the cause. But you don’t need to worry about it as I’ll explain the cause and the solution in this post. So let’s dive into the topic and get to the bottom of it. But before that,
Why does the ‘oops! unexpected error’ occur in Twitch?
The ‘oops! unexpected error’ occurs in Twitch when trying to log in or resetting the password. It can also appear if your Twitch account is deactivated, some browser extension conflicts with Twitch, or due to a corrupt cache.
Keep reading the post to learn more.
How To Fix Unexpected Error In Twitch
As the error message doesn’t direct us to any specific fix, we are on our own.
However, Twitch users have fixed the issue by going through some methods, which I will discuss now.
As these methods worked for many Twitch users and streamers, you should definitely give them a go. Is twitch turbo worth it? See the drawbacks of twitch turbo from our separate guide.
Here are the methods to fix Twitch’s unexpected errors:
1. Check the Twitch server status
Before trying any fix, you should check how the Twitch servers are holding up. Twitch has millions of daily active users, so it’s not surprising if one of their servers goes down.
The problem is related to the Twitch account authorization or login system. Tired of origin not loading on Windows 11? Follow our 2-minutes epic guide to fix this issue.
Luckily, Twitch has a server status page where you can see live updates on all the different types of systems.
Check if all the systems are operational, especially the login system. 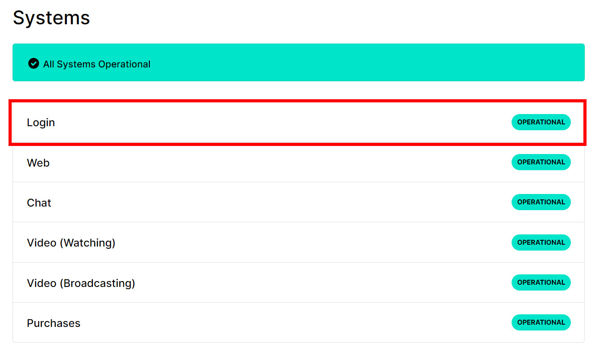
Unfortunately, if the issue is from their servers, you cannot do anything about it. They should give a timeframe to fix the problem or tell you an alternative until it gets fixed.
2. Try to reset the password
If you get the error message while trying to log in to Twitch, it’s time to reset the password.
There is a chance the same error message might show up while resetting the password. But at the same time, resetting the password worked for some users. Enable or disable CD burning capability in Windows 11 with this registry hack our experts provided.
Hence you should give the reset password a shot, and if that doesn’t help, there are fixes to deal with it below.
Do as follows:
- Open Twitch in a web browser.
- Click on the Login button.

- Click on Trouble Logging In? link. It will take you to the Twitch account recovery page.
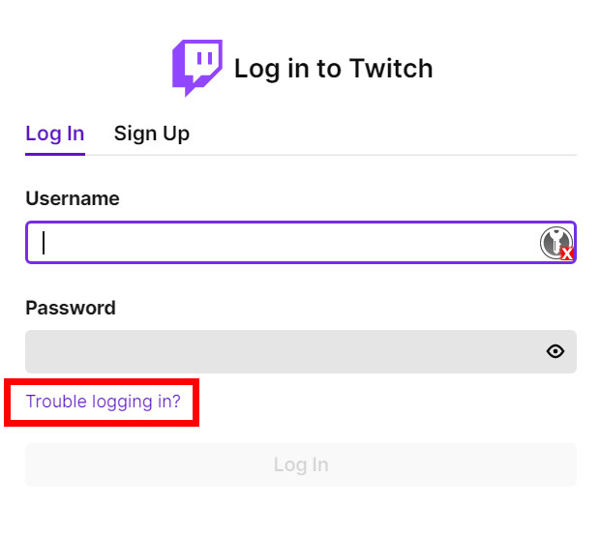
- Enter the email or phone number associated with Twitch, then click Continue.
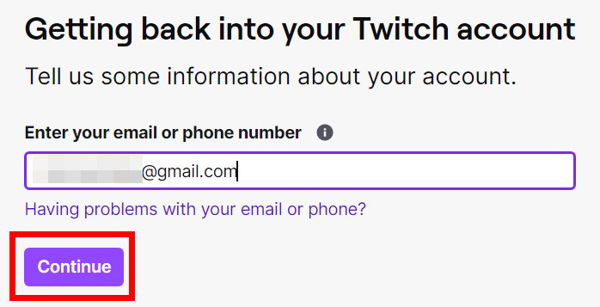
- Enter your Twitch username.
- Click on the Send My Password Reset Link button.
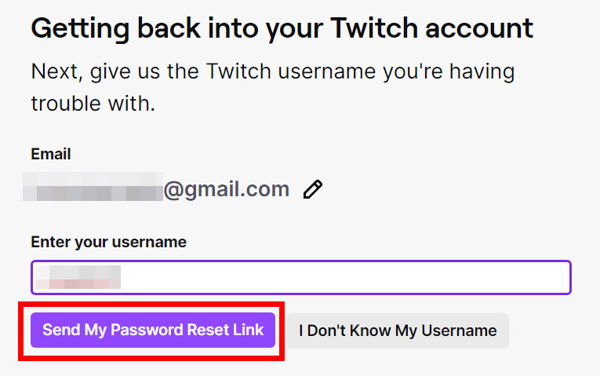
- Open the password reset email or SMS from Twitch and click on the reset link.
- Enter a new password and confirm.
- Go to the Twitch login page and use the new password to log in.
If everything goes well, you should be able to log in to Twitch successfully.
But if you see the error message while resetting the password or after trying to log in with the new password, refer to the following methods which tackle them. So, you can’t change the display name on Twitch?
3. Check if your Twitch account is disabled or inactive
If you face the error message when resetting your password, this method is for you.
There are two ways you can remove the account from Twitch: you can delete the account, or you can disable it.
Deleting the account removes it permanently while disabling the account has a temporary effect.
But there’s more.
As per the Twitch Rename & Recycling Policy, Twitch will mark your account as inactive if you don’t log in or show activity for 12 months.
The username of inactive accounts is made available for new users. Once claimed by someone, all the previous data are wiped, and you lose all access to it.
In either case, Twitch will show the error when you try to reset the password. You need to reactivate the account if it’s disabled or gains access to the inactive account before someone else claims it.
If your account is disabled and you need to reactivate it, the process is simple.
Open Twitch in a desktop browser and log in to the account. It will show a message saying your account is disabled and ask would you like to reactivate it. Click on the purple Reactivate button and follow the instructions to reactivate the account.
If you’re still facing issues, go to the Twitch support page and open a ticket. Choose the category as ‘Account/login issues’ and the sub-category as ‘Reactivate Account’. Fill out the rest of the form and submit it. 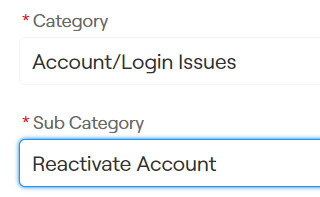
But if your account is marked as inactive, you need to log in to Twitch and hope it’s not too late. If someone claims your username, you will lose access to the previous data, and even Twitch support can’t do anything in such a case.
4. Use incognito mode
We use Incognito mode to hide our browsing activity in the browser. But it has some added advantages.
Incognito mode disables all the extensions or add-ons for the window, so they cannot interfere. It also doesn’t use the cached images and files from the regular browsing history.
So it’s a great way to check if the error originates from the extensions’ interference.
Whether you use Google Chrome, Mozilla Firefox, Microsoft Edge, or other browsers, the shortcut to open Incognito Mode is the same: Ctrl + Shift + N. It will open a new window with incognito mode on.
After opening the incognito window, browse Twitch and see if you encounter the unexpected error message.
5. Disable browser extensions
If you don’t face the error message using incognito mode, you can be confident that some extension is causing the problem.
So now the question is, which one is it?
A quick solution would be to disable any extension dealing with videos or Twitch.
Specifically, several users have found that the Disable HTML5 Autoplay extension caused the issue. The extension prevents any video from playing automatically in the browser. But it’s outdated, and out of maintenance for quite a while, so you can remove it and find an alternative.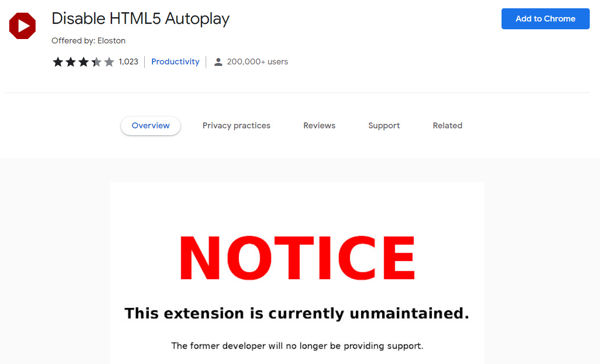
But if you don’t want to remove the extensions dealing with videos or Twitch randomly, you need to find the correct one.
You can do so by disabling the extensions one at a time and checking if it solves the issue.
For ease, I’ve given a step by step guide below for Google Chrome first and then other browsers below:
- Open the desktop browser.
- Keep Twitch open in a separate tab.
- Click on the three dots from the top-right to open the menu.
- Hover the cursor over More Tools, then select Extensions.
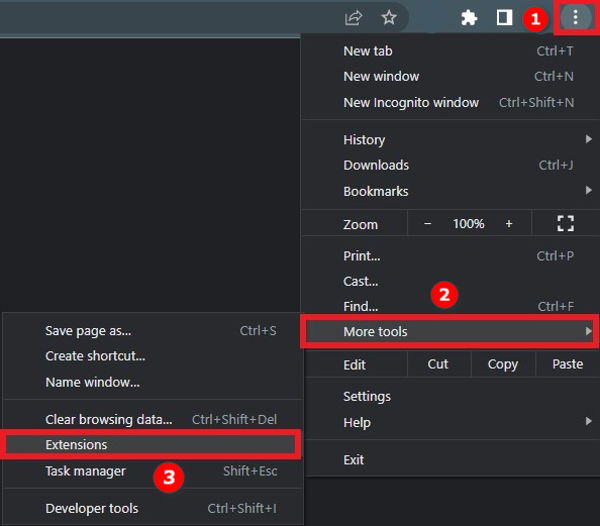
- Disable an extension.
- Go to the Twitch tab and reload.
- Check if the issue goes away. If it does, the last disabled extension is the origin of the problem. Otherwise, repeat steps 5-7.
- Remove the extension causing the issue and find an alternative if needed.
- Enable all the other extensions which are not causing the problem.
In Mozilla Firefox, the extensions are called Add-ons, and you can find them at Menu > Add-ons and Themes. 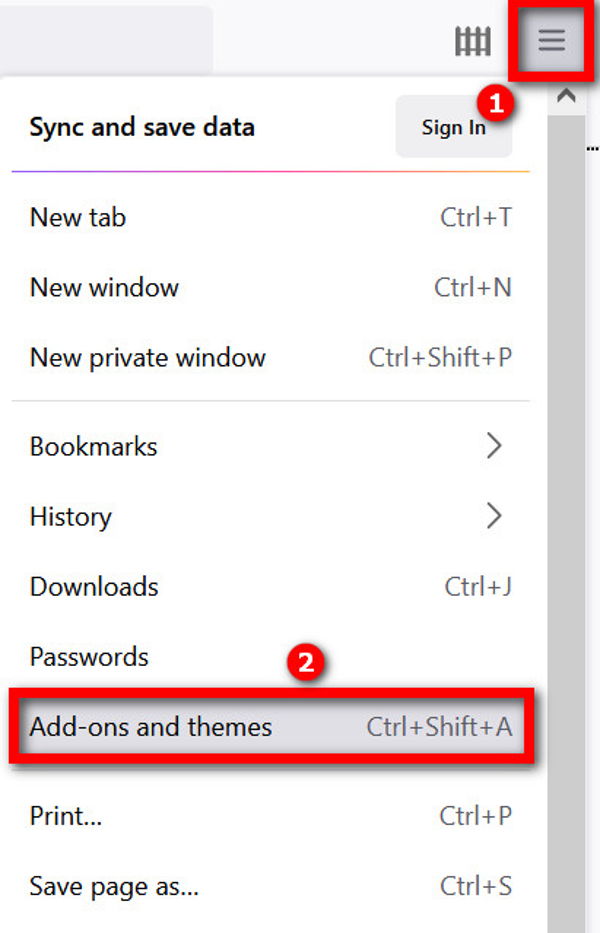
For Microsoft Edge, the way to find extensions is Menu > Extensions. 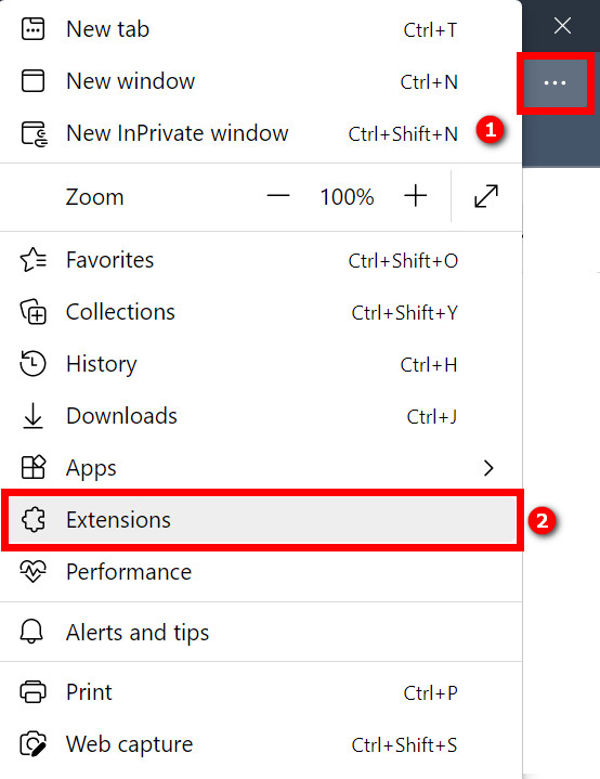
6. Clear browser cache
A corrupt browser cache can cause issues in different ways. So it is wise to clear the browser cache to remove any possibility.
Doing so is quite simple, so I’m going to elaborate on the process for Google Chrome, along with a short explanation for other browsers.
Follow the steps below:
- Open the browser.
- Go to menu > Settings.
- Go to the Security & Privacy settings from the left.
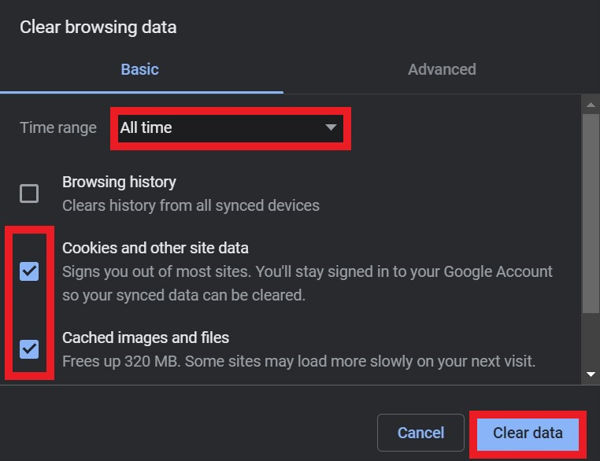
- Click on Clear Browsing Data.
- Select ‘Clear cached images and files’.
- Select All Time as the time range.
- Click on the Clear Data button to complete the process.
In Mozilla Firefox, you need to go to Menu > Settings > Privacy & Security > Cookies And Site Data section. Then click on the Clear Data button. 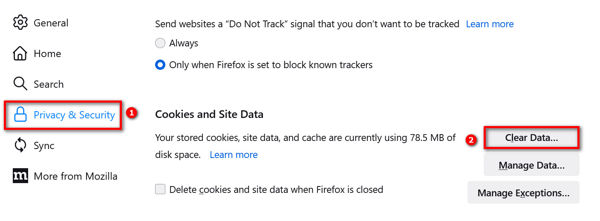
From the popup, click on the Clear button to finish the process. 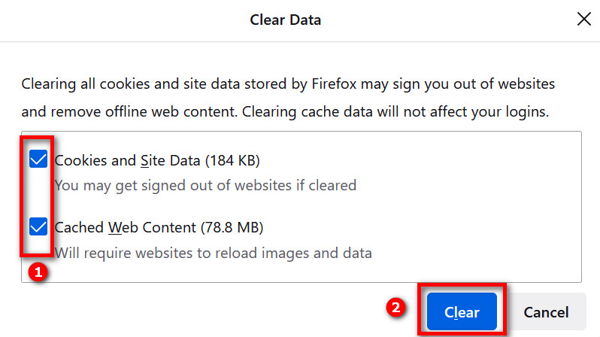
In Microsoft Edge, go to Menu > Settings > Privacy, search and services > Clear browsing data section. Click ‘Choose what to clear’. 
Like Google Chrome, select All Time as the time range and check Cached images and files. Then hit the Clear Now button. 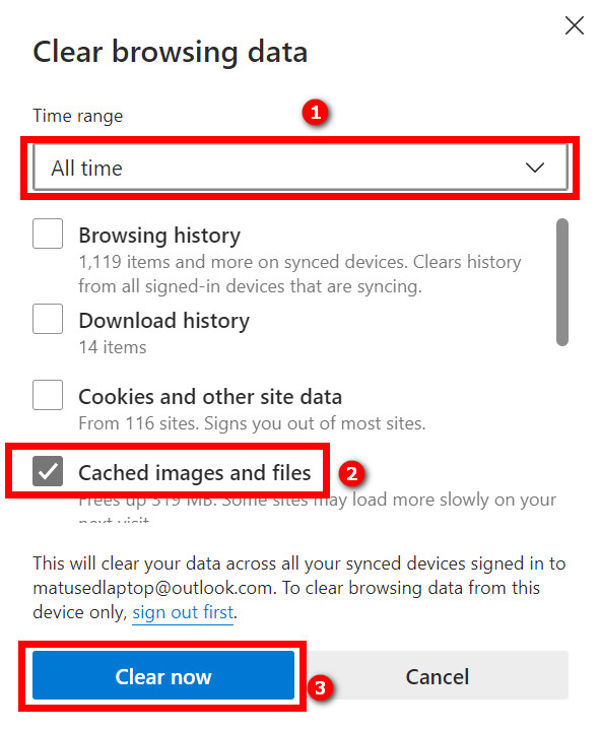
7. Try a different browser
If none of the browser-related fixes solve the problem, it’s time to move on to a different browser.
There are many popular browsers from which you can choose to watch Twitch. Google Chrome, Mozilla Firefox, Microsoft Edge, Brave Browser, and Safari are all excellent choices as browsers.
The game-centric browser Opera GX also has tight integration with Twitch and might give you a better experience.
8. Reinstall the app
If you face any issue with the Twitch mobile app, reinstalling the app can do wonders.
You might have already tried clearing the cache and data, but that does not suffice.
Complete uninstall of the Twitch mobile app followed by an install will give you a fresh start and remove the issue.
Go to your device Settings > Apps to uninstall the app and uninstall Twitch.
Then go to the Play Store or App Store and install Twitch again.
9. Enable 2FA
This method is a specific solution to the problem where you cannot stream from the mobile app and see the unexpected error message.
If you try to stream through your phone using the Twitch mobile app, it might show the ‘unexpected error’ message. Streaming from the phone requires access to the stream key, which Twitch can restrict based on your security settings.
A quick solution is to enable 2FA (two-factor authentication) on Twitch.
Here is a detailed guide:
- Go to Twitch from a desktop browser.
- Login if you aren’t already.
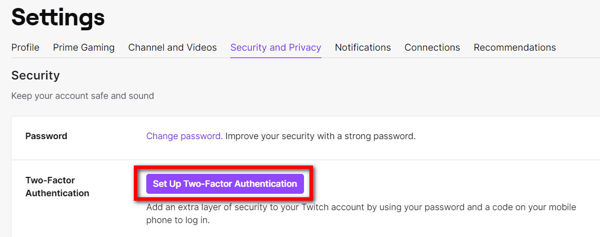
- Click on the avatar from the top-right and select Settings.
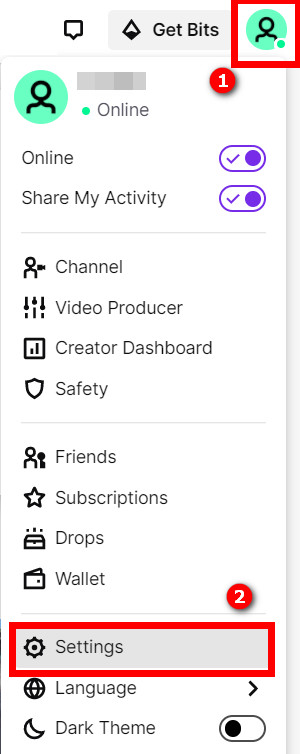
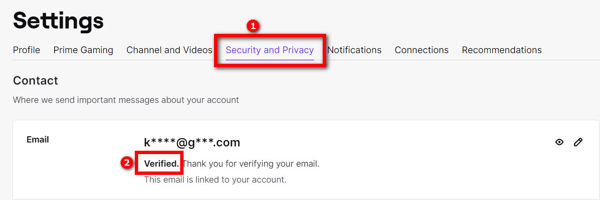
- Go to the Security and Privacy tab.
- Check if your email is verified. If not, you need to verify the email before enabling 2FA, and there will be a verify email button to do so.
- Scroll to the Security section below.
- Click on the Set Up Two-Factor Authentication button. A popup will appear.
- Click Enable 2FA and type your phone number. You will need access to the phone number every time you log in to Twitch.
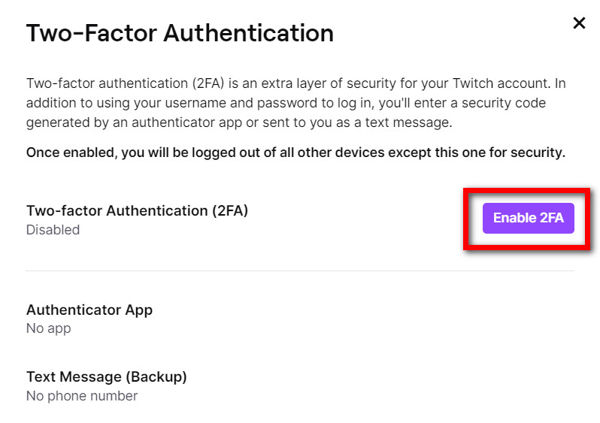
- Click on Continue.
- Check your phone inbox for an OTP code from Twitch.
- Type the seven-digit OTP code.
- Click ‘Skip (Use SMS as an authenticator)’.
And that should be it. Now head over to Twitch mobile app and log in. You will need to go through the 2FA, and your problem should go away.
10. Contact Twitch support
If you’ve reached this far, you can be confident the problem is on Twitch’s side and not yours.
Therefore, your only hope is to contact them and wait for a reply. If you explain the issue clearly and open the ticket correctly, you might listen back from Twitch quickly.
Otherwise, it usually takes seven working days to get a reply from Twitch.
Final Thoughts
Twitch is a streaming platform with over 140 million monthly active users, and it does a reasonably decent job of maintaining such a huge load.
However, there are times when you can come across the oops! Unexpected error message on Twitch.
Though there are several reasons behind the problem, you should be able to fix them by following through with the fixes in this post.