Change is scary! Especially when you leave your comfort zone and experience a new User Interface (UI) for your daily used applications.
While switching from Outlook to Gmail, many users found the UI comparatively complicated, and sometimes they wanted to change the Gmail appearance to Outlook.
In this article, I will show you how to change the Gmail looks and make it exactly like the Outlook interface.
Tag along!
How to Set Up Gmail to Look Like Outlook
While switching from Outlook to Gmail, you can efficiently mirror Gmail to Outlook in different ways. The most helpful method is to enable Preview Pane, disable Conversation view, enable the full-screen compose window, add a signature, and use labels instead of folders.
Besides, you can add a custom color for each label and create a task list similar to Outlook. Go through the following methods to make your Gmail look like Outlook.
Here are the methods to set up Gmail to look like Outlook:
1. Enable Preview Pane
Among thousands of Outlook features, the Preview Pane is the unique one that lets you go through the email preview. Contrarily, there is no default preview pane in Gmail like in Outlook.
The first step is to set up a Preview Pane for Gmail. Fortunately, Gmail offers a similar feature known as the Reading Pane. Check the subsequent instructions to enable the email Preview feature in Gmail.
Here are the steps to enable the Preview Pane:
- Open your browser and go to Gmail.
- Sign in using your login credentials.
- Click on Settings (Gear Icon).
- Scroll down and locate the Reading pane.
- Choose Right of inbox.
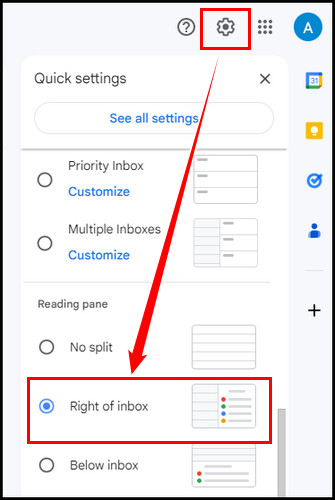
The above procedure will enable the Preview Pane in your Gmail inbox. You will see the Preview Pane on the right side of your Gmail inbox.
Quick Note: When an email opens in the Preview Pane, it takes 3 seconds to be marked as read. However, using the General Settings menu, you can adjust the delay time.
Adjust the Preview Pane size by dragging and dropping the Vertical Split (Double Arrow) option until it feels like your Outlook inbox.
2. Disable Conversation View
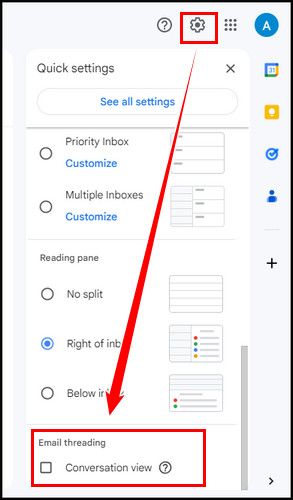
Under Email threading, there is an option known as the Conversation view. It helps to group the same types of emails.
Adding Gmail in MS Outlook can be a quick workaround. Check out a separate post on how to set up Gmail in Microsoft Outlook.
Outlook users used to have each email as a separate conversation. Disable the Conversation View option by following the steps below to achieve the same in Outlook.
Check the following process to disable Conversation View:
- Open your browser and go to Gmail.
- Click on the Gear Icon to open Settings.
- Scroll down and locate the Email threading menu.
- Uncheck the Conversation view checkbox.
- Reload Gmail when prompted.
Now, whenever you open an email in the Preview Pane, you will see only the selected email instead of the conversation view.
3. Enable Full Screen Compose Window
By default, Gmail starts a new email in a tiny reply window. If you hate this miniature design and love Outlook’s full-screen compose window, go through the following procedures to enable full-screen composer.
Consider the following instruction to enable the full-screen compose window:
- Click the Compose button.
- Select the More options (three dots) to expand the menu.
- Choose the Default to full-screen option.
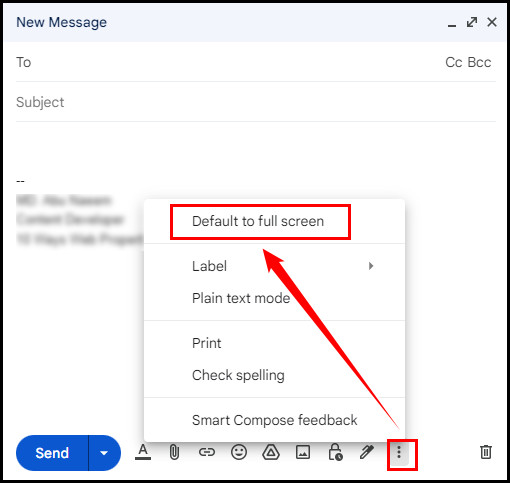
Next time, whenever you click the Compose button, you will get a full-screen email compose window.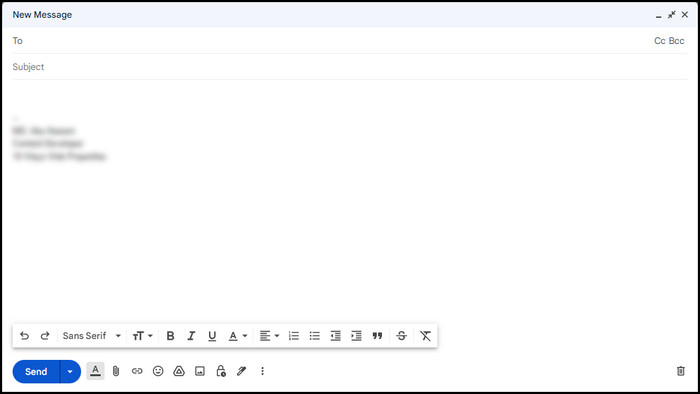
Note: If you hold down the Shift key and click the Compose button, the email composer will open in a new tab with a full-screen window.
4. Add a Signature
Outlook users can attach their signatures with emails informing them of their position and other details in an organization. If you often use a signature with your emails, you may also want to add one with Gmail.
Gmail allows users to add multiple signatures, and you can set one as your default signature. For brief instructions, check the following method.
Here’s how to add a signature in Gmail, like in Outlook:
- Sign in to your Gmail account.
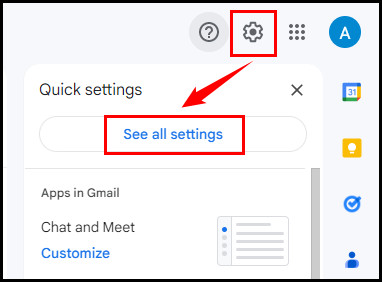
- Navigate to Settings > See all settings.
- Scroll down and locate the Signature section.
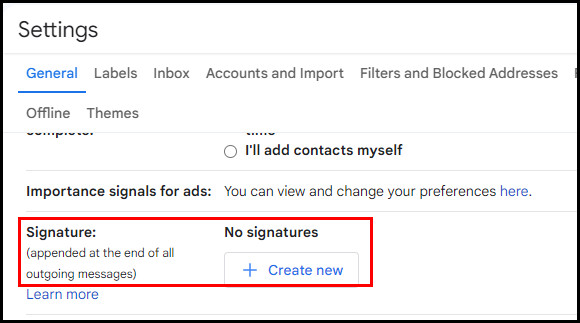
- Click on Create new button.
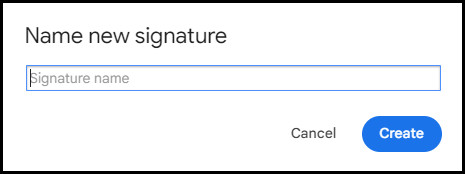
- Enter a name for the Signature and select Create.
- Type your signature details.

- Scroll down and click Save changes.
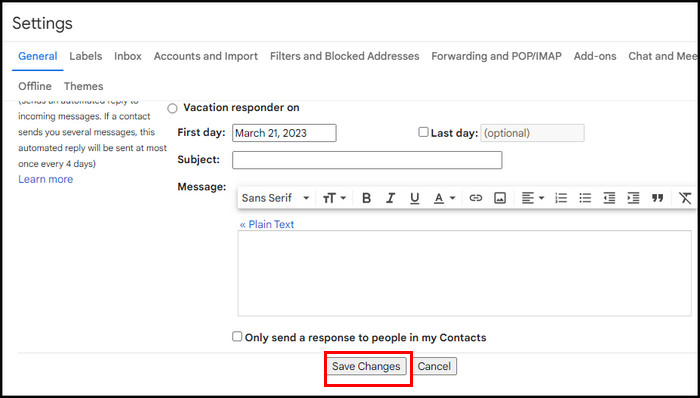
After adding the signature, you will see the signature attached at the bottom of the email whenever you click on Compose.
You can also add an image in your signature when required. However, if your image is now visible in the signature, you can quickly resolve the signature image not showing the issue.
Note: You can add a default signature for the new emails and your replies. Click on the drop-down menu to choose signature for NEW EMAILS USE and REPLY/FORWARD options.
5. Use Labels
Outlook users are used to sorting their emails by folders. So, users panic when they switch to Gmail and don’t find the folder option.
However, Gmail has its own folder system known as Labels. Using this feature, users can apply a label or tag to any email and search through them efficiently to find the correct emails.
Outlook Classic View has a different User Interface compared to the modern view. Changing Outlook to Classic View can be a good workaround.
Consider the subsequent process to create a new Label in Gmail.
Here is the process for creating a new Label in Gmail:
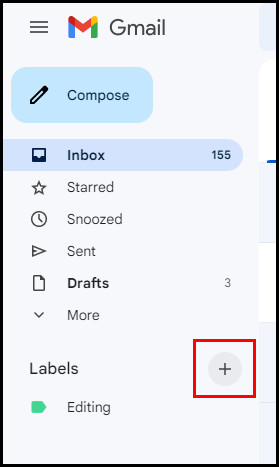
- Click on the Plus icon (Create new label) next to Labels.
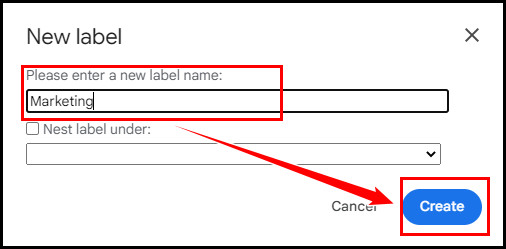
- Enter a name for the label and select Create.
- Click on an email and select Labels from the top bar to assign a label.
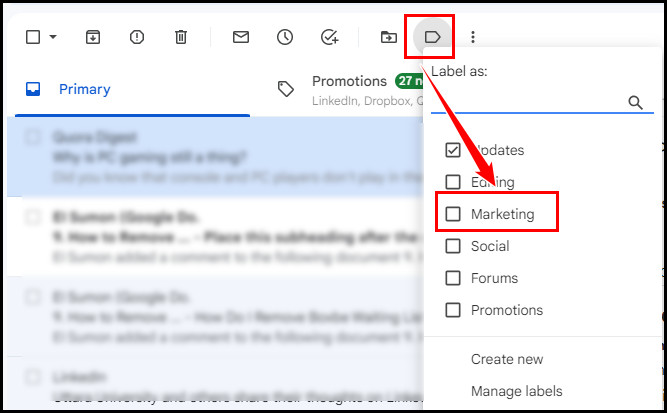
- Select Apply to save the changes.
Labels have more functionality compared to Outlook folders. For instance, Outlook allows only one folder for an email. Contrarily, Gmail allows assigning multiple emails under a single label.
For further control over the label’s functionality, navigate to Settings > See all settings. Switch to the Labels tab and scroll down to locate your labels. Here you can edit your previously created labels.
To add colors to your labels, place the mouse cursor on the label, and you will notice the three dots (kebab) menu. Click on it and choose any built-in color for your Gmail labels. For custom color, choose Add custom color and click Apply to save the changes.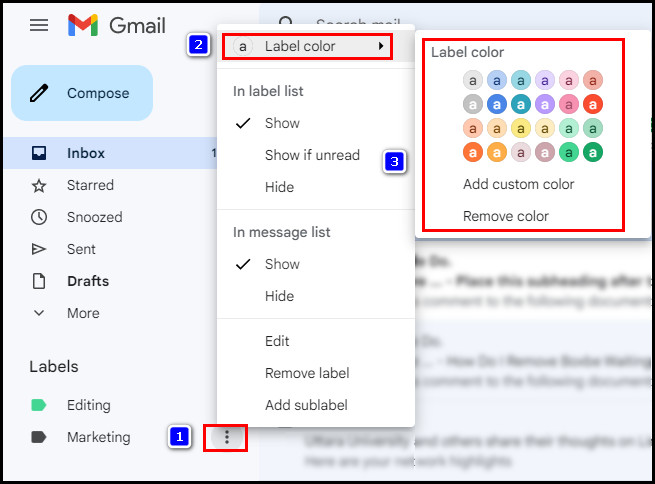
6. Enable Offline Mail
Outlook users can browse their emails even offline. While changing the default email platform to Gmail, they seek the offline feature.
Fortunately, in Gmail, users can enable the offline mail feature to access their emails even when they are not online. Check the following procedure to allow offline mail in Gmail.
Here are the steps to enable Offline Mail in Gmail:
- Go to Settings > See all settings.

- Switch to the Offline tab.
- Tick the Enable offline mail checkbox.
- Twerk the Security and Sync settings options.
- Click Save Changes.
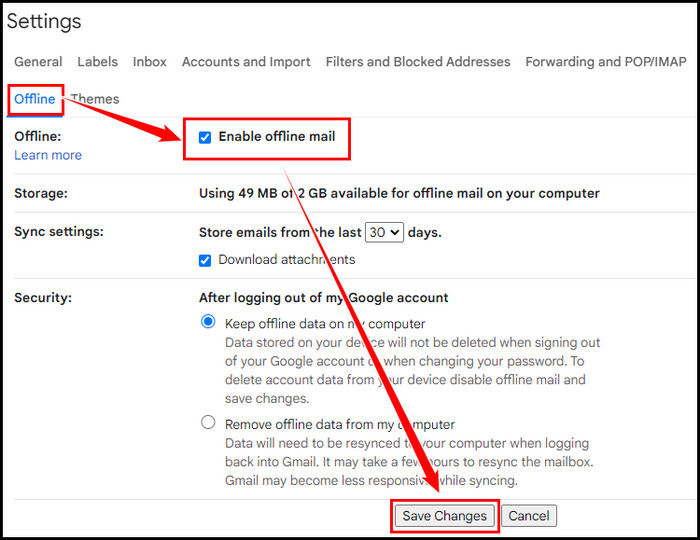
After performing the above steps, you will be able to use Gmail even when you are offline. Next to the Sync settings option, choose how many days Gmail should store your emails.
There is no direct method to reset Gmail’s settings. Instead, you must go through all settings and tweak the ones you messed with. You must disable the Preview Pane, enable Conversation view, undermine the full-screen compose window, and delete signatures to return to Gmail’s default looks.
If you use a Gmail account on Outlook, you may face some errors, such as Gmail 78754 failure. You can quickly resolve the Gmail 78754 failure error Outlook.
Furthermore, you must remove the label color and disable Offline Mail to bring back the exact look of default Gmail. Let’s have a look at the following discussions.
Here are the ways to roll back Gmail’s default appearance:
Disable Preview Pane
To disable the Preview Pane in Gmail, click on Settings and choose No split under the Reading pane menu.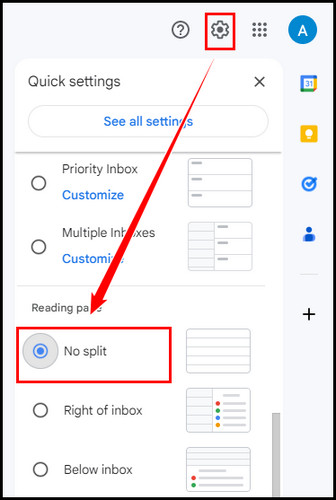
It will instantly change the preview and return it to the standard Gmail appearance.
Enable Conversation View
Conversation view is an essential feature of Gmail. To enable the Conversation view, click on Gmail Settings and enable the Conversation view from the bottom of the settings.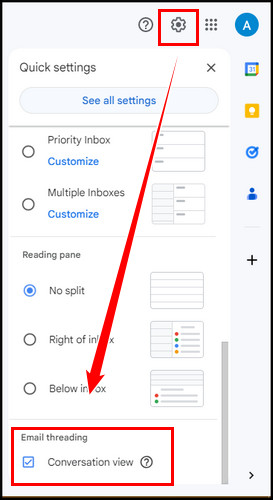
Disable Full Screen Composer
To remove the full-screen feature, click Compose, select More options (three dots), and remove the tick from Default to full screen.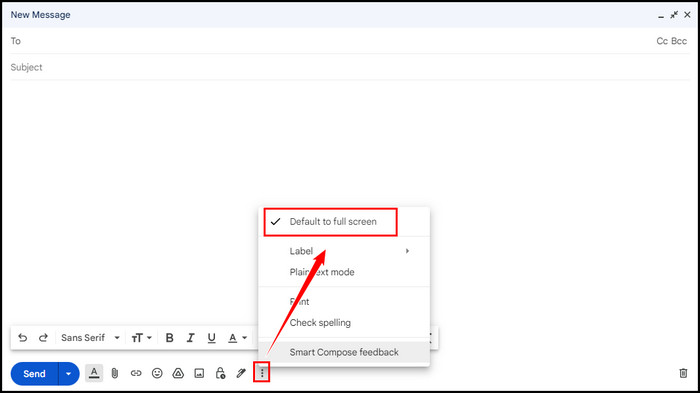
Remove Signature and Labels
To remove the signatures, navigate to Settings > See all settings. Scroll down and locate the Signature section. Click on the delete icon to remove the signature.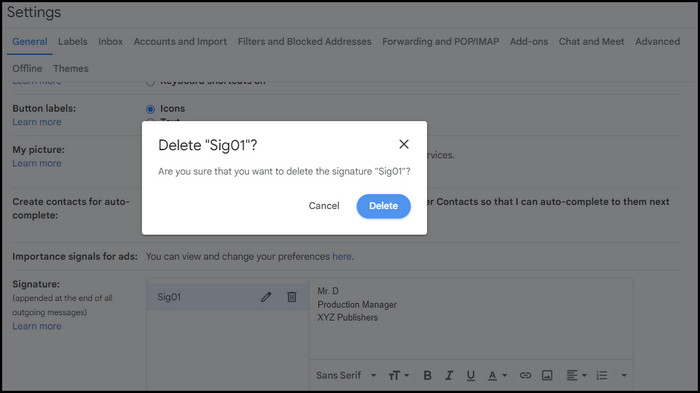
Contrarily, switch to the Labels tab to remove your labels. Scroll down, locate your labels, and click remove to delete the existing labels.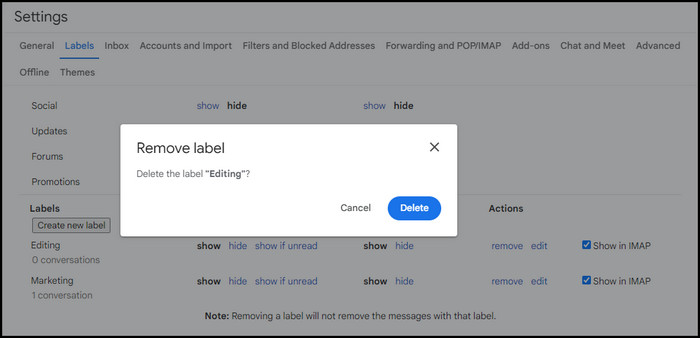
Why Do You Need to Mirror Gmail to MS Outlook?
Outlook’s user interface (UI) and user experience (UX) are dissimilar from Gmail. While switching from Outlook to Gmail, numerous users found Gmail more complicated, though it’s not. To overcome this situation, people want to mirror Gmail to Microsoft Outlook.
It’s crystal clear that migrating from Outlook to Gmail can be a hassle, especially for senior citizens.
Without wasting time educating them on a new interface, changing the look of Gmail to an Outlook interface is more accessible.
Though Outlook and Gmail are competitors and battling for their email platforms, they still have some integrated features. For instance, you can effortlessly transfer contacts between Outlook and Gmail.
Besides, it can be inconvenient if anyone uses Outlook and Gmail as their daily email service provider. For example, if you use Gmail for your office tasks and Outlook for personal use, you should mirror Gmail to Outlook to increase your work productivity.
Frequently Asked Questions
Does Gmail have folders like Outlook?
Gmail uses Labels instead of the folder system of Outlook. Labels are very similar to folders, and you can assign multiple labels for an email.
Can I change the way Gmail looks?
Yes, using Gmail Quick Settings, you can change the Gmail appearance. To access Quick Settings, navigate to Settings > See all settings. Change the theme and play with other settings to change Gmail’s appearance.
How do I make my Gmail look more professional?
There are some great techniques to make your Gmail more professional. For instance, while composing an email, use correct terminology, make things short & to the point, add attachments, and edit perfectly.
Wrap Up
Changing the Gmail appearance to Outlook can be handy and save a ton of time if you are a regular Outlook user.
When you make the Gmail inbox more similar to Outlook, it’s easier to find everything without wasting time.
I have covered every aspect of making Gmail closer to Outlook and how to revert the process. Do you have any additional queries in mind? Let me know in the comment section below.