There are times when we send an email, only to realize we missed some crucial details or an attachment.
Of course, you can send another email with the missing details, but it looks unprofessional.
This post will guide you through the steps to recall an email in Outlook.
You’ll also know how to confirm if your recall action was successful and what the recipient will see.
So keep reading the post till the end.
What Does Recalling Email Mean?
If you’re often forgetful, you’ll love the recall email feature in Outlook. It lets you un-send an already sent mail in the Outlook desktop app.
You might forget to add any necessary information or attachment and send the email. Sometimes we send emails to the wrong person or department, especially if the email addresses look similar.
If you remember quickly about the mistake, there’s a big chance you can recall the message.
You have two options: you can recall the email, or you can replace the email with a new one (with the missing attachments or information added).
To recall a message, you must meet some requirements. Let’s see them first.
Follow our guide step-by-step to add multiple emails to Outlook easily.
What Are The Requirements To Recall An Email In Outlook?
Not every user can recall an email in Outlook. There are some requirements you and the recipient must meet. They are as follows:
- The email must be unread. You cannot recall an already opened email.
- You must use the Outlook desktop app. There’s no recall message feature in Outlook web.
- Both the recipient and you must have either Microsoft 365 or Microsoft Exchange account.
- Both the recipient and you must be under the same organization.
- The organization must allow the email recall feature.
- Azure Information Protection does not protect email.
If you and the recipient meet these requirements, you’re ready to recall a message.
Also read how to add new Mailbox in Outlook easily.
How Do I Know If My Email Was Recalled In Outlook?
You cannot rely 100% on the recall message option. Many factors must be met to initiate the recall functionality, as I’ve discussed in the previous section.
But even then, it’s not inevitable. Recalling a message takes some time, and the recipient can see the message meanwhile.
It’s also possible that the recipient has set some options in the Outlook settings, which prevent the recall functionality, and you’ll get a “recall failure” notification.
So even if you have successfully started the recall process, it might eventually fail at some point.
So the best option is not to rely on the recall function but to double or triple-check everything before sending the email.
But as humans, it’s natural to make mistakes once in a while. In such a case, your best option is to resort to the recall message option.
Follow the methods below to know if your email was recalled successfully in Outlook:
1. Check the recall notification message
If you’ve checked the “Tell me if recall succeeds or fails for each recipient” option during recalling, you will receive recall status notifications for each recipient.
The notification will be in the form of a message with the same subject as the recalled message. The only difference is the recall status will be attached at the front of the subject.
So if the recall were successful for a recipient, you’d see a notification message with the subject “recall success {rest of the subject here}.”
But if the recall failed (there are various reasons behind it), you’d see a message with the subject as “recall failure {rest of the subject here}.”
If you sent the original message to multiple recipients, you’d receive a notification for each of them.
2. Check inside the Tracking option
You can still see the recall status if you forget to check the “Tell me if recall succeeds or fails for each recipient” option.
This method is ideal if you don’t want to receive notifications for every recipient.
Here are the steps:
- Open the Sent folder.
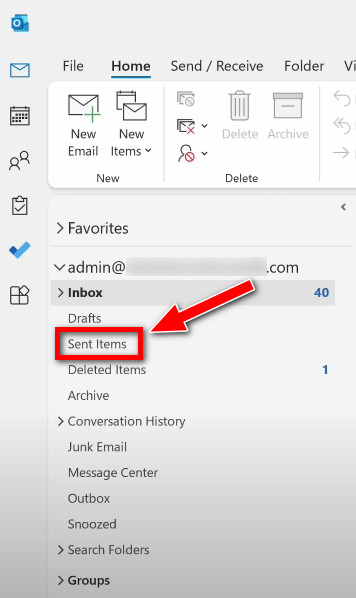
- Click on the recalled message to select it.
- Click on the Tracking button at the top.
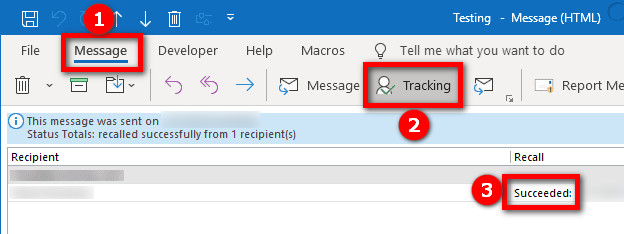
You’ll see a table with a list of recipients. The right column will tell if the recall was a success or failure.
The recall status will depend on the Outlook settings of the recipient. Various settings will play a role here.
For example, if the message you’re trying to recall and the replacement message are in different folders, the recall will fail.
Enabling a specific option also allows the recipient to see both the original message and the replacement one. Sometimes the recall is successful, and the recipient gets a notification regarding the recall.
You can know all about this by visiting the Microsoft support page on the topic. Go through the table at the bottom of the webpage to know the details.
Also read how to fix Outlook junk mail rules not working.
How To Recall An Email In Outlook
After checking the requirements to recall emails, you can proceed to know how to recall emails in Outlook.
But be aware that recalling the message might still not work, even if you meet all the requirements. If the recipient has the Outlook settings in a particular manner, they can know about the recall or still see the recall message.
As per the requirements, you must use the Outlook desktop app and have a Microsoft 365 or Exchange account.
Follow the steps below to recall an email in Outlook:
1. Open the sent email you want to recall
First, you need to open the sent email that you want to recall from the Outlook desktop app.
Do as follows:
- Open the Outlook desktop app.
- Open the Sent folder.

- Double-click on the sent email that you want to recall. This will open the message.
The last step is essential, as merely selecting the email with a single click won’t bring up the recall option.
2. Recall the email
With the sent mail open, you can recall the mail and set up some essential options.
Here are the steps:
- Go to the Message tab from the top.
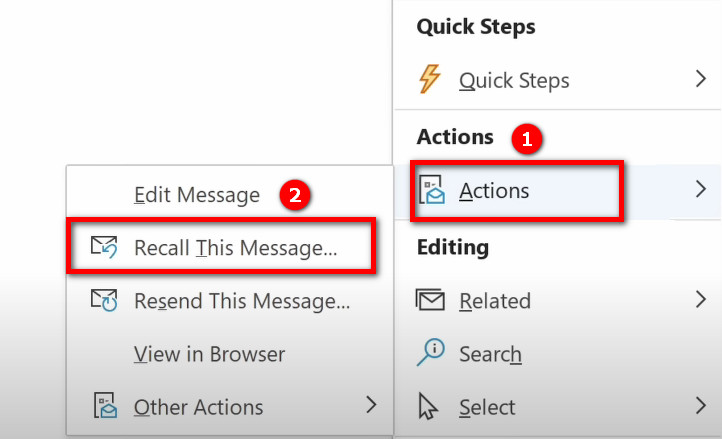
- Click on the Actions option from the top ribbon. It’ll open a dropdown list of features.
 Alternatively, click on the More Move Actions button from the Move section on the top ribbon.
  You won’t see the Actions option if you have the simplified ribbon. Then you need to click on (…) More Commands > Actions.
 - Click on Recall This Message. A new window will appear.
- Check the “Tell me if recall succeeds or fails for each recipient” option. It’ll enable notifications for the recall status of each recipient.
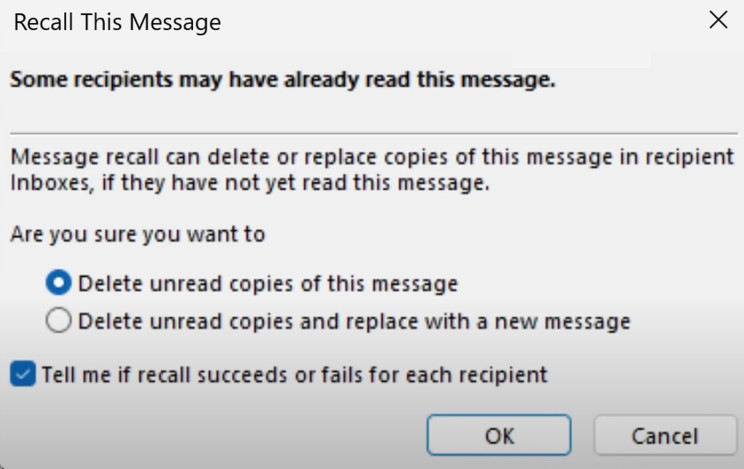
If you enable the last option, you’ll see the recall status of the email for each recipient in front of the subject. It’ll either say “recall success” or “recall failure.”
But wait, you’re not done yet. Next, you must choose if you want to send a replacement message.
Here’s a complete guide on how to fix email icons not showing forward/reply status in Outlook.
3. Choose if you want to send a replacement message
You can either opt to recall the sent message or replace the sent message with a new one.
Do as follows on the recall window:
- Choose “Delete unread copies of this message” if you want to recall the message without any replacement email.
- Choose “Delete unread copies and replace with a new message” if you want to replace the recalled message with a new one.
- Click on OK.

You’re done if you’ve decided not to send a replacement message.
Otherwise, you need to type the new replacement message in the new blank mail that appears on the screen. After you’ve finished typing, click on Send, and you’re done.
Find out how to change Outlook rules.
Final Thoughts
Recall Message is an excellent feature in the Outlook desktop app that lets you recall already sent messages.
The message to be recalled, the sender and the recipient need to fulfill some requirements to be able to recall the message.
Even then, the recall status might fail. It depends on the recipient’s Outlook settings.
You can know if the recall message was successful by checking the recall status or the Tracking option.