The error message “no bootable device found” might come as a shock to you.
After all, everything was working fine before. What suddenly went wrong?
Don’t worry, as it’s not a severe issue that’ll take many hours to solve.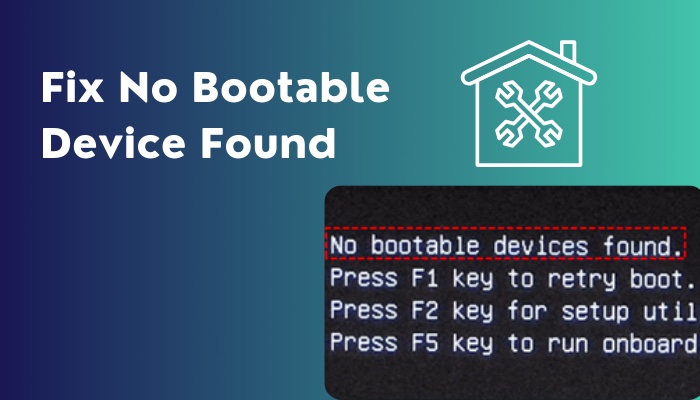
You can fix the problem at home quickly following this post.
This post will elaborate on the error message and why it shows up. Then we’ll discuss the fixes.
So keep reading the post till the end.
What Does It Mean When Your Computer Says No Boot Device Found?
At first, let’s get a grip on the issue; then, we will better understand the solutions to the problem.
When you press the power button on the PC, the control goes to the BIOS (basic input output system). BIOS is a firmware present on the motherboard.
It is responsible for initiating the different PC components, performing the POST check, detecting the boot devices and boot partitions, and finally handing over the control to the operating system on the boot drive.
The “no bootable device found” error message appears when the BIOS cannot detect any boot device or a storage device (hard disk, SSD, USB drive, DVD are some examples) with a boot partition. The boot partition contains the required files to boot up the operating system.
Depending on your computer and motherboard model/brand, the error message might read as “No boot device found” or something similar.
Since the BIOS cannot detect any bootable device, your PC cannot boot into the operating system (like Windows) and is stuck in BIOS.
Why Does The Error “No Bootable Device Found” Occur?
The “no bootable device found” error appears when the BIOS cannot find any bootable device. Without a bootable device, the BIOS cannot hand over the control to the operating system. So you’re stuck with the error message on the screen.
There could be many reasons behind BIOS not finding the bootable device. They’re as follows:
- The bootable device is not plugged in correctly.
- The bootable device is damaged or corrupted.
- The BIOS Boot order is incorrect.
- Important files in the boot partition are missing.
- BIOS is failing to identify the boot drive.
- Windows 10 system partition is inactive.
- The boot disk MBR sector is damaged.
- Problem with newly installed storage.
Don’t worry. The causes might seem intimidating, but you can quickly fix most of them. Let’s discuss the solutions in the next section.
How To Fix No Bootable Device Found
To fix the “no bootable device found” error, you need to work with the BIOS and installation media and potentially open the side panels to access the drives physically.
You should find out the BIOS key of your computer model or motherboard model. Usually, anyone among the Esc, Del, F1 or F12 keys are BIOS keys depending on the brand. A quick Google search will bring up the correct BIOS key for your PC.
Also, you’d need access to another computer and a USB drive (minimum size is 8GB). We’ll need them to create installation media.
Follow the methods below to fix no bootable device found:
1. Set the boot order correctly
The boot order in the BIOS dictates where to look for the boot partition. The BIOS searches the first storage in the boot order for the boot partition. If it doesn’t find any boot partition, the BIOS then moves onto the second storage and so on.
If the storage or drive containing the boot partition is missing from the boot order, there’s no surprise the BIOS will fail to detect a bootable device.
So set up the boot order correctly and put the bootable device at the very top of the boot order.
Here are the steps:
- Power on the computer and press the BIOS key repeatedly until the BIOS appears. You can Google to know the BIOS key for your computer/motherboard model. Usually, it’s the Esc or Del key.
- Switch to the Boot You can use the mouse to go to the Boot tab. If the mouse doesn’t work, use the arrow keys to move to the Boot tab.
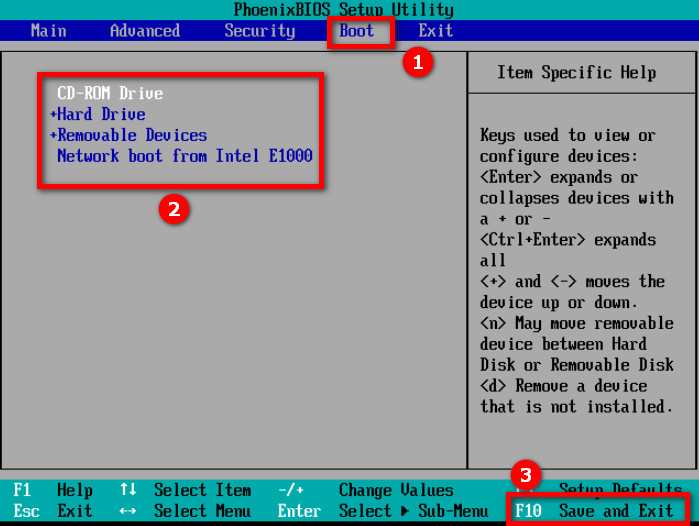
- Find the boot order. Depending on your computer or motherboard model, you might see two boot orders: BIOS boot order and UEFI boot order. In that case, we’ll work with both of them.
- Find the bootable device in the boot order. Typically it’s the HDD or SSD where you’ve installed Windows.
- Move the bootable drive at the top of the boot order. Follow the on-screen instructions to move the bootable drive up the order. In my case, I needed to select the bootable device with a mouse click, then use the arrow keys to move it to the top. Do the same for both the BIOS boot order and the UEFI boot order if you have both.
- Go to the Exit
- Save Changes and Exit.
Now the BIOS should look for the boot partition in the appropriate bootable device and boot into Windows.
2. Fix damaged MBR
The MBR (master boot record) contains essential data for boot. The MBR can get damaged due to bad sectors, power outages or viruses.
BIOS cannot detect the bootable device and show the error if the MBR is damaged or corrupted.
We must create a Windows installation media and use the command prompt to fix the MBR.
Do as follows:
- Go to the following link and download the installation media creator tool for Windows 10 or Windows 11.
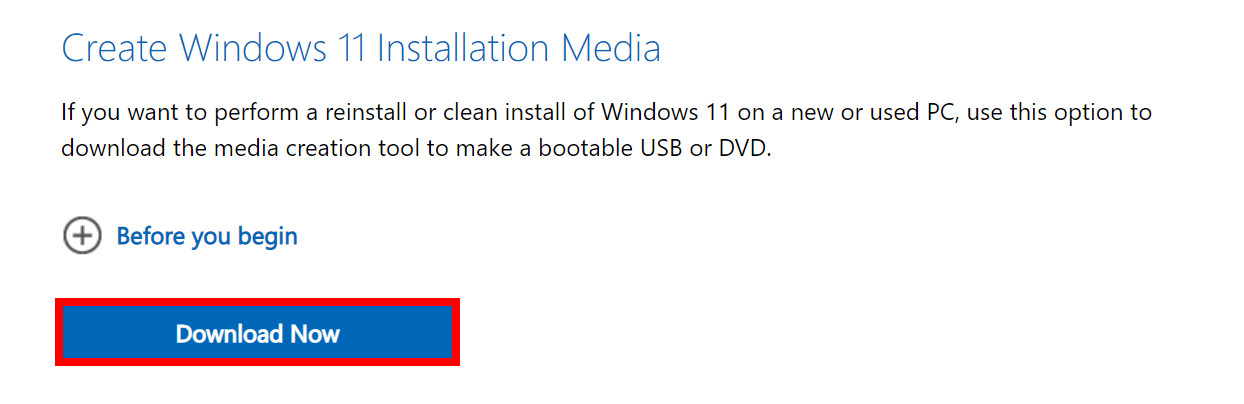
- Run the downloaded tool and follow the instructions to create Windows installation media. You’d be asked to insert a USB drive where the tool will download a fresh copy of Windows 10 or 11.
- Turn off the PC.
- Plug in the USB drive containing Windows.
- Power on the PC and press the BIOS key repeatedly until the BIOS shows up.
- Go to the Boot tab and move the USB drive to the top of the boot order.
- Save Changes and Exit. The PC will boot into the USB, and you’ll see a Windows installation screen.
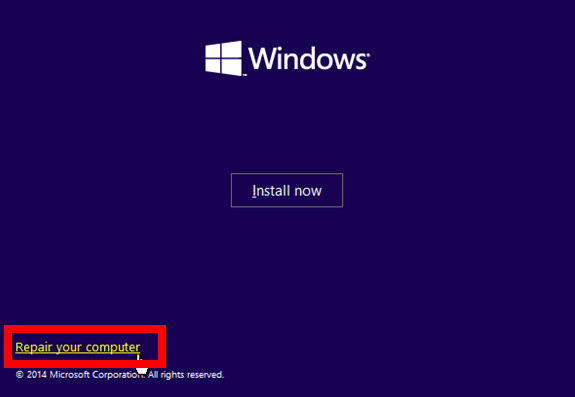
- Select language and region and hit “Next.”
- Click on the “Repair your computer” button at the bottom.
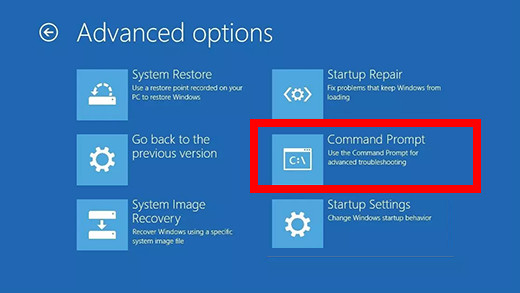
- Go to Troubleshoot > Advanced Options > Command Prompt. You’ll see the command prompt window. You now need to type a series of commands (given below inside quotes).
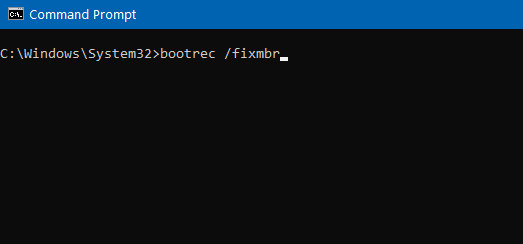
- Type “bootrec /fixmbr” and press Enter.
- Type “bootrec /fixboot” and press Enter.

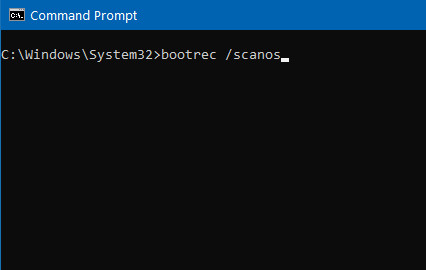
- Type “bootrec /scanos” and press Enter.
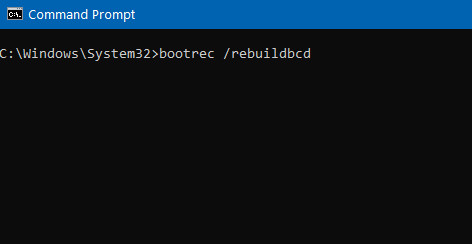
- Type “bootrec /rebuildbcd” and press Enter. If prompted to add a new installation to the boot list, type “Y” and press Enter.
- Close the Command Prompt.
- Restart the PC and enter BIOS by pressing the BIOS key.
- Go to the Boot tab and move the USB drive down in the boot order. Keep the HDD or SSD containing Windows at the top.
- Save Changes and Exit.
Now the PC should boot into Windows without showing the error.
3. Reconnect the storage devices
Sometimes the error message “no bootable device found” indicates a loose connection to the hard drive or the SSD containing Windows.
So you have to open the side panel of the PC and check the connections.
Do as follows:
- Power off the PC.
- Disconnect the PC from the power outlet.
- Open the side panel of the PC case.
- Check if the SATA cables are appropriately connected with the motherboard.
- Check the SSD and HDD connectors. Reconnect them if you have doubts.
- Put back on the side panel.
Now reconnect the PC to the power source and turn it on. The BIOS should detect the bootable device now.
4. Activate Windows 10 primary partition
The partition in your hard drive or SSD containing Windows (known as the primary partition) should be marked as active. If it’s not, the bootable device not found error appears.
Using the Command Prompt on Windows installation media, you can mark the Windows system partition as active.
Here are the steps:
- Download and create Windows installation media as mentioned in method 2.

- Connect the USB to the PC and boot into it. While the computer turns on, press the BIOS key to enter BIOS. Then go to the Boot tab and put the USB at the top of the boot order. Then save changes and exit to boot into USB.
- Go through the initial options by selecting the language, region and other stuff.
- Click on “Repair your computer” at the bottom once you see the “Install Now” screen.

- Select Troubleshoot > Advanced Options > Command Prompt. You now need to type a series of commands (given below inside quotes).
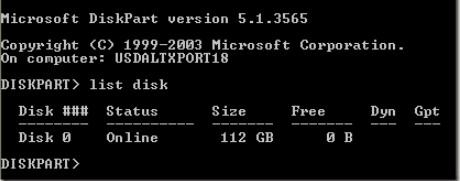
- Type “diskpart” and press Enter.
- Type “list disk” and press Enter. It’ll list out the hard drives and SSD. Note out the disk number of the drive containing Windows.
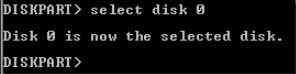
- Type “select disk n” and press Enter, where n is the disk number you’ve noted in the previous step.
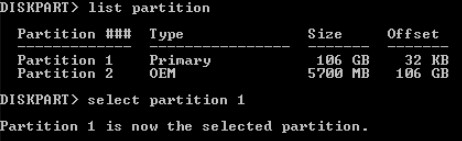
- Type “list partition” and press Enter to see the list of all partitions on the selected disk.
- Note the partition number, which is of type Primary.
- Type “select partition n” and press Enter, where n is the primary partition number. Now you have selected the primary partition in the Windows installation drive. Let’s mark it as active.
- Type “active” and press Enter.
- Close the Command Prompt window.
- Restart the PC and enter BIOS.
- Go to the Boot tab and move down the USB drive. Put the HDD or SSD with Windows at the top.
- Save Changes and Exit.
And the primary partition will now be the active one. The PC should successfully boot into Windows.
Final Thoughts
The no bootable device found error message might seem frightening as you can’t even get into the operating system.
But some easy fixes will take care of the problem, and you should be good to go.
As you cannot enter the operating system Windows, you’d need to take the help of another computer, a USB drive and know how to access the BIOS to fix the problem.