Error messages are a heartbreaking experience. You could be very close to achieving something you wanted, and then your hopes break down because of an error message on your computer.
You may face specific error messages while trying to upgrade your BIOS. It may not be a heartbreaking experience, but it is still annoying. If you use a Gigaboard motherboard, do not worry. I have you covered.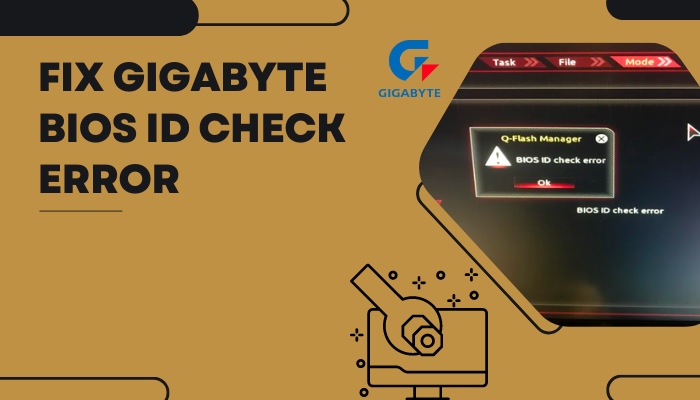 As someone who has been using Gigabyte motherboards for a long time, I have researched the various problems people face when using the products. The BIOS id check error is no different.
So, keep reading this article till the end to know how to fix the Gigabyte BIOS ID Check Error.
Why Does the BIOS ID Check Error Come Up?
A Basic Input/Output System, or BIOS, is software that runs as soon as a computer turns on and is kept on a tiny memory chip (firmware) on the motherboard.
The BIOS gives the computer instructions on how to carry out fundamental tasks like booting and keyboard control. The BIOS is also used to identify and set up the hardware of a computer, including the CPU, memory, optical drive, hard drive, and other components.
It controls how data moves between the associated devices and the computer’s operating system.
If you have experienced the BIOS ID check error while trying to update your BIOS, you may first wonder why this is happening. 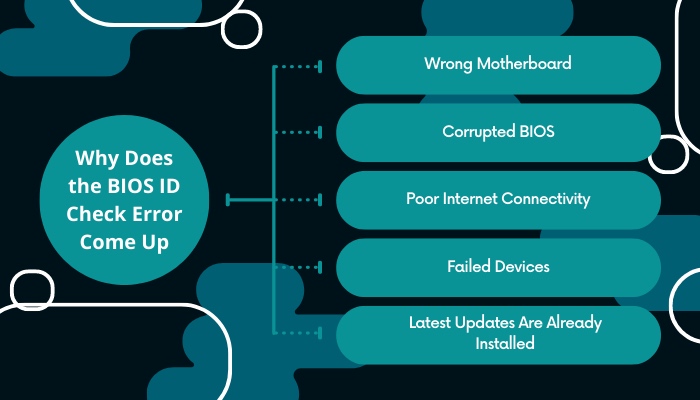
Here is why you might be experiencing a BIOS ID check error in detail:
1. Wrong Motherboard
Different updates are uploaded for different models of motherboards. If the update you are trying to install is not appropriate for the model of motherboard you have, then you may experience an ID check error.
This is the most common reason people face this problem.
2. Corrupted BIOS
To update the BIOS, you must rely on existing BIOS files. If the original BIOS is corrupted, all sorts of problems will occur; you may have to boot with a secondary BIOS.
If the BIOS update you downloaded is corrupted, the corrupted files may not recognize the motherboard. This is why your computer might show you the ID check error.
3. Poor Internet Connectivity
The ID check error may also be caused by a poor internet connection. Consider downloading an update while experiencing multiple disconnects.
It wastes your time and makes it possible for some downloaded file components to become corrupted quickly. A BIOS fault will surely result from this.
We already know that corrupted BIOS files can cause an ID check error. A poor internet connection can be an indirect cause of this problem.
4. Failed Devices
Sometimes, broken hardware can damage the motherboard to an extent. This can potentially cause an ID check error. This case is sporadic.
If the error starts appearing after you install some new hardware on your computer, you may think about this as a possibility.
5. Latest Updates Are Already Installed
If you’ve ever attempted to update the BIOS version, it’s possible that you already have the newest version installed and are attempting to do it once more. Your computer may then report this as an ID check error.
If this is the cause, then there is nothing much to fix.
How to Fix the Gigabyte BIOS ID Check Error
Now that I have explained the causes let us now discuss the solutions. We can summarize all the causes into two distinct scenarios. One is where you get the wrong updates for your motherboard.
In this case, there is a mismatch between the update and the motherboard, and the error message’s purpose is to make you aware of that mismatch.
If this is indeed the problem, you can double-check what update you are getting and what motherboard model you have. If you have identified the problem, get the correct update, and you should be ready to go.
Therefore, I must teach you how to identify your motherboard information properly.
Follow these steps to check your current BIOS version.
- Type cmd in your Windows search menu. This should display the command prompt executable file.
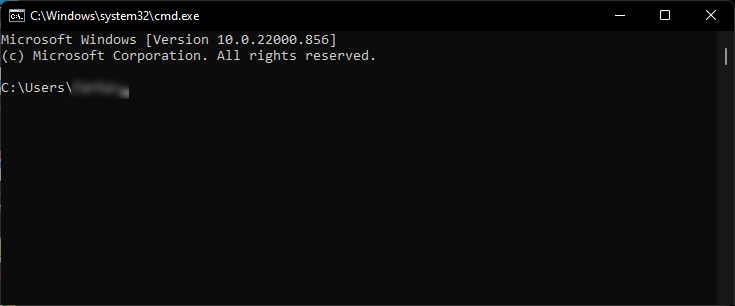
- Run the command prompt program as an administrator from the list.
- Type the command wmic bios get smbiosbiosversion and press enter.

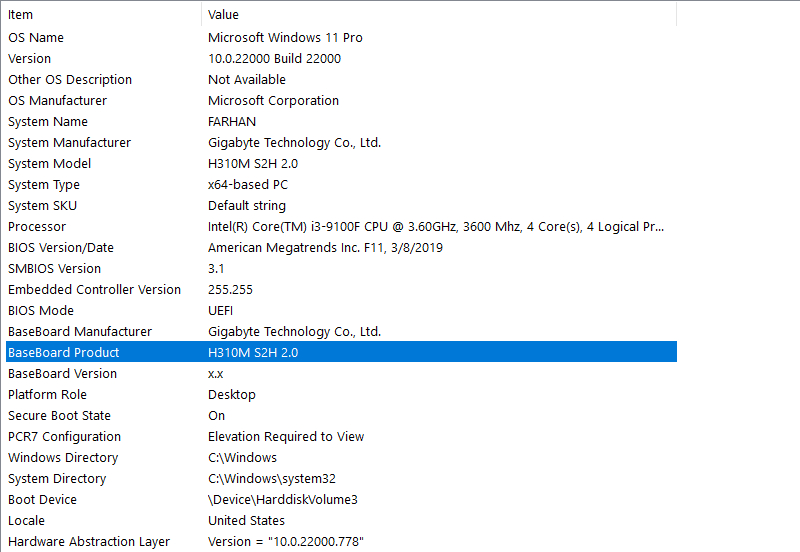
Follow these steps to check your motherboard model:
- Open a run dialog by pressing Windows+R, then type msinfo32 into the Run box and press Enter. msinfo32
- By default, the System Summary page will be displayed. Your motherboard can be found on the line marked BaseBoard Product if you scroll down.
After knowing your current BIOS version and exact motherboard model, you can download the appropriate update. Once you do, you should not have any problems left.
This covers the scenario where you are getting the motherboard and update compatibility wrong.
But what if you got it right and you are still facing the BIOS ID check error?
This means either your current BIOS or update files were harmed through hardware-related issues, poor internet connection, etc.
If BIOS files are corrupted, installation cannot go smoothly. If you reset your BIOS, you can get rid of potentially harmful new files.
System compatibility difficulties can be resolved by resetting the BIOS to default settings. If you finish the operation, BIOS returns to the most recently saved configuration, and the vast majority of error messages are immediately resolved.
Reinstalling the CMOS battery or entering the boot menu will both reset the BIOS. I will show you how to reset the BIOS in both ways.
Follow these steps to reset the BIOS by reinstalling CMOS:
- Remove the power cords and shut down the computer.
- Look for a little battery with a silver color on your motherboard.
- Replace the battery after turning it off for five to ten minutes.
- Retain the computer case closed.
Your BIOS settings should go back to default.
Follow these steps to reset the BIOS by entering the boot menu:
- Press F2 or Delete to access the boot menu while the computer is booting up.
- Press F9 to restore the default BIOS settings.
- Click the final tab, then choose Save & Exit.
It does not matter which method you choose. Both of these methods do the same thing.
Lastly, if update files are corrupt, just download them again from a reliable website.
How to Install BIOS?
Now that we have covered the causes and fixes for the BIOS ID check error let us go back to talking about the correct steps to take when installing BIOS on your computer.
Follow these steps to install BIOS properly:
- Connect a USB flash drive that is empty to your computer.
- Extract the downloaded contents on the flash drive. Write down the update file’s name precisely as it appears on the screen.
- Restart your computer. And to access the boot menu, press F2. The linked USB drive should now be the primary boot device.
- Press F10 to quit after saving modifications to reset the computer; the Command Prompt won’t appear right away. Please wait.
- Enter the names of the BIOS files that you noted.
- Press Enter to start the process. To finish it, press the Y button.
Conclusion
In this article, I’ve discussed the causes and fixes to the BIOS ID Check error in Gigabyte motherboards. Read all the steps and other information carefully to fix the problem. Make sure to try fixes for all the scenarios.
Install and update BIOS in a proper way so that you do not face any difficulties afterward. If you have any queries, comment below!