Data Execution Protection(DEP) is an additional tool that provides good protection services against all malicious attacks and for some specific programs like Docker.
Speaking of Docker, you may be familiar with the error message, which says- Hardware assisted virtualization and data execution protection must be enabled in the BIOS. 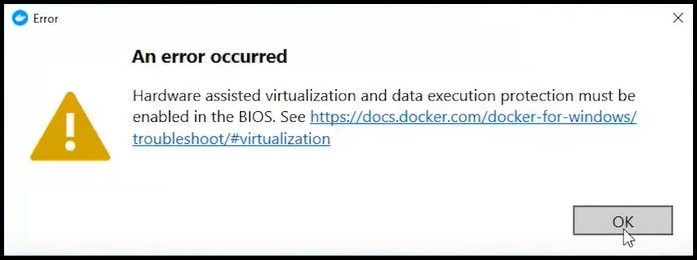
It means you must turn on the DEP to run that program.
In this guide, I will discuss the step-by-step methods to enable DEP.
So, let’s begin.
Check our epic post on how to change Boot order in BIOS.
How to Turn on Data Execution Protection in BIOS
The DEA is a useful tool. It can be turned on any version of Windows, like Windows 11, 10 or 8.1. To turn on the feature successfully, follow the steps.
Here are the steps to enable DEP in BIOS:
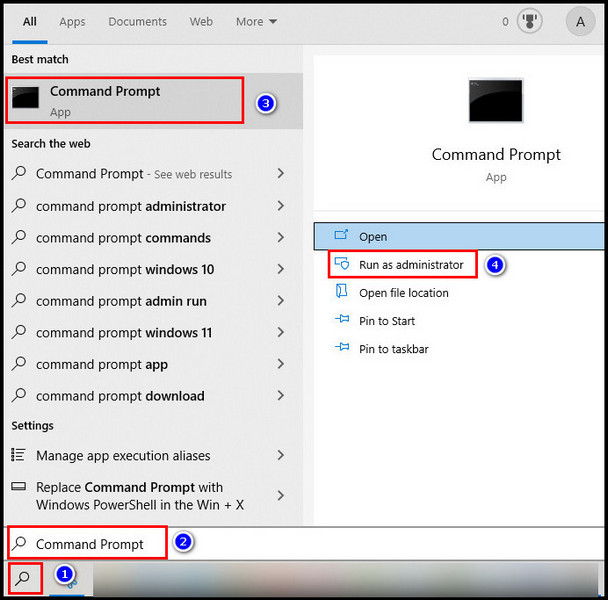
- Click on the search icon, type Command Prompt and select Run as administrator.
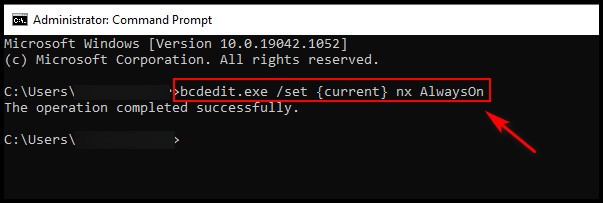
- Type bcdedit.exe /set {current} nx AlwaysOn. It will turn on DEP. if you want to disable the feature, type bcdedit.exe /set {current} nx AlwaysOff.
Note: If the commands fail to work, you must restart your computer. Go to the BIOS settings, disable the Secure Boot option, and save the changes. Reboot the PC. Now run the commands. When the commands successfully run, enable the Secure Boot option from BIOS.
In case the command doesn’t work, you must switch on the Virtualization feature from the BIOS settings. Follow the steps:
- Restart the PC.
- Press the boot menu key (F2, F8, F12, Esc, Delete, etc.) to enter the BIOS settings.
- For Dell Intel laptop:
- Choose BIOS Setup.
- Expand the Virtualization Support option.
- Check the Enable Intel Virtualization Technology option.
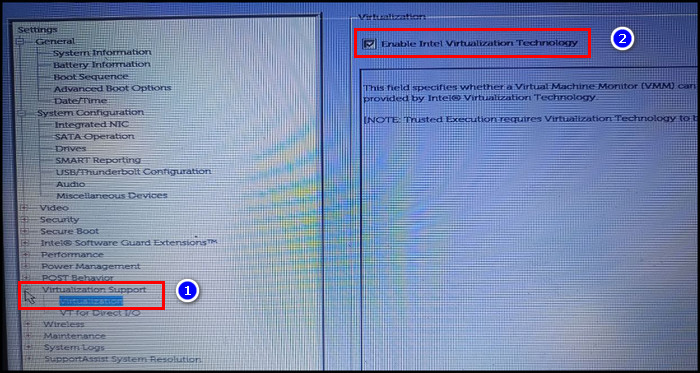
To check whether the virtualization is activated or not, open the Task Manager by pressing the Ctrl + Shift + Esc button. Go to the Performance tab, and you will find Virtualization at the bottom. 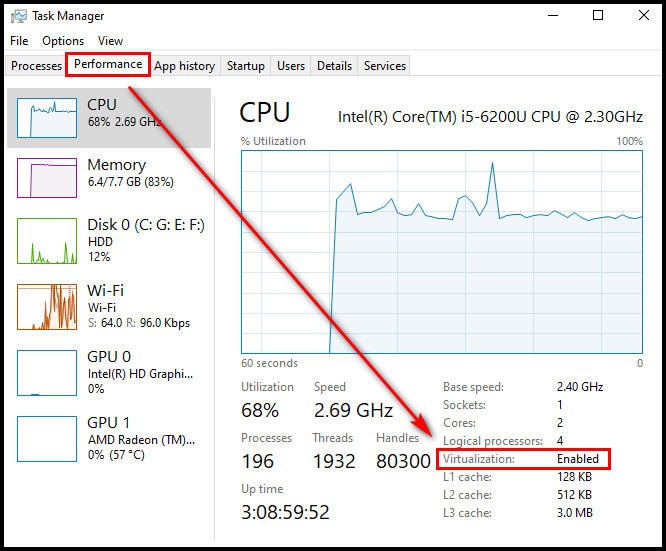
Note: For various manufacturers, the virtualization feature can be under different names in BIOS. If you can’t find any options with virtualization labels, you must look for the SVM feature on AMD and the VT-x feature on Intel.
Now the Data Execution Protection should be turned on.
Even though the feature is enabled and you may still get the Hardware assisted virtualization and data execution protection must be enabled in the BIOS message.
It’s because the Hyper-V function is not working. You must enable that function.
Note: If you are not seeing Hyper-V, it’s because it is not installed on your Windows. Hyper-V is only available on Windows 10 Professional, Windows 10 Enterprise, and Windows 10 Education. You won’t find this function if you are using Windows 10 Home, Windows 10 Mobile Enterprise or Windows 10 Mobile.
Follow our guide to fix PC won’t Boot to BIOS.
Here is the process of turning on Hyper-V:
- Click on the search icon, type Turn Windows feature on or off and click on it.
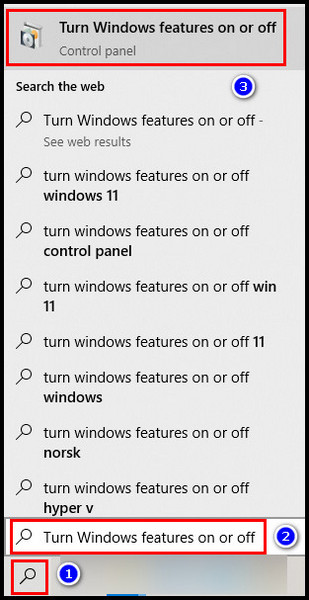
- Locate Hyper-V and expand the menu. Make sure you check all the options there.
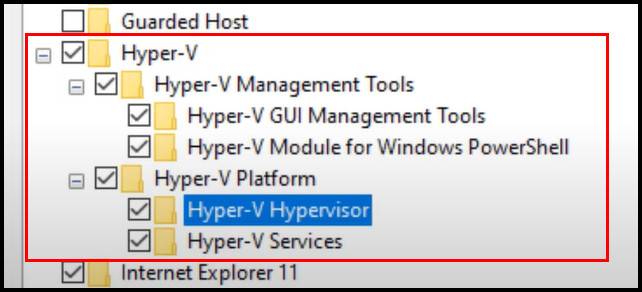
- Find Windows Subsystem for Linux and also check the box.

- Right-click on the Windows icon and select Windows PowerShell(Admin).
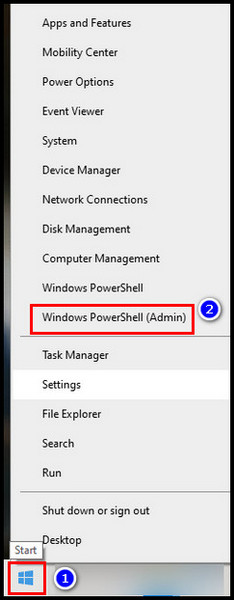
- Type bcdedit /set hypervisorlaunchtype auto and hit Enter. If the Hyper-V is deactivated or not installed, try the next command.

- Type dism.exe /Online /Enable-Feature:Microsoft-Hyper-V /All press Enter.
- Restart the computer.
If the error message persists, your system’s Hyper-V is definitely corrupted. Therefore uncheck all Hyper-V-related components from Windows features and restart the PC.
Re-enable Hyper-V and again restart the computer.
Conclusion
DEP is intended to help shield Windows systems from harm that can be done by viruses and other potential threats. You should always keep it enabled.
Hope you don’t face any problems activating DEP.
If you have any questions, comment below.
Peace Out!