As Guardians, you were supposed to rise to defend humanity and unravel the mysteries of the cosmos in Destiny 2. But instead, you are defeated by mere olives!
The Olive error code can strike without warning, disrupting cutscenes, interrupting gameplay, and kicking you back to the character select screen.
But fear not, as in this article, I’ll explain the causes and provide the methods to fix the Olive error in Destiny 2, so you can return to fighting the Darkness ASAP!
Why Do You Keep Getting the Error Code Olive in Destiny 2?
The Olive error in Destiny 2 occurs mainly due to Bungie server problems. It disrupts the connection and leads to this error. Another issue arises when Bungie accounts are not correctly linked. Corrupted game files and outdated drivers also contribute to the Olive error.
Here are the reasons why you keep getting the Olive error in Destiny 2:
- Ongoing server maintenance.
- Outdated graphics drivers.
- Damaged data within the Battle.net folder.
- Game files compromised.
- Your Bungie account connectivity problem.
- Extended periods of game inactivity cause problems.
Bungie’s decision to shift Destiny 2 from Battle.Net to Steam has generated various complications, such as the Olive error.
Getting Olive’d in Destiny 2 can be annoying, as the game becomes completely unplayable. Also, the Bungie support page doesn’t offer proper guidance except suggesting to close the game and relaunch it.
But in the following section, I’ve compiled a set of solutions that will resolve the Olive error for good.
How to Fix Olive Error in Destiny 2
To get rid of the Olive issue in Destiny 2, uninstall the Battle.Net edition of the game, remove the cache file, and install Destiny 2 from Steam. Also, make sure the Bungie servers are up and running, and don’t forget to sign in to the game using a Bungie account.
Additionally, keep the game and the launcher updated.
Here are the methods to fix the Olive error code in Destiny 2:
1. Check Destiny 2 Server Status
Prior to any troubleshooting steps, verify that fellow Guardians near you are encountering similar issues. The Bungie Destiny 2 error code Olive may arise from ongoing server maintenance.
Navigate to the Destiny server status webpage using a web browser and confirm the servers are operational. In the event of a service outage, be patient and try to access the game at a later time.
Services such as DownDetector and Outage.Report provide information on Destiny 2 server status. Also, visit the official Twitter support for Destiny 2. It will let you verify any details concerning ongoing server-related issues.
2. Login with a Valid Bungie Account
Destiny 2 beta error Olive is frequently connected to not being properly linked to a Bungie account. After encountering this issue, I resolved it by establishing a connection to a valid Bungie account.
So, restart Destiny 2 and follow the prompts to create and link a Bungie account.
Once you have completed this process and authenticated your account, launch the game to check the issue’s status.
3. Update Graphics Drivers
Having outdated drivers can significantly impact your gaming experience, causing the Olive error, resulting in sudden crashes, annoying freezing, frustrating lag, or even preventing the game from launching altogether.
To ensure you have a smooth and enjoyable time playing Destiny 2, update your GPU driver.
Here are the steps to update your graphics driver:
- Right-click the Start icon on the taskbar at the bottom and choose Device Manager.
- Extend the Display adapters section.
- Double-click on your graphics card driver.
- Go to the Driver tab and click on the Update Driver button.
- Select Search automatically for drivers.

If an update is found, let it download and install. Then launch Destiny 2 and see if you still get olive’d.
4. Check the Integrity of the Destiny 2 Files
The smooth operation of the game is compromised due to one or more damaged or missing game files. This issue makes the game unstable and triggers the Olive error code.
Incomplete downloads, system crashes, malware attacks, improper installations, or accidental removal can corrupt these files. To fix this issue, verify the integrity of the game files using the game launcher.
To check the integrity of the Destiny 2 files:
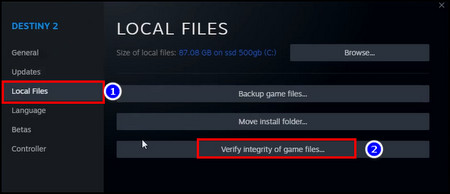
On Steam
- Close Destiny 2 and open Steam.
- Proceed to the Library, right-click on Destiny 2 from the list of games on the left, and choose Properties.

- Navigate to the Local Files tab and select Verify integrity of game files.
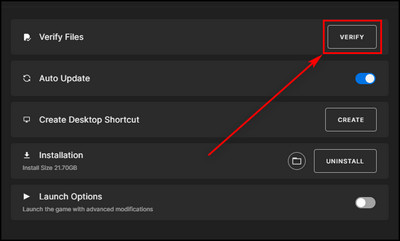
On Epic Games Launcher
- Launch the Epic Games.
- Move to Library.
- Select the ellipses for Destiny 2 and click on Manage.
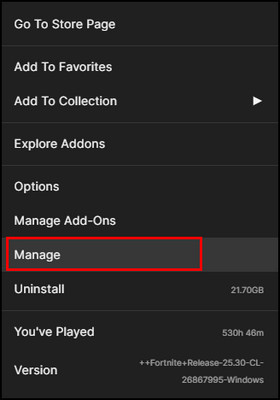
- Choose the Verify option.
Be patient while the launcher authenticates your game files. Once the verification process is finished, start the game and check whether the Olive error continues to occur.
Also, update Destiny 2 to the latest version, as updates often include patches that resolve known issues, including file corruption.
5. Use Google’s DNS Servers
Occasionally, you can get issues with your DNS servers, leading to an error code Olive. A process to mitigate DNS-related problems is to use different DNS servers that are reliable and secure.
Among various alternatives, configuring your device or network settings to utilize Google’s DNS servers can improve your internet connectivity while gaming.
Here’s how to use Google’s DNS servers:
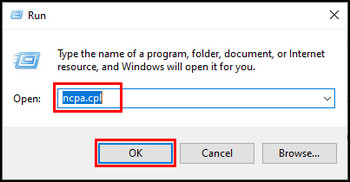
- Right-click on the Windows icon from the bottom and choose Run.
- Type in ncpa.cpl in the text box and click OK.
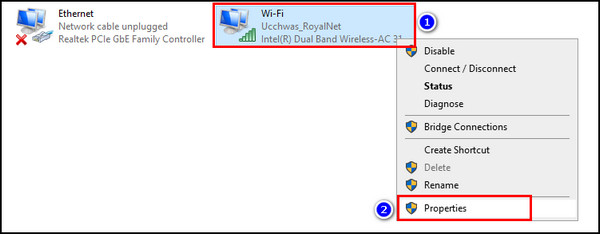
- Right-click on the network you are currently using and select Properties.
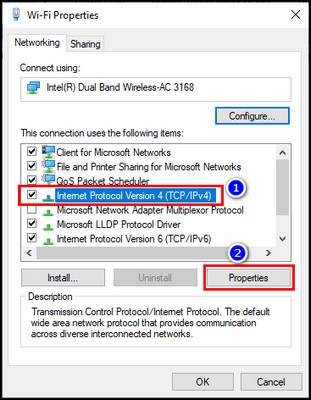
- Select Internet Protocol Version 4 and click the Properties button.
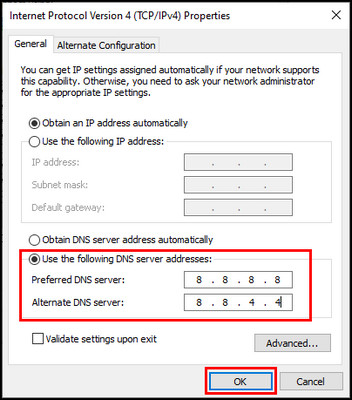
- Check the Use the following DNS server addresses option.
- Input 8.8.8.8 for the Preferred DNS Server and enter 8.8.4.4 in the Alternate DNS Server field.
- Click OK to apply the changes.
6. Power Cycle Your Console
The power cycle refreshes your console’s system and clears any temporary glitches or bugs that might be causing the Olive error.
Follow the steps below to power cycle your console:
- Press the Power button on your PS5 or the Xbox button on the Xbox One console and hold it down for a few seconds until it shuts down. Wait for your console’s lights and fans to turn off completely.
- Unplug the power cable from the back of your console. Additionally, if you’re using an external power brick, unplug it from the power outlet as well.
- Give your console and power adapter some time to discharge any residual electricity. Waiting for a few minutes should be enough.
- Plug the power cable back into your console and connect it to the outlet. Make sure all the connections are secure.
- Press the power button again to turn on your console.
7. Reinstall Destiny 2
Bungie’s transition of Destiny 2 from the Battle.net platform to Steam has produced different problems, including the Olive error.
To fix this problem, firstly, uninstall the existing Battle.net version of Destiny 2 from your system. So, the previous installation doesn’t conflict with the new installation. Then delete the cache data thoroughly and download the latest version of Destiny 2 from Epic Games or Steam.
Here’s how to reinstall Destiny 2:
Uninstall the Game
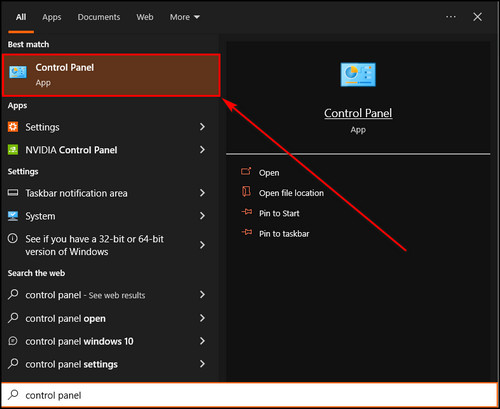
- Click on the search icon from the taskbar.
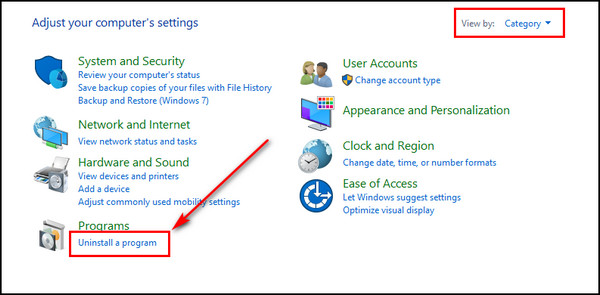
- Search for Control Panel and launch it.
- Set Category for View by and click on Uninstall a program.
- Select Destiny 2 from the list of installed programs on your device.
- Click on the Uninstall button.
Delete Cache Data
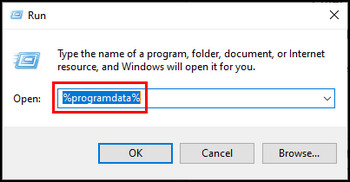
- Press Windows + R on the keyboard to open the Run program.
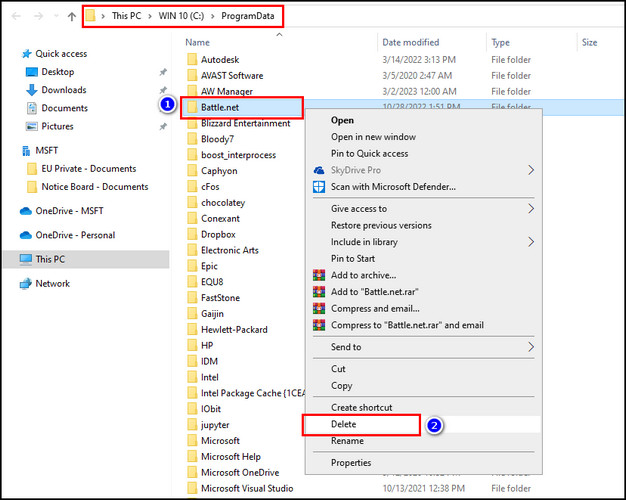
- Write %programdata% in the text field and press Enter.
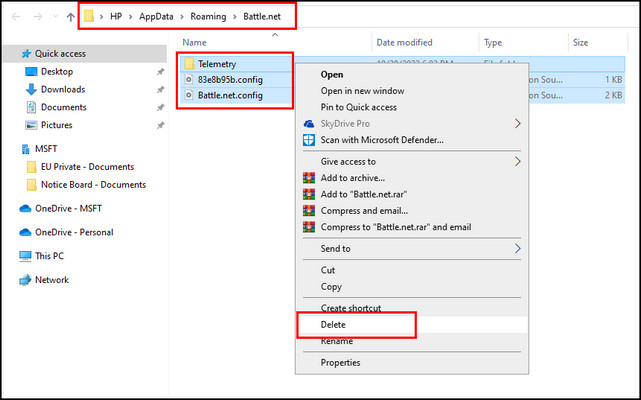
- Delete the Battle.net folder.
- Open the Run program, type %APPDATA%\Battle.net, and click OK.
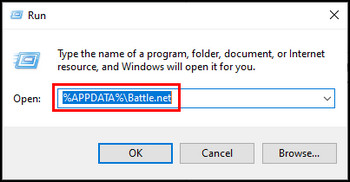
- Remove all the files and folders from the Battle.net directory.
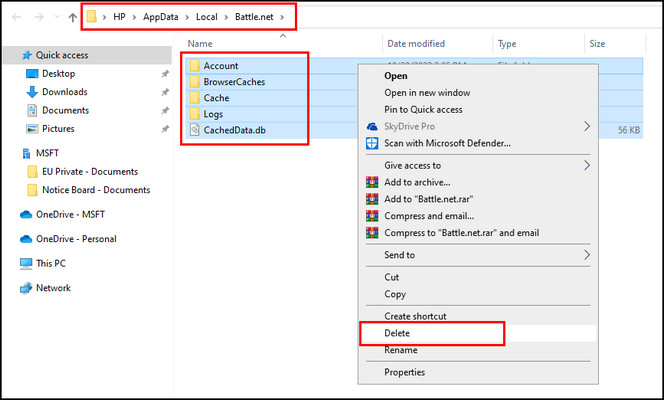
- Open the Run dialog box again, input %LOCALAPPDATA%\Battle.net, and press Enter.
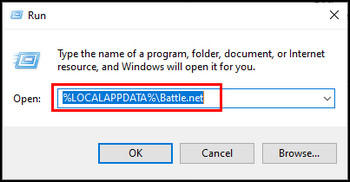
- Erase everything inside the Battle.net folder.
- Launch the Run program again, type in %APPDATA%\Bungie\DestinyPC, and click OK.
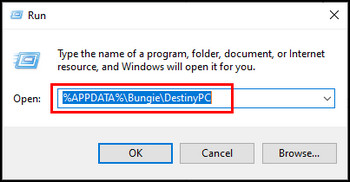
- Delete all the files and folders from the DestinyPC directory.
Install Destiny 2
- Open Steam or the Epic Games Launcher.
- Go to the Store page.
- Search for Destiny 2, download the game, and let it install on your computer.
After installation, launch the game and confirm that the Olive problem has been resolved.
FAQs
What does error code olive mean?
Error code Olive can occur in Destiny 2 due to connectivity issues with a Bungie account. To fix this error, establish a connection with a legitimate Bungie account. Restart Destiny 2 and follow the instructions for configuring your Bungie account.
Why do you keep getting error codes in Destiny 2?
A server problem from Bungie may result in continuous error codes. But in case the issue is originating from your end, restart Destiny 2, clear the cache on your respective platform, power cycle your console, check your connection, and stay informed about any developments from Bungie’s Twitter page.
Why can’t you connect to Destiny 2 servers?
You cannot connect to the Destiny 2 servers due to network problems. Troubleshoot by disconnecting the power cable from your modem and router and waiting a few minutes before reconnecting them. Once your network is restored, launch Destiny 2 to see if you can connect to the game servers.
Final Thoughts
Following the steps in this article, you can resolve the Olive error and enjoy better gameplay in Destiny 2.
Optimizing the network settings, checking for server status, verifying the data, and keeping the game up-to-date will mitigate the problem.
Comment below if you have further questions, and we’ll get back to you.