The waiting room is a place of suspense and anxiety for most people. Especially when waiting for an important interview or meeting, it’s usual for the participants to feel tense.
During and after the Covid-19 pandemic, many business and educational events and meetings are shifted to virtual platforms. Sitting in the waiting room and continuously staring at your screen may feel distressing.
But, with the customization of the Zoom waiting room, you can animate your waiting room and create a welcoming place for the participants.
Customizing the waiting room is helpful for greeting, preparing and giving a brief to the attendees about your service, meeting and event.
This article aims to explain the requirements and the effortless ways to customize the waiting room in Zoom. So, let’s start.
Here is the easiest guide to quickly merge Microsoft Accounts.
Prerequisites for Customizing the Zoom Waiting Room Settings
The waiting room option is available for every account in Zoom. However, you need to meet some conditions to change or customize the waiting room settings in your Zoom account. Users need specific privileges and account types to access the Zoom waiting room settings.
Many people get confused when they don’t find the settings in their waiting room sections. Reading the following prerequisites will clear all your doubts about the availability of waiting room settings.
Here are the prerequisites for customizing the Zoom waiting room settings:
- Users need account ownership or admin privileges to access the Zoom waiting room settings.
- Must use a Pro, Business, or Education account.
- Need to have a Zoom Contact Center license.
Once you’ve fulfilled the requirements, you’ll see the Customize Waiting Room options in your settings. Consider reading the following passage to learn the procedures of customizing waiting room settings.
Also read Microsoft Word not pasting correctly.
How to Customize Waiting Room in Zoom
By changing the waiting room title and choosing the A logo and description option from the Customize Waiting Room settings, users can modify the waiting room appearance. Also, selecting the A video option will allow the user to animate the Zoom waiting room background.
The waiting room settings are only available in the Zoom web portal. Follow the instructions below to access the waiting room settings and customize the background.
Here are the steps to access waiting room settings in Zoom:
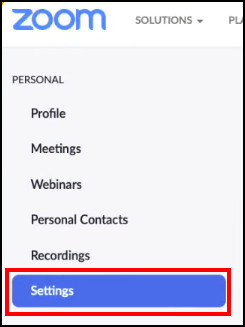
- Visit the Zoom web portal using a browser.
- Log in to your account.
- Press on Settings from the left pane.
- Enable Waiting Room.
- Click on Customize Waiting Room.
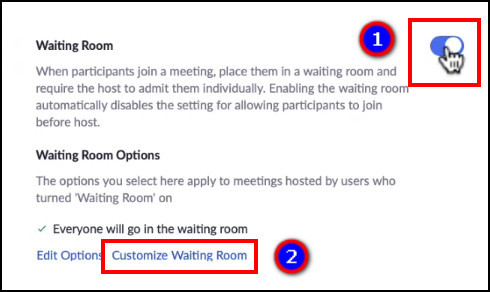
After entering the Customize Waiting Room settings, you’ll find the option to edit the title and customize the appearance.
Here is the process to edit the title of your Zoom waiting room:
- Click on the box from the Title.
- Type your title within 64 characters.
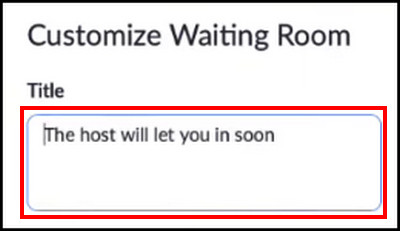
- Press on Save.
The default room option is enabled as your waiting room background by default. You must choose between A logo and description and A video to customize the Zoom waiting room background. Both options provide different customization settings for your waiting room.
Follow our guide to fix Microsoft Word quotation marks not working.
If you want to add an image and description, follow the steps below to customize them.
Here are the procedures to customize the logo and description of the waiting room in Zoom:
- Choose the radio button beside the A logo and description under the Participants in waiting room will see section.
- Press on Upload Logo and select your logo.
- Type the description within 400 characters.
- Click on Save.
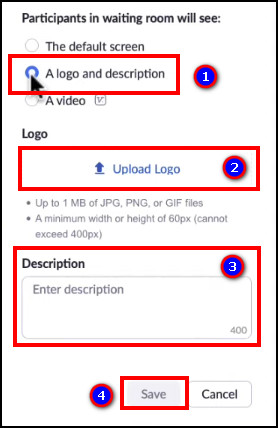
You can upload a logo up to the size of 1 MB. The minimum width or height of the logo is 60px and can’t exceed 400px.
But, if you want to animate your waiting room and promote your business or service, adding a video is the best option. The following process will describe the ways to include a video in your Zoom waiting room.
Here is the method to add a video in the Zoom waiting room:
- Select the radio button beside the A video option.
- Click on Upload Video and choose your video file.
- Press on Save.
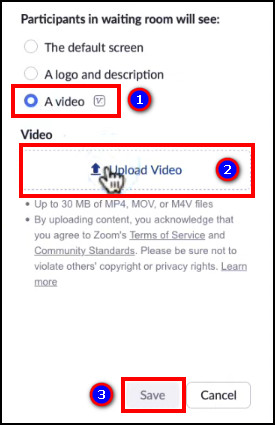
The maximum size of a waiting room video is 30 MB, and the video has to be in MP4, MOV, or M4V format.
Quickly check out our separate post to find out Microsoft Word paste function not working.
Frequently Asked Questions
How to customize the waiting room background in Zoom?
To customize the waiting room background in Zoom, log in to Zoom web portal > Settings > Customize Waiting Room > type waiting room title > choose logo and description > select video > Save.
Can you customize the Zoom waiting room?
Yes, you can customize the title, logo and description of a Zoom waiting room with owner or admin privileges and with a Pro, Business, or Education account.
How do I add a video to my Zoom waiting room?
To add a video to your Zoom waiting room, go to Settings > Security > Customize Waiting Room > Choose A video > Upload Video.
Conclusions
Making a friendly and welcoming waiting room is a positive element for your business and meeting. It helps to establish an optimistic first impression and comfort the participants.
In this article, I’ve provided straightforward methods to customize the appearance of your Zoom waiting room, and I believe you’ve started using the feature with efficiency.
Don’t forget to share your astonishing addition to the waiting room in the comment box below.
Stay well, and I’ll catch you at the next one. Goodbye.