Microsoft SharePoint is a powerful collaboration and document management tool for the organization, and creating a list is one of its most useful features.
With the SharePoint list, users can create, track, and efficiently organize information and share them with members of the organization.

In this article, I’ll provide multiple ways to make a SharePoint list and help you track information easily.
So, let’s begin.
Users can create lists in Microsoft SharePoint by adding the List application from Office 365. You can set up a blank list and import one from existing lists, Microsoft Excel, or CSV. Also, users can use different templates from the List app to customize them quickly.
Creating the list in SharePoint is similar to making a list in Microsoft Teams. Microsoft Teams and SharePoint use the Office 365 List application to create one.
You can set up a list from scratch, import the format from another list, or use the Excel and CSV files from OneDrive. The following passage will describe how to create a list in Microsoft SharePoint using different methods.
Here are the ways to create a list in Microsoft SharePoint:
1. Create a Blank List
Making a blank SharePoint list allows users to customize them as they want. You can add elements depending on your requirement. Follow the steps below to create an empty list in MS SharePoint.
Read the following process to create a blank list in Microsoft SharePoint:
- Open a browser and go to the Microsoft SharePoint website.
- Log in to your account.
- Press the App launcher from the top left.
- Click on All apps.
- Find and open Lists.
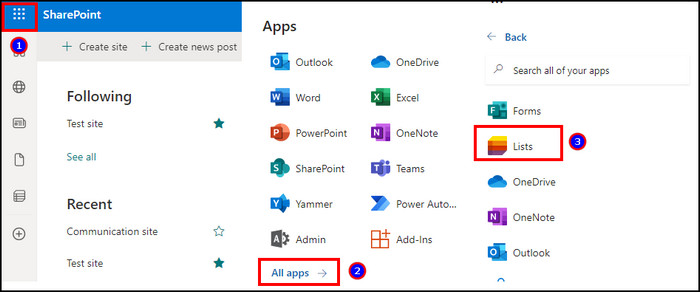
- Press on the New list.

- Click on the Blank list.
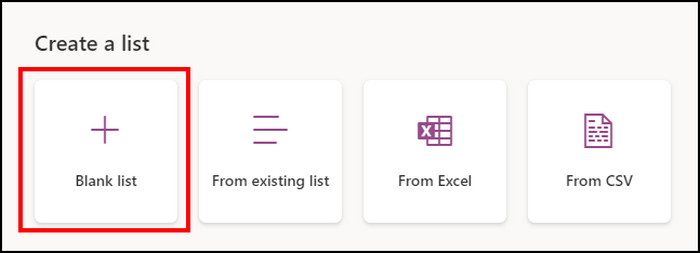
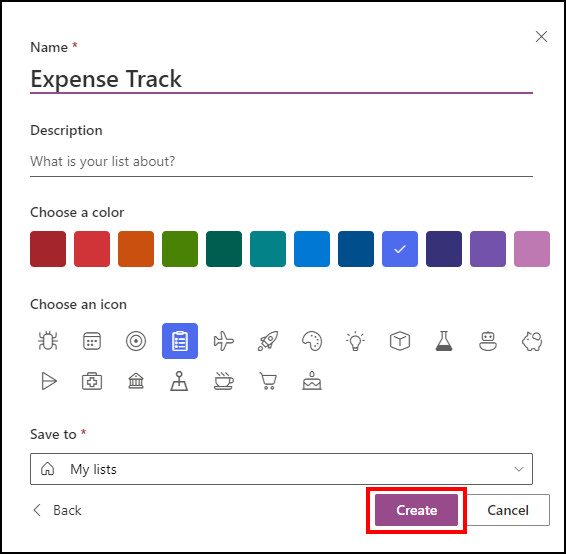
- Type the list name.
- Provide description, color, and icon.
- Select a saving location from Save to.
- Click on Create.
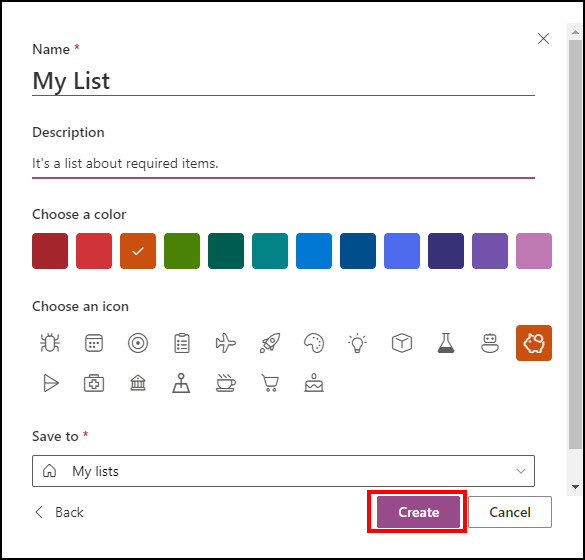
It will create a blank SharePoint list for you. You can add new items to it to customize the list.
2. Create from an Existing List
If you have created a list and want to use the format again, creating a SharePoint list from scratch is unnecessary. You can import the list format by using the From existing list option.
Here are the steps to create an MS SharePoint list from an existing list:
- Navigate to the Lists application.
- Click on the New list.
- Select From existing list.
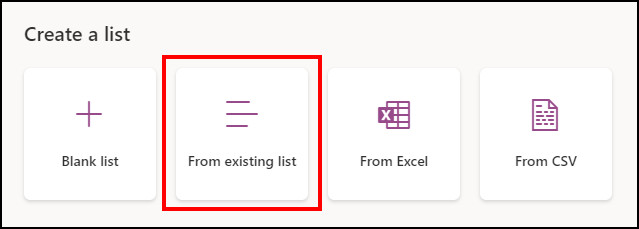
- Choose the List and press Next.
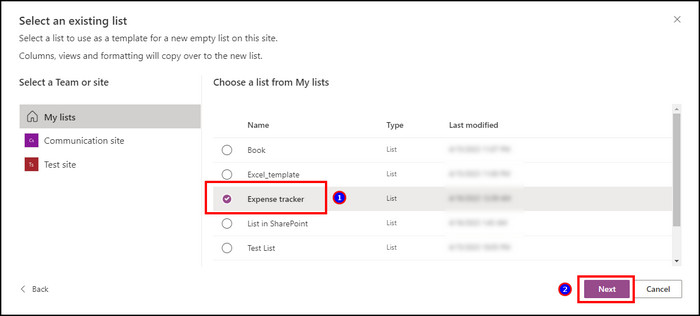
- Type another name.
- Provide additional information and click Create.
Once you create an existing SharePoint list, it will import the same format from your other list.
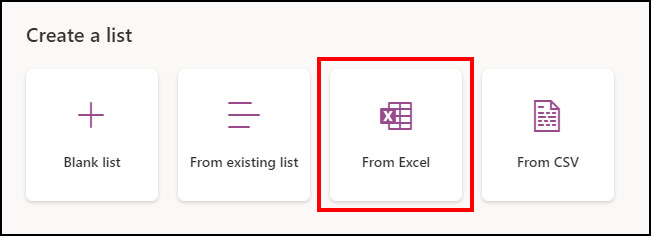
3. Create from Excel
Users can import a data table from the Excel file uploaded in Microsoft OneDrive. Read the following procedures to create a list from the Excel file.
Follow the below method to create a SharePoint list from Excel:
- Go to the Lists application.
- Press on the New list.
- Click on From Excel.
- Select the Excel file from OneDrive and press Next.
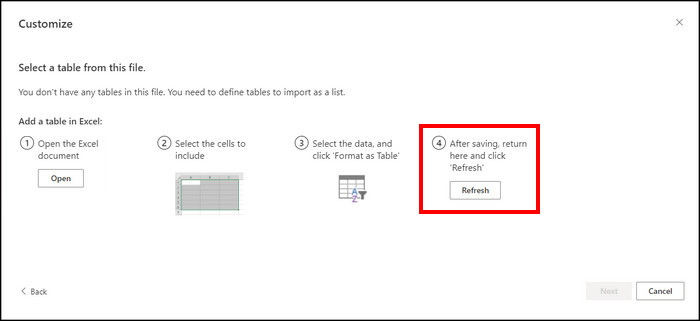
- Click on Open the Excel document.

- Select the cells from the Excel file.
- Press on Format as Table.
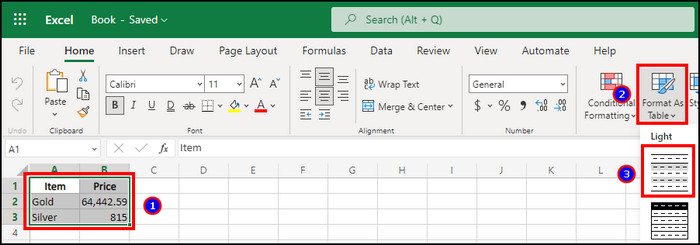
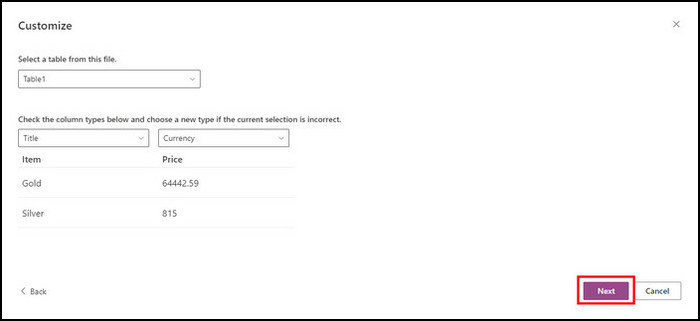
- Click on Refresh from the Customize tab.
- Press on Next.
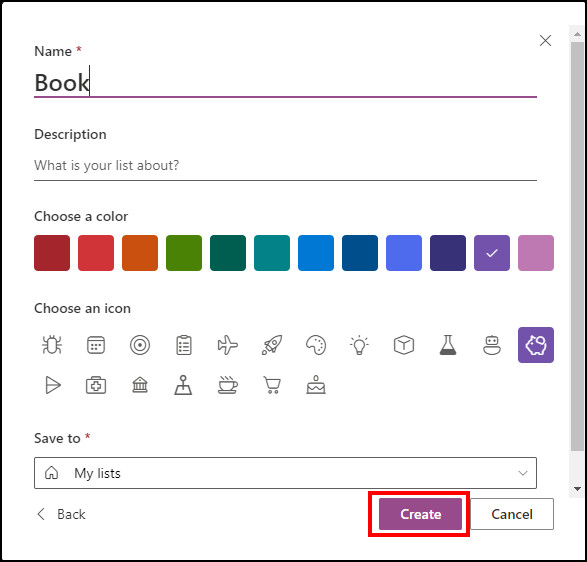
- Provide name and other information.
- Click on Create.
It will create a SharePoint list like the table in your Microsoft Excel file.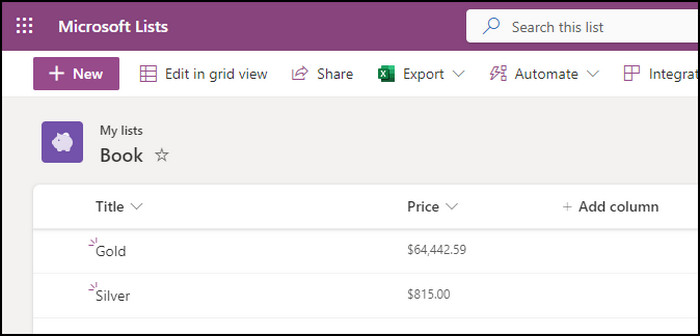
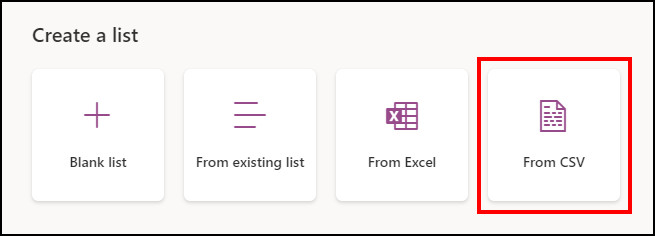
4. Create from CSV
If you have a CSV file on your PC, you can import the data from the file and create a list in SharePoint using the information. The following steps will describe how you can create a list from CSV.
Here is the process to create a SharePoint list from CSV:
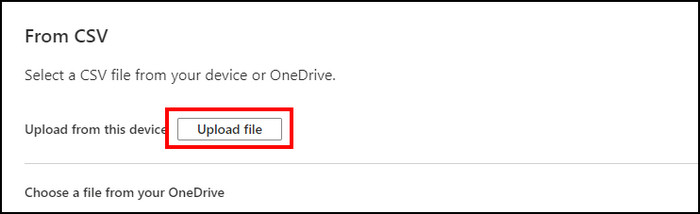
- Go to the Lists application page from SharePoint.
- Click on the New list.
- Select From CSV.
- Press Upload and open the CSV file.
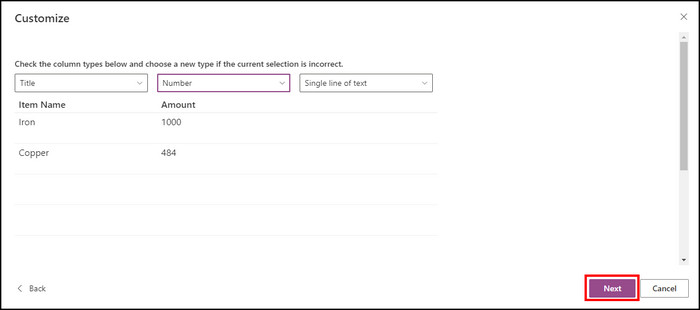
- Click on Next to finalize the table.
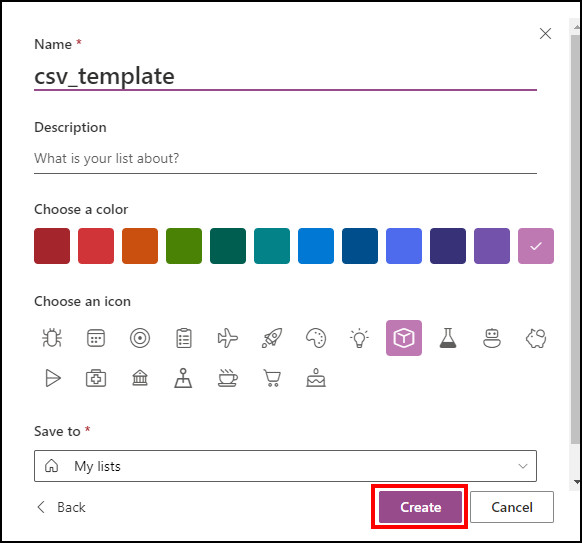
- Provide the name and press Create.
It will automatically extract the data from the CSV file and create a list in SharePoint.
5. Use a Template
Apart from the manual process above, you can use a Microsoft template to create a list automatically. Using the template is faster when you need to make a new list.
Here is the process to make a SharePoint list using the template:
- Open the Lists app.
- Press on the New list.
- Choose a template.
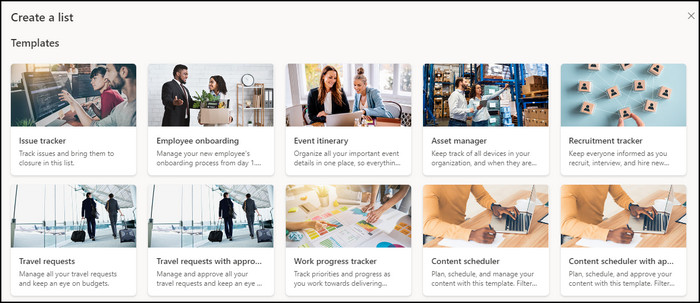
It will create columns based on the selected template, and you can add data to the chart.
Depending on the circumstances, you can choose one of the above methods and create a list in your SharePoint.
Users can use the list by adding multiple columns and inserting values. You can choose the column type and rename each of them. After creating the column, you can add a New item or use the Edit in grid view to insert multiple values quickly.
The List option is very straightforward, and the following passage will describe the ways to use different options in List.
Read the following passage to use the options in the SharePoint list:
Add Column
When creating a list, you must need columns to describe the values. The following steps will provide how to create columns in the SharePoint list.
Here is the way to add a column in the SharePoint list:
- Press on the Add column.
- Select the column type and click Next.
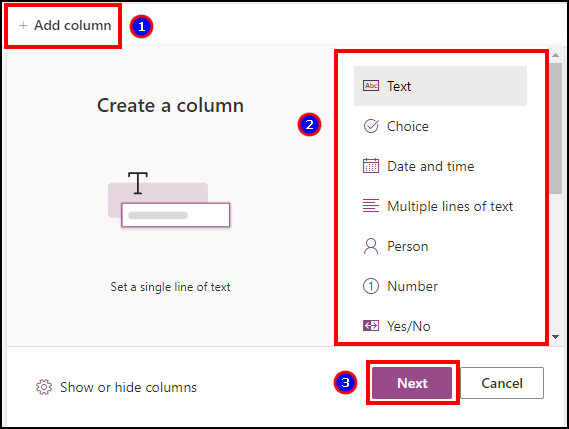
- Type the column’s name and press Save.
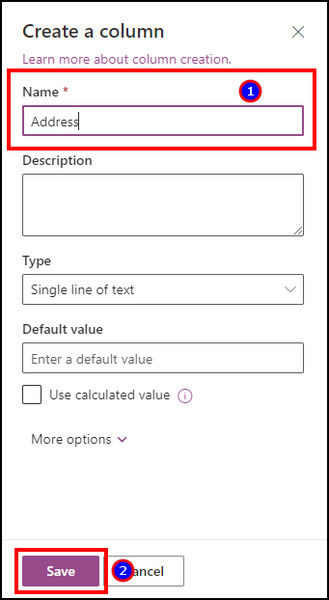
You can create multiple columns by following the same procedure.
Rename Column
If you want to rename the Title or change the name of a created column, you can follow the methods below.
Read the process below to rename a column:
- Click on the column’s name.
- Press on the Column settings.
- Click on Rename.
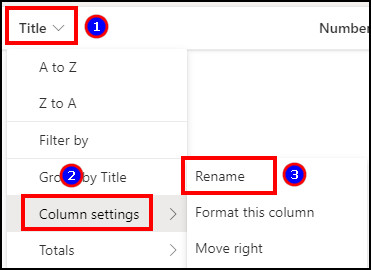
- Type the new name and press Save.
The renaming process is the same for all the columns in the SharePoint list.
Create New List
After making the necessary columns for your list, it’s time to add values by creating a new list. Follow the steps below to create a single list and the values.
Here is the way to create a new list in Microsoft SharePoint list:
- Click on New from the ribbon.
- Provide values and press Save.
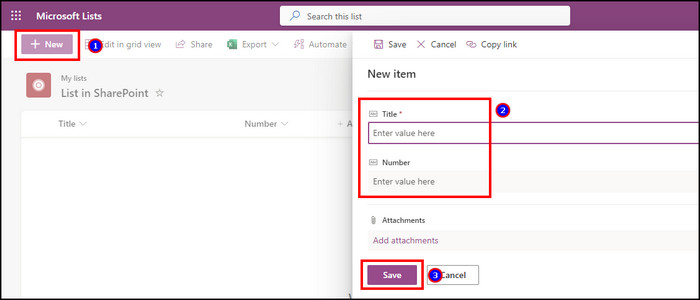
It will add a single row of values to the SharePoint list. However, if you want to add multiple values, read the following process.
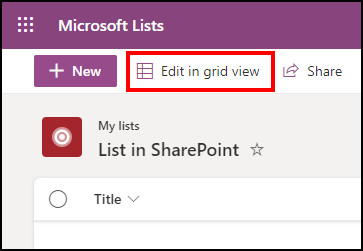
Edit in Grid View
The grid view helps to add multiple values to the SharePoint list quickly. You can follow the procedures below to edit the values in the grid view.
Read the following method to edit the SharePoint list in grid view:
- Press on Edit in grid view from the top ribbon.
- Add values for each column.
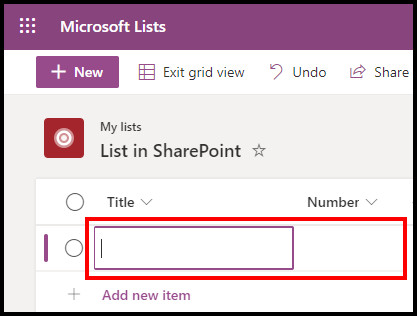
You can continue inserting the value into the list. To quit the grid view, press on Exit grid view from the top ribbon.
Frequently Asked Questions
What is the purpose of a list in SharePoint?
The list in SharePoint helps to quickly collect data and share them with team members in your organization.
Is the SharePoint list available on a free Microsoft Office plan?
No, the list in SharePoint isn’t available on a free Microsoft Office plan. It’s only available for the Microsoft 365 business subscription.
Can I export a list from SharePoint?
Yes, you can export the data from a SharePoint list to CSV, Excel, and Power BI by using the Export option.
Conclusion
The SharePoint list allows an organizer user to create a data file using information and categorize them through different columns.
There’s no question of using a list when you need to collect or track data effortlessly. And this article has provided various ways to make data depending on your need.
If you find the article helpful, don’t forget to share it in the comment box below.
Cheers!