Logitech is one of the most well-known brands for its peripherals worldwide. Most of the Mouse, keyboard and other gears especially their ‘G’ line up are highly customizable and can be controlled by their proprietary software ‘Logitech G Hub’.
It’s highly in-depth software and can customize the particular peripherals to a ridiculous point. You can set up different RGB profiles, DPI settings and macros; pretty much anything you can expect from a high-end computer gear.
But recently I’ve seen a good number of Windows 11 users struggling to work with the ‘Logitech G Hub’ after their Operating System upgrade.
But don’t you worry. In this guide, I will explore every possible way to fix this G Hub not working on Windows 11 problem and surely they’ll fix any type of issue you are having.
So buckle up and stick with me till the end.
Why is Logitech G Hub not Working on Windows 11?
An operating system upgradation and keeping everything intact is not an easy thing if I’m taking the computer’s side. Even though Microsoft mostly did a pretty splendid job on their part, this type of problem is to be expected.
Most of these problems are fixable with simple tweaks and refreshes. Some might need an in-depth solution namely reinstalling a few things, clearing cache files etc. Rest assured that I’ll get you through this.
We can categorize the problem into two types. Those who just upgraded their system from Windows 10 to Windows 11, can’t get the G Hub working correctly. And the ones who did a fresh installation of Windows 11 and struggled with G Hub installation.
First, we will address issues related to already installed G Hub
Also read how to update drivers on Windows 11.
Here are the steps to fix Logitech G Hub not working on windows 11:
1. Install the recent Windows updates
Sometimes Windows update comes with crucial driver updates. Thus it’s a good practice it keeps the Operating system up to date.
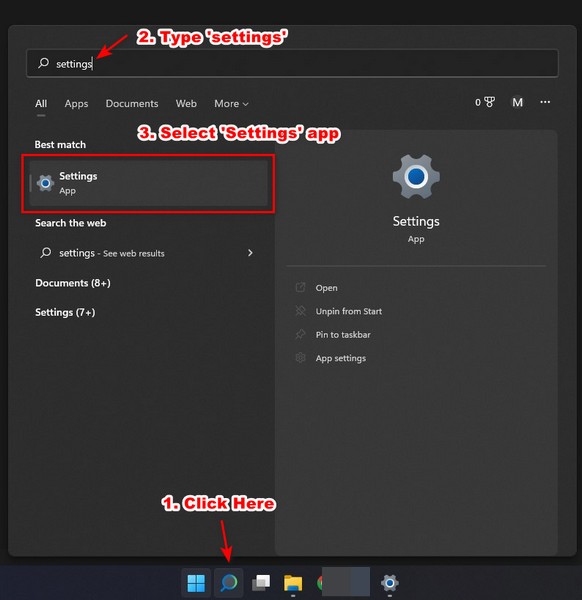
To update Windows 11
- Go to ‘Search’> Type in ‘Setting’ > Select ‘Setting’ from the result.
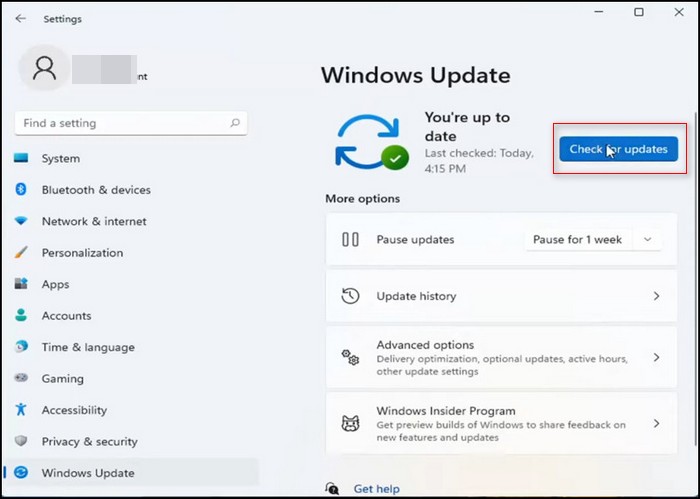
- Go to the Bottom Left corner of the Window and Select ‘Windows Update’
- Click the ‘Check for Updates’ Button. It will take a few seconds.
If there is any update available for your system, this will start downloading.
- Click the ‘Install now’ button.
- Restart the System.
Once there is no update available, the button ‘Check for Updates’ will turn grey.
2. Update the Logitech G HUB assisted Devices drivers
You might need to manually update your Logitech Devices just in case.
To update device drivers individually
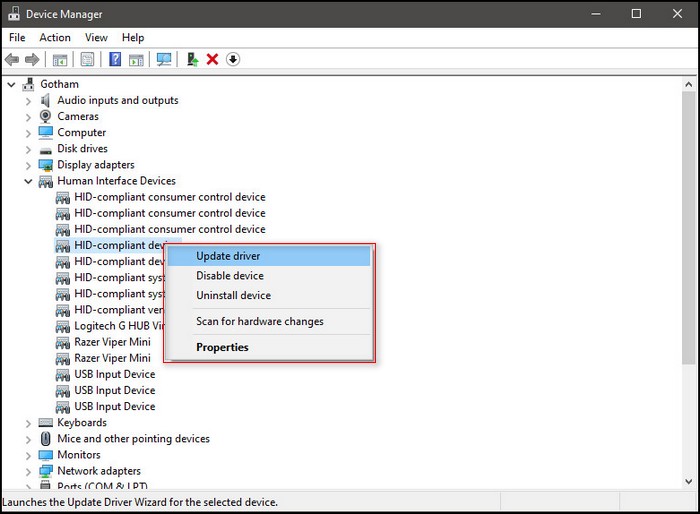
- Go to Search > type in ‘Device manager’ > Open ‘Device Manager’.
- Find ‘Human Interface Devices’ from the Device list and Expand. Your device is mostly named as ‘HID Compliant Device’.
- Find the particular device, right click and Click Update.
- Restart the system after the wizard ends.
N.B. Some devices might need drivers directly from the Logitech Support Page
Follow our guide to fixing Windows can’t access network drive on Windows 11.
3. Use Run as Administrator for the G Hub app
Logitech G Hub might need administrative privileges to control the devices properly.
Once installed
- Go to Search > Type in ‘Logitech G Hub’.
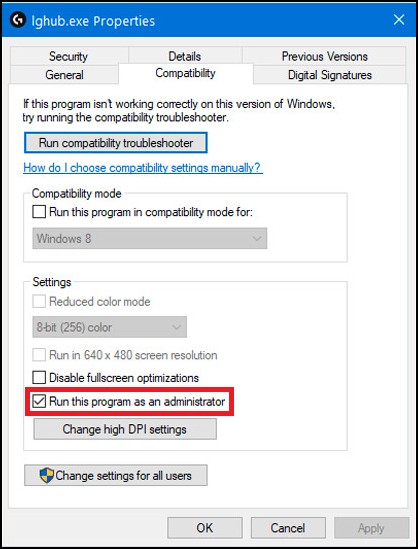
- Right-click on the ‘Logitech G Hub App’ and select Properties.
- Go to the ‘Compatability’ Tab.
- Check the ‘Run this program as Administrator’ option.
- Select ‘Apply’ and close the Window.
- Starting G Hub again.
4. Restart The G Hub services
Restarting the G Hub services might fix the issues you are facing.
To restart G Hub devices properly
- Press Control+Shift+ESC. This will open the task manager.
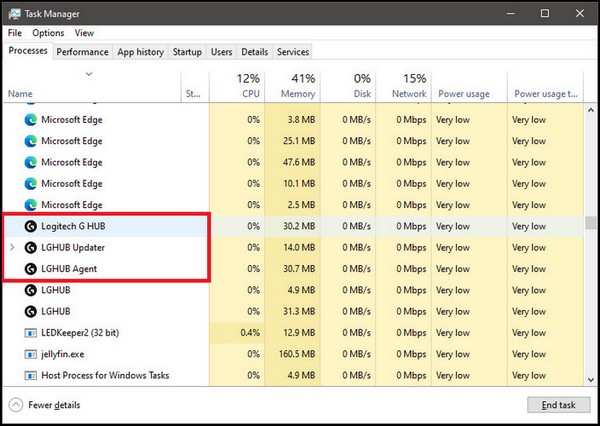
- Go to Services Tab and find Logitech G HUB, LGHUB Updater and LGHUB Agent.
- Select each of them by holding control or individually and click ‘End Task’.
- Once the Programs are terminated, Close the Task Manager.
- Open Logitech G HUB again.
5. Check if the LGUpdate Service is Enabled
LGUpdate service makes sure that everything is up to date including drivers and recognizing devices.
To make sure it’s enabled
- Go to Search and type in ‘Services’
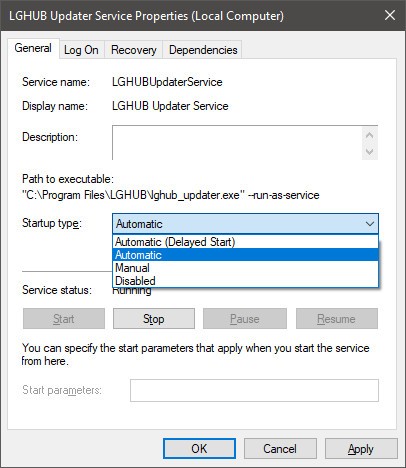
- Find ‘LGHUB Updater Service’ from the list of services
- Open and Go to the ‘General’ Tab
- Make sure the ‘Startup type’ is ‘Automatic’. If not, select ‘Automatic’.
- Select ‘Apply’ and close the Windows.
- Restart the System and check.
6. Reinstall G Hub Devices
You can try reinstalling G Hub-controlled devices individually.
- Go to Search > type in ‘Device manager’ > Open ‘Device Manager’.
- Find ‘Human Interface Devices’ from the Device list and Expand.
Your device is mostly named ‘HID Compliant Device’.
- Find the particular device, right click and Click Uninstall.
- Disconnect the device physically from the system.
- Reconnect the device. Windows should Recognise the device and reinstall it.
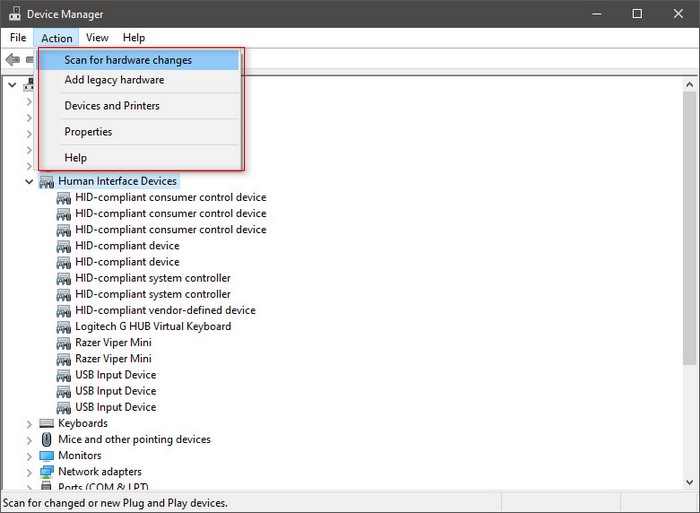
If not, Select ‘Human Interface Devices’ from the Device list in Device manager.
- Go to the ‘Action’ drop-down menu and select ‘Scan for hardware changes’. Windows will rescan the devices and find the device.
Find out how to fix lock screen stucked on Windows 11.
7. Reinstall Logitech G Hub
If none of these works, you can try reinstalling the G Hub app itself.
To do that
- Go to Search> Type in ‘Programs’ > Select ‘Add or Remove programs’
- Find Logitech G Hub from the list.
- Right-click and select ‘Uninstall’ and select the necessary prompts.
- Restart the system.
- Go to Logitech G Hub Download Page
- Click ‘Download for Windows 11’. It may take a while to download.
- Open the setup file and install.
- Restart the System if necessary.

Follow our guide step-by-step to fix Windows License will expire soon on Windows 11.
8. Check your internet connection
G Hub comes with an online installer means it needs an internet connection to be installed Properly. Make sure your system is online.
Turn off the firewall while installation if necessary.
9. Install Microsoft Visual C++
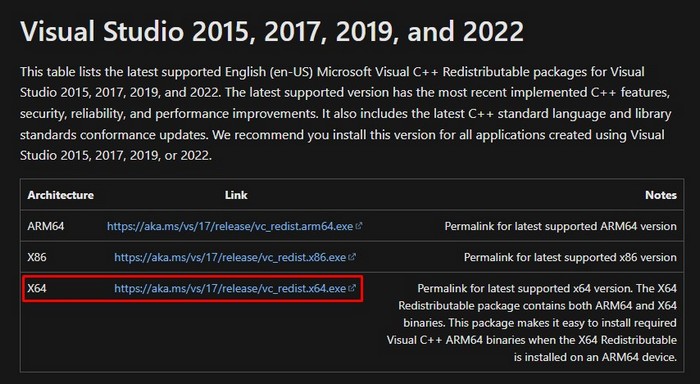
Logitech G Hub needs Microsoft Visual C++ to get installed properly. Make sure to install the latest version of Visual C++ before attempting to install G Hub.
You can download the latest Microsoft Visual C++ from here.
N.B. Windows 11 needs an X64 version of Microsoft Visual C++
10. Enable Safe mode while installation
Safe mode is the best possible environment for installing any software.
To boot your system in safe mode:
- Go to search and type in ‘msconfig’.
- Select the ‘Select System Configuration’ app.
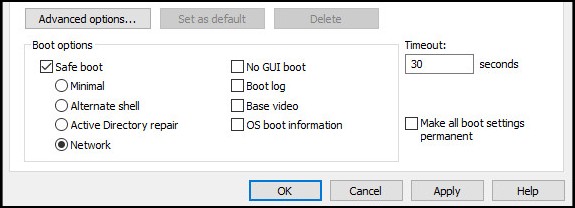
- Go to the ‘Boot’ tab, check ‘Safe boot’ and select ‘Network’.
- Select Apply and Restart the system. Windows should boot into ‘Safe mode’.
- Try installing now.
Also check our exclusive tutorial on does Windows 11 support Dolby vision.
FAQ
Q: Is Logitech G Hub essential to use Logitech Peripherals?
A: If you want to customize your device such as RGB, macro, dip etc; then yes. The device should work in default settings without G Hub. Personally, I would recommend you use the G Hub because Logitech peripherals have huge potential in terms of customization.
Q: Is the Logitech G hub only for Logitech Devices?
A: Yes, so far Logitech G Hub only supports modern Logitech gaming devices. It’s brand-exclusive software, so we do understand their approach. But it would have been much appreciated if they did support other brands’ peripherals, at least the visual part.
Conclusion
If you’ve come this far, I’m sure your Logitech G Hub is working properly with your Windows 11 system. G Hub is an integral part of Logitech User Experience and it’s getting better by the day.
Unfortunately, if you’ve done everything and still having trouble, you should contact ‘Logitech Support’ immediately.