In windows, users commonly face a common issue that their PC shows them an error message saying CPU fan can not be detected; Press F1 to boot. This can happen for various reasons.
Over time, your computer may become clogged with dust, preventing it from performing correctly. Moreover, a loose fan connection or a failed fan can cause the fan detection problem.
If you are looking for a solution to your CPU fan detection issue, you have come to the right place. This article discusses various reasons for CPU fan detection issues and how to resolve them. Let’s dive into it without any delay.
Reasons for CPU fan not getting detected in the BIOS
CPU fan detection problems in the BIOS may be caused by malfunctioning hardware, i.e., broken fan or non-functional power ports for fans. However, some system settings can also cause errors during boot.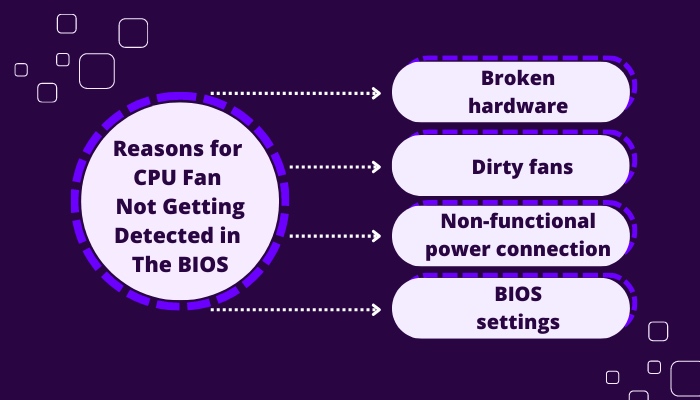
Some reasons for CPU fan not getting detected in the BIOS are given below:
1. Broken hardware
The problem can be triggered by physical damage to the CPU fans, heatsink, or motherboard. If this is the case, you should look for any visible signs of wear & tears and either fix it or replace it if you find any.
2. Dirty fans
Fans clogged with dust are one of the most frequently seen sources of errors related to cooling system issues.
Many users who have encountered the CPU fan not detected error have stated that their problem was fixed after they cleaned their internal CPU fans more thoroughly than they had previously done.
I personally can attest to this statement as accurate. My laptop’s cooling fan was clogged with dust. Whenever I turned my computer on, it showed me a fan error message and prompted me to press f1 to boot without the fan.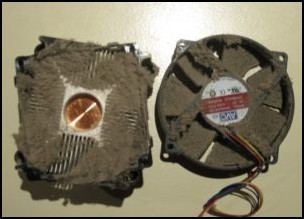
Related contents you should read about how to Know If CPU Cooler Is Compatible With Motherboard?
3. Non-functional power connection
A three- or four-pin connector on a PC fan’s wire is a typical motherboard fan connector. This is hooked up to the motherboard’s three- or four-pin fan header.
If the fans’ cables aren’t securely connected or any connector pins are broken, it can lead to several problems, including the CPU fan not detected error.
4. BIOS settings
The BIOS settings of modern computers regulate the fan’s speed, which means that any modified settings could be a potential source of the issue. In this scenario, you can try resetting the settings in our BIOS to their default values to see if it resolves the issue.
How to fix CPU fan detection issue in BIOS?
The CPU Fan Error Message is the motherboard’s way of telling you that it doesn’t see a cooling fan for your CPU. And since running a CPU without a cooler is a perfect way to ruin it, the motherboard stops the computer from starting.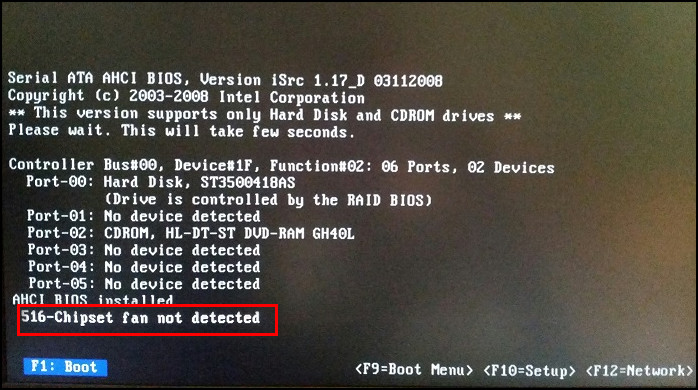
Here is some advice that you should follow to fix CPU fan detection issues in the BIOS:
1. Look out for any physical damage
Unplug your computer, open the case, and look for any physical evidence of damage to your fans, fan rotors, heatsink, or motherboard since any damage to these may be the source of this issue. This is a fairly obvious place to start.
Note that you might have to power on your PC again to test whether your fan is working properly or to find out a point where the fan power connections might have gone wrong.
Remember the following things when you open your PC to troubleshoot CPU fan detection issue:
- Never move, slide, bump, or pick up your computer while it is in use since you run the risk of damaging the hard disks and maybe causing additional issues. When you need to access the computer, ensure it is shut off first.
- Be delicate with the hardware. Check to determine if it’s the correct slot for that part if something won’t fit. Investigate the area surrounding the hardware and look for any types of clips or fasteners. Never yank a piece of computer hardware out by the cord.
- It is best to ground the computer’s case after you have opened it up. You should always touch something metal before touching the computer to remove any static electricity you may have on you if you don’t have anything else to do this with. Also, wool clothes should be avoided as they can generate significant static charges.
- Avoid getting oil from your fingers on the delicate electrical circuits imprinted on the board when handling hardware by keeping your fingers on the sides of the board or on any type of plastic or metal covering on something like a GPU.
Ensure you are appropriately grounded because you will be interfacing with your computer’s hardware. Moreover, take electrostatic discharge precautions to avoid damaging any components.
2. Check the CPU fan connections
It will be impossible for your computer to detect the fan if any CPU fan cables are disconnected or connected to the wrong socket.
Connectors on the motherboard supply fans with the small amounts of power needed to continue spinning and, in some cases, allow the user to control fan speed.
The fan connector on the motherboard is a Molex KK connector. It belongs to a family of computer power connections designed by the Molex Connector Company. They also designed the larger 4-pin Molex used by older hard drives and the motherboard power connectors.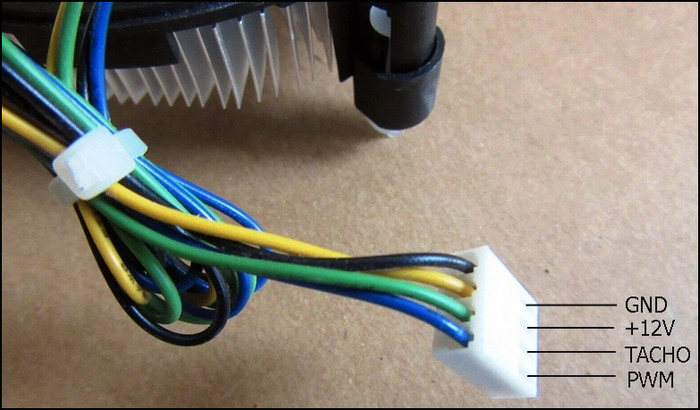
Today, the name Molex is seldom used. SYSFAN and CPUFAN are utilized more frequently in motherboard manuals when referring to these connectors. Technically, SYSFAN and CPUFAN are the same connectors, but SYSFAN connects PC case fans while CPUFAN connects the fan to the CPU heat sink.
Ensure your CPU fan is connected to the header whose name is CPUFAN. Don’t worry if you’ve never used these connections before. They are simple to use and difficult to connect.
Check out the easiest way about is CPU or GPU More Important for Gaming?
3. Clean the CPU fans, air vents, and the heatsink
Dirt is the biggest enemy of computers. The system runs hotter and less reliably when dirt gets in the way of airflow. Dirt is an insulator for heat, which causes parts to overheat and shortening their useful lives.
Fans that try to keep the system cool will run faster and louder if they get dirty. Dirt corrodes contact surfaces, creating resistance in the fans’ movement.
As computers run, they get dirty on their own. Dust, pet hair, and other particles are sucked into the case by the fans, where they settle on every surface.
Even in clean rooms, operating rooms, and other very clean places, a PC will get dirty over time. If there is any dust in the air, the system fans will pick it up and put it inside the case, which will cause problems sooner or later.
This accumulation of dust inside CPU fans can turn them obsolete, which would cause the CPU fan to not get detected in the BIOS. Hence, clean the fans, air vents, and the heatsink to keep the CPU fans performing well.
Follow our guide about do You Need A CPU Cooler?
Follow these tips while you clean the cooling fans, air vents, and heatsink:
- Routinely vacuuming the outside of the case helps keep dust from building up, but it’s not a perfect solution. Depending on how dirty your environment is, you’ll need to do a more thorough job every few weeks to every few months.
- If the vacuum isn’t getting the job done, use a long-bristled brush to knock the dust, grime off the fan blades, and then vacuum it up. While cleaning the fan blades, set up the system so that the dirt falls away from the motherboard instead of into it. Try canned air or a cleaner if you can’t reach all of the fan blades with the brush.
- Even while a regular vacuum and a few brushes will do, the correct equipment makes the process easier. Most PC stores sell vacuum accessories.
These attachments are small enough to reach into cracks and crevices, and the adapter you use to connect them to your home vacuum reduces the airflow.
If your CPU fan still doesn’t get detected in the BIOS, proceed to the next possible solution.
4. Reset BIOS to default
Custom BIOS settings can cause your internal CPU fan to fail the startup test, resulting in the CPU fan not being detected issue. Restoring the standard BIOS settings can remedy this.
Internally through your PC’s boot menu is the simplest and safest approach to reset your BIOS settings to factory defaults. The best and most user-friendly ay to go to your computer’s BIOS settings is from the desktop.
Here is how to reset BIOS to factory settings:
- Press Win + I to access Settings.
- Navigate to Update & Security.

- Click on Recovery from the left pane.
- Click on Restart now, under the Advanced startup section.
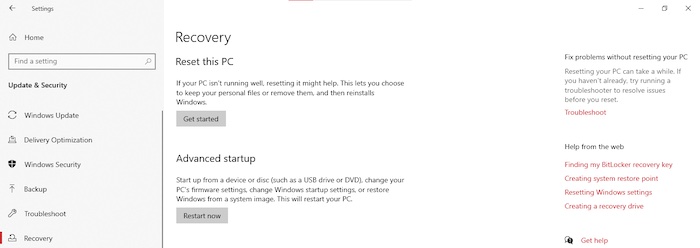
- Select Troubleshoot from the blue prompt screen that appears after your PC restarts.
- Go to Advanced Options > UEFI Firmware settings > Click Restart.
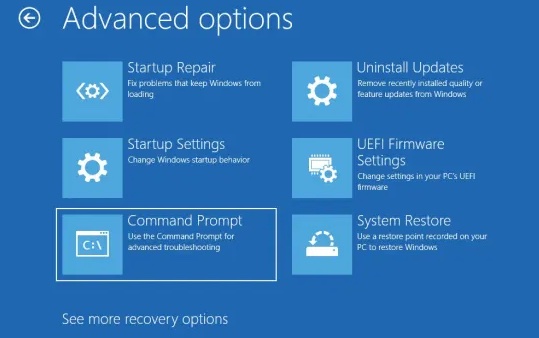
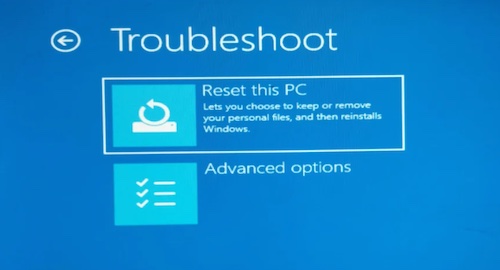
Your PC will boot into the BIOS screen now. Since the BIOS screen differs depending on the motherboard manufacturer, you have to find the location of the reset option yourself.
After resetting the BIOS, restart your PC again, and check to see whether the fan detection issue still persists or not.
Also, check out our separate post on is My CPU Overclockable?
Conclusion
CPU Fan Error Message tells you that the motherboard doesn’t recognize a cooling fan for your CPU. By unplugging it and opening the casing, look for signs of physical damage to your computer’s fans, fan rotors, heatsink, or motherboard.
Ensure that the fan is properly connected to the motherboard. Clean the outside and inside of your PC with a vacuum cleaner. Canned air or a cleaner can help if you can’t get to all of the fan blades. Incorrect BIOS settings can cause CPU fan detection issues. This can be fixed by resetting the BIOS to its default factory settings. So, what method do you think is appropriate for you?