Employing quotation marks on your document is a staple for making it look good. Also, some parts of your document may grammatically require the use of quotation marks.
Microsoft Word has two quotation options that you can use, the smart quotes – (“), which are the curly in-facing quotation marks, and the straight quotes – (“). If you are using the smart quotes in Microsoft Word, you may see black diamond with a question mark – � instead of the quotes while using other apps to open the document. That is, when you open a document using another app, you may face issues with the text format not viewing the quotations marks properly.
It can be quite a nuisance if you have to use your created or edited Word document on another app. There is an easy workaround for this. It is simply to change the type of quotes you are using.
If you have faced the problem of quotes not viewing, you will find the process of how to flip the quotes in Microsoft Word here in detail.
So keep reading to learn how to change quotes in Microsoft Word.
You may also like to read about MS Word Table of Contents not Updating.
What are smart quotes in Microsoft Word?
Microsoft Word allows you the feature of using smart quotes (curly quotation marks) – (“) as its default settings. If the settings are not changed, every document you create in Microsoft Word will have smart quotes. You can change the settings to use straight quotes instead of curly ones.
Quotation marks are an important part of any document that include quotes used from other sources or speeches. In most electric mediums, the default format of quotes is the straight quotes – (“), which are not curled. If you are not using smart quote in Microsoft Word, then the straight quotes are what will appear when you press the quotation key.
Smart quotes or curly quotes are the default settings in Microsoft Word. This may create issues while displaying the quotation marks when using your Word document on other platforms.
So, if you want use the straight quotes in Microsoft Word, you have to change quotes from the settings. The way to flip quotation marks in Word has been presented in simple words after this section here so stick to find out how to change quotes settings.
Related contents you should read about Microsoft Word not pasting correctly.
What issues may arise while using smart quotes?
Smart quotes, as the name suggests, can make your document visually refined and look attractive but it can also create issues with compatibility while displaying these quotes on other apps.
Microsoft Word uses smart quotes in default and so, if you do not change the settings, every document you create will have the curly quotes instead of straight ones. In this case, if you use another app, computer or online document viewer to view or upload the document, it may not display the curly quotations and show the black diamond shape with a question mark in the middle.
This issue can be quite troublesome because then you may have to re-edit the document in word again to change or remove all the quotation marks.
So, if you are creating or editing a document which will alter be used on another app or platform, it is advised that you change the quotation settings to use the straight quotes. To learn how to flip quotes in Word, move on to the next section where it is discussed in details.
Related guide about Microsoft Word: Quotation marks not working.
How to flip quotes in Microsoft Word
Microsoft Word users can find themselves in the need to change their quotation marks settings in order to solve their problems of quotes not being displayed on other apps and mediums if they are using smart quotes. Because, as a feature of Microsoft Word, it might not be available on other document apps and platforms.
If you have been facing this issue and need to flip quotation marks in Word, you must be quite eager to know how to change the type of quotes used in Microsoft Word. So let’s get right to it.
This process is applicable for Microsoft Word 2010, Microsoft Word 2013, Microsoft Word 2016, Microsoft Word 2019 and Word for Microsoft 365.
Some more guides on Microsoft Word paste function not working.
Follow these methods to flip quotation marks in Word:
1. Flip quotation marks from settings
The first process you can go through to flip the quotation marks is to change them from the settings from the settings. If you are getting the black diamond sign – � on your document elsewhere, then you have to find out which quotation mark isn’t being displayed.
Opening that document in Microsoft Word will let you see which quotes you are using. If it is not being correctly displayed, then it is most likely the curly quotes – (“) and you need to change them to straight quotes from the settings.
Go through our epic guide on Microsoft Word find and replace is not working.
In order to change your quotation marks from smart quotes to straight quotes, go through these steps:
- Launch Microsoft Word.
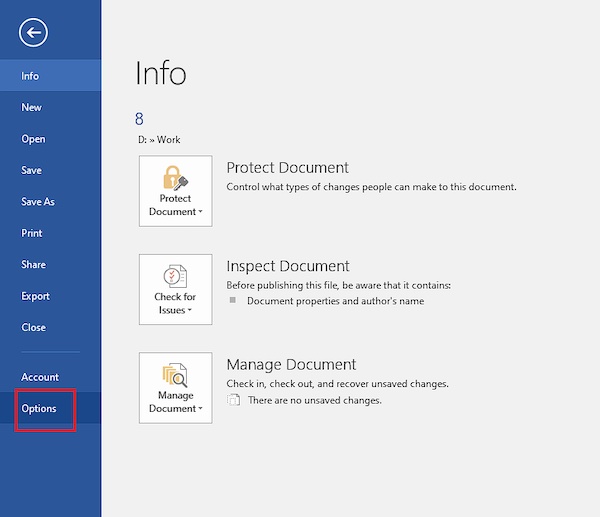
- Click on File after opening Word.
- Select Options from the left-side window within After having selected Options, a pop-up window will appear.
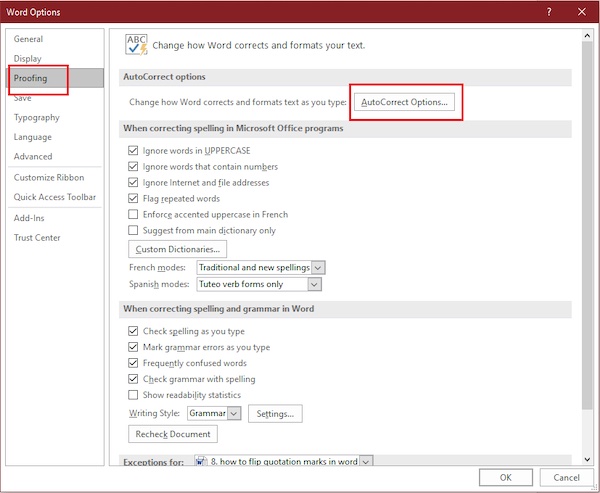
- Go to Proofing from the pop-up window called Word Options.
- Press on the AutoCorrect Options button in Proofing.
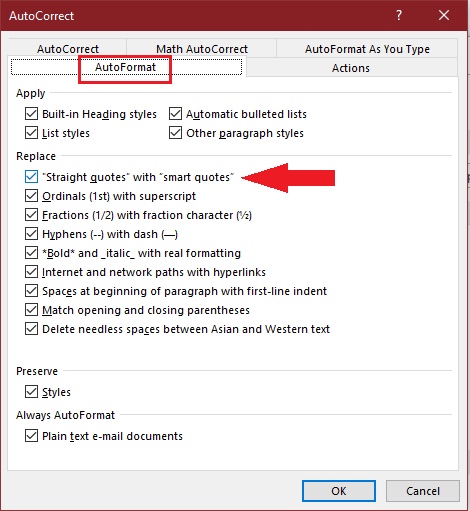
- Clicking on AutoCorrect Options will open another pop-up window called AutoCorrect.
- Go to the AutoFormat tab and uncheck straight quotes with smart quotes within the AutoCorrect window.
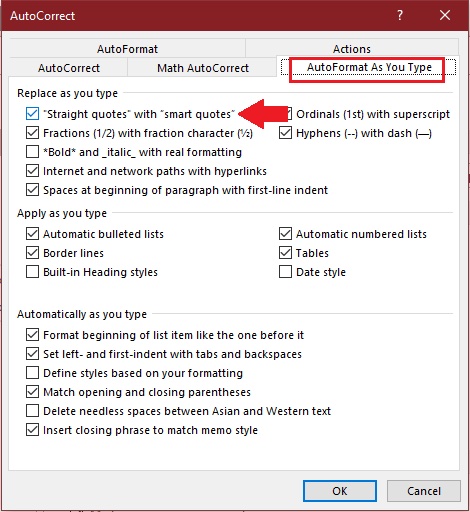
- Go to the AutoFormat As You Type tab and uncheck straight quotes with smart quotes.
- Click on OK on the pop-up windows to close them and save your settings.
After you have gone through these steps, any quotation you type in Microsoft Word (single or double) will be the straight quotes. The curly quotes will not appear again unless you revert the changes that you have just made.
If you are making documents to upload on the internet or to send to someone else, it is advised that you keep these settings changes and do not revert them. It will prevent you from typing the curly quotes in your documents and avoid any displaying issues that you might have to face due to format incompatibility.
2. Edit and flip the quotation marks within the document
If you want to keep using the smart quotes in Microsoft Word but need to change the quotes to straight quotes in certain documents, then you can change them on the document individually instead of changing the quotation settings.
Follow this process to change the existing quotation marks in a document:
- Launch Microsoft Word.
- Open the concerned document in Word.
- Press Ctrl + H on the keyboard to open the Find and Replace dialog box.
- Click on the Replace tab within Find and Replace box.
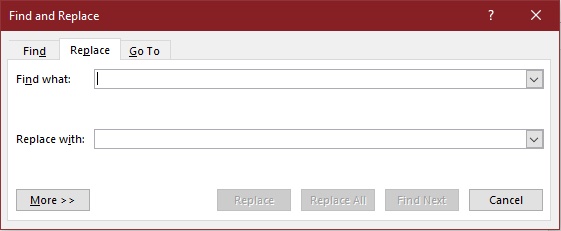
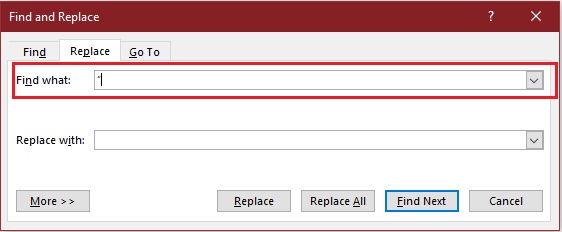
- Type the curly quotations – (“) within Find What section.
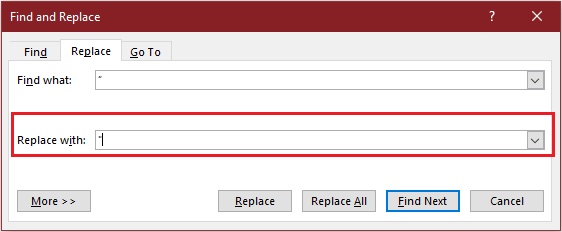
- Type in the straight quotes – (“) on the Replace With section.
- Click on the Replace All option.
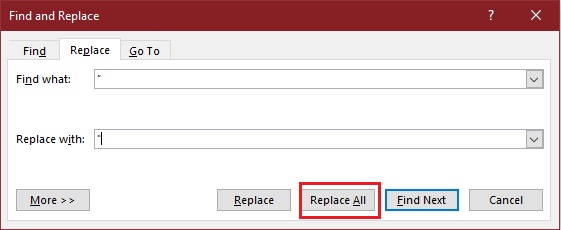
After you have pressed on Replace All, every smart quote on the document will be replaced by the straight quotes. This way, you can change the flip the quotation marks on the document without changing any settings on Microsoft Word.
Conclusion
Whether you want to change the quotation marks in your document or want to troubleshoot them not appearing, you can now do it pretty simply if you have gone through the processes that have been discussed here.
Some Word users prefer the smart quotes while others want straight quotes in their documents. You can have the quotes set to your most preferred quotation marks as you are now familiar with how to flip quotes in Microsoft Word.
Quotations not being displayed on other apps can be quite troublesome if you do not know why it is happening or how to fix it.
If you have been facing trouble with the quotations not displaying, you can now easily change the quotes within your document by following the methods explained here.


