Microsoft introduced the Note to Self feature for Outlook mobile clients to take quick notes without leaving the application.
While this feature helps to find the send emails under the Note to Self heading, many users find this feature unnecessary and want to turn it off.
In this article, I will demonstrate three methods to turn off the Note to Self feature in Outlook.
Without further ado, let’s begin!
How Does the Note to Self Feature Work?
While using the Outlook client for Android and iOS, you can note important information by sending an email to the same email address that you’re using to compose the email. This feature is handy to keep notes without leaving the Outlook mobile application.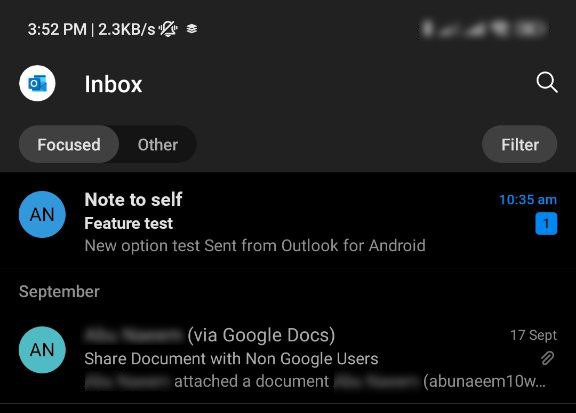
Like the Outlook desktop client, there are no options to save notes. So, when you’re on Outlook mobile apps, you can use the Note to Self feature to take quick notes and remind yourself to take necessary actions.
But can other people see your Note to Self emails?
The answer is no. All the Notes to Self emails are only visible to your (author) inbox, and no one else can access these emails unless they have your Outlook login credentials.
By default, this feature is turned on. However, if you don’t prefer to get emails showing Note to Self instead of your name, you can turn off Note to Self reminders.
How to Disable Note to Self on Outlook
Disappointingly, Microsoft did not include any direct option or toggle to turn off the “Note to Self” feature in Outlook. There are three workarounds to stop sending emails to yourself: using the flag feature, marking Never Block Sender, or creating a new rule to move the items to a specific folder.
As there is no way to completely turn off the Note to Self feature, moving it to another specific folder is the best way to access the items when necessary. Consider the following methods to turn off the Note to Self feature.
Here are the methods to disable Note to Self feature in Outlook:
1. Use the Flag Feature
The flag feature is used to highlight emails or remind you about the context so that you can later take the necessary actions.
You can easily flag the Note to Self emails using the flag icon on top of the email conversation. Moreover, by creating a new rule, you can allow Outlook to flag emails automatically. It will stop notes to self emails.
Once the note to self messages are marked as flag emails, you can access them all by using the Filter Email option under the Home tab.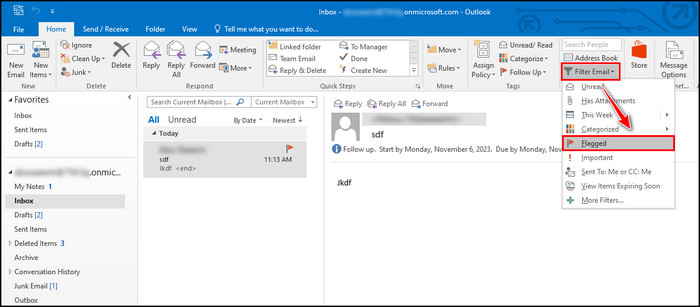
2. Mark as Never Block Sender
During the test of the Note to Self feature, I noticed that on some devices, Outlook automatically marks the note to self emails as spam and moves them to the Junk folder.
In such scenarios, you can easily find the blocked emails and utilize the Never Block Sender option to restrict the Note to Self emails from being marked as spam. To do so, go to the Junk Email folder, right-click on the email, and choose Junk >> Never Block Sender.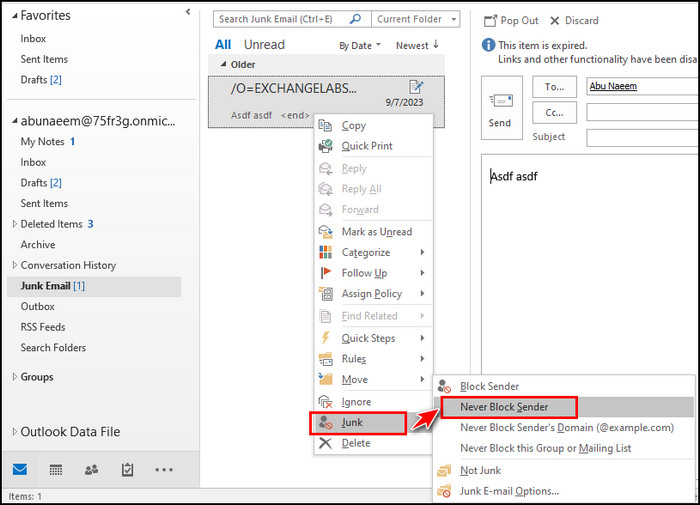
However, if you see any error message while changing the options, move down to the following method to stop Note to Self birthday or other emails in Outlook.
3. Create a New Rule
Another workaround you should try is to add a new rule to automatically move your Note to Self emails to a new folder instead of appearing in the Inbox. Before crafting the rule, create a new folder named My Notes or something similar.
After creating the folder, perform the subsequent instructions to move the notes directly to the My Notes folder.
Here are the steps to create a new rule to move the Note to Self items to My Notes:
- Launch the Outlook desktop client.
- Navigate to File > Manage Rules & Alerts.
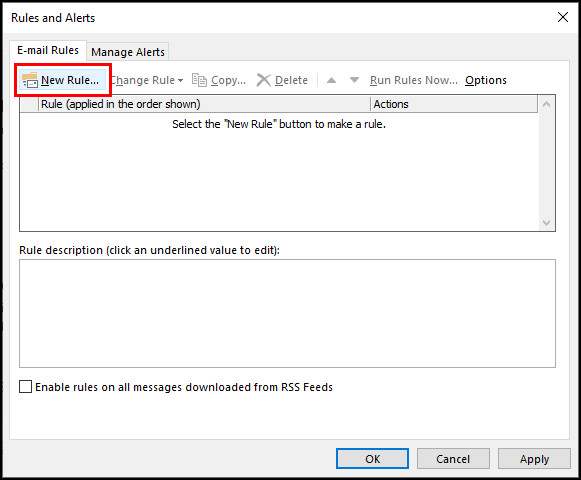
- Click on New Rule under the E-mail Rules tab.
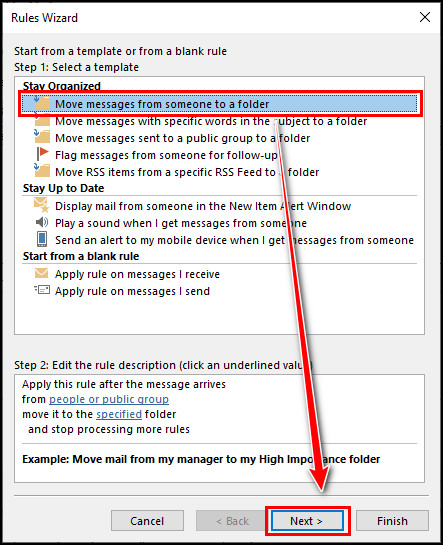
- Choose Move messages from someone to a folder and click Next.
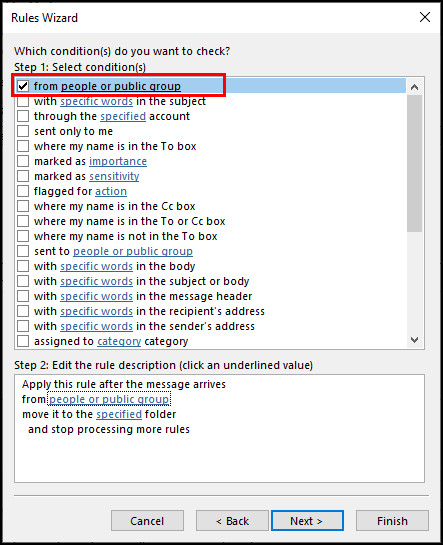
- Select from people or public group.
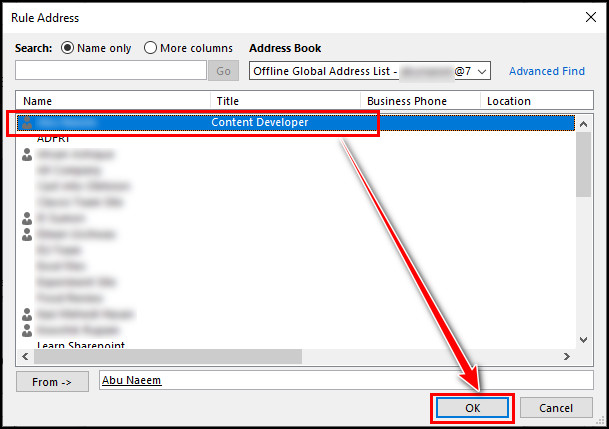
- Click on people or public group value from the bottom.
- Double-click on your name and select OK.
- Click on the specified value from the bottom.
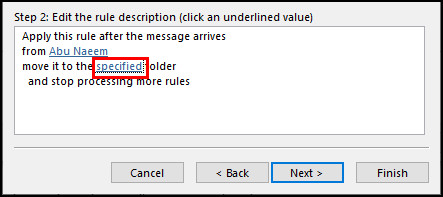
- Choose My Notes (the folder you created earlier) and click OK.
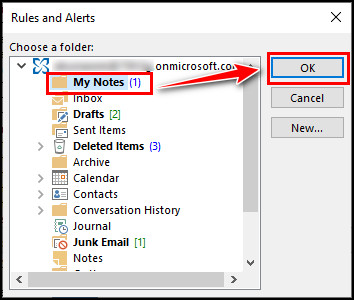
- Click Next and uncheck stop processing more rules.
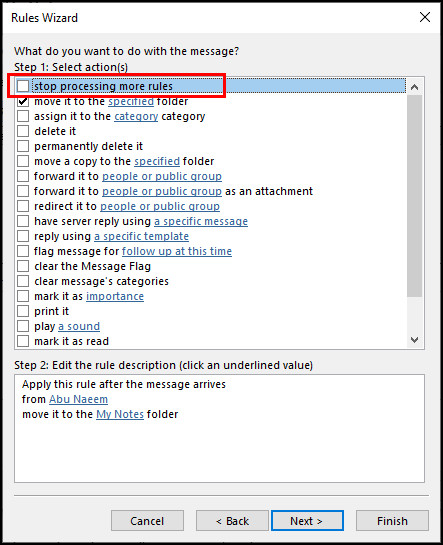
- Select Next > Next > Finish.
- Click Apply and then OK.
Bingo! You‘ve successfully created a new rule to move the Note to Self items to the My Notes folder instead of the Inbox folder. You will no longer receive annoying notifications for your self-notes in Outlook.
In case the Outlook rule is not moving emails to the folder, you may need to adjust some values while creating the rule.
Wrap Up
Creating a new rule to move the Note to Self emails to another folder is the most relevant and admirable method for turning off the feature. Moreover, you can flag the emails and use the Filter Email option to sort the Note to Self emails.
If you’re still unable to disable this irritating Outlook option, don’t hesitate to comment below for further assistance.