Microsoft Excel is a spreadsheet application that lets you create, view, edit, and share your files with friends or colleagues. Several users can use an Excel document simultaneously. The multi-user ability take this application to another level.
While working on a shared file, you may sometimes need to limit access for different users to avoid unwanted situations. In Excel, you can easily lock or unlock any cell or a group of cells from other users.

This article briefly covers all the possible ways to lock or unlock cells in Excel. Besides, I have managed to gather some relevant topics to clarify the process.
Let’s dive into this well-researched article to quickly lock or unlock cells in Microsoft Excel without wasting time.
How to Unlock Cells in MS Excel on Windows
In Windows, you can quickly unlock cells. Remember, you can only lock or unlock a cell if the sheet is protected. If you need to unlock cells in Excel, follow the given steps below.
Here are the steps to unlock cells in Excel on Windows:
- Open a sheet in Excel.
- Select the cells you need to unlock.
- Press the Ctrl + Shift + F keys to open Format Cells.
- Switch to the Protection tab.
- Uncheck the Locked option to unlock the cells.
- Click OK to save changes.
Following the above instructions will unlock selected cells in Excel. If you are using Mac, move on to the next part to unlock cells on Mac.
Also read on how to highlight duplicates in Excel.
How to Unlock Cells in Microsoft Excel on Mac
Unlocking cells on Mac is almost similar to the Windows version. See the below procedure to unlock cells on your Mac.
Here are the methods to unlock cells in Excel on Mac:
- Open your Excel file.
- Select your desired cells.
- Right-click on the cells and select Format Cells.
- Switch to the Protection tab.
- Uncheck the Locked option.
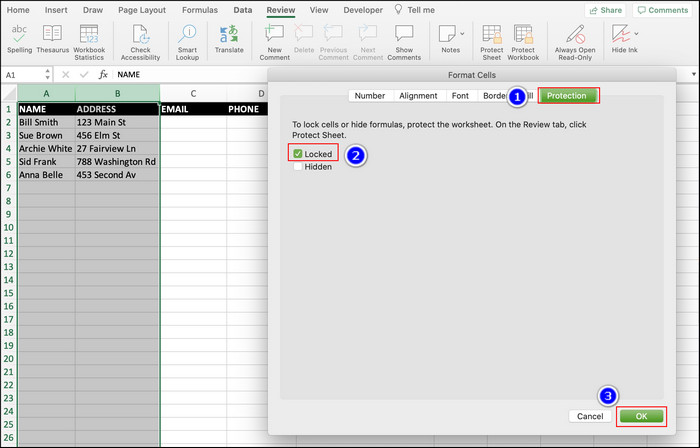
- Press OK.
You have successfully unlocked the selected cells. You can also unlock cells on the web version of Excel by going through the following procedures.
How to Unlock All Cells on a Sheet in MS Excel (Unprotect a Sheet)
The process of unlocking all cells on a sheet is straightforward. To quickly unlock all cells, you just need to unprotect the sheet. Follow the subsequent procedure to unlock all cells.
Here are the ways to unlock all cells on a sheet in Excel:
- Open your sheet in Excel.
- Locate the sheet name in the bottom-left corner.
- Right-click on the sheet.
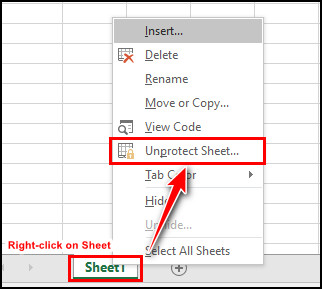
- Select the Unprotect sheet from the menu.
You can also unprotect your sheet by navigating to Review > Unprotect Sheet. Sometimes you may need to unlock individual cells on a protected sheet. Move on to the next part of this article to learn more.
How to Unlock Individual Cells on a Protected Sheet in MS Excel
In a protected sheet, you can’t edit any cells. However, for some reason, you may need to edit some individual cell data on a protected sheet. See the subsequent procedures to unlock individual cells on a protected sheet.
Here are the procedures to unlock individual cells:
- Select your desired cells.
- Click on the Allow Users to Edit Ranges under the Review tab. allow-users-to-edit-ranges
- Click on the New button.
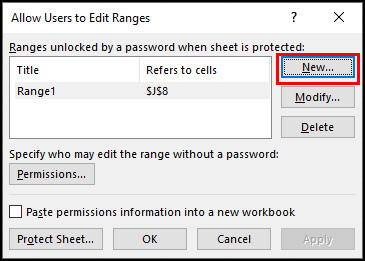
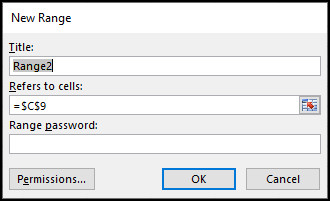
- Set Title, Refers to cells, and Range password. Leave the Range password empty to allow anyone to edit the range.
- Click OK to save the changes.
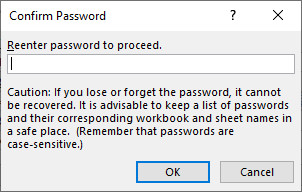
- Re-type your password in the Confirm password window.
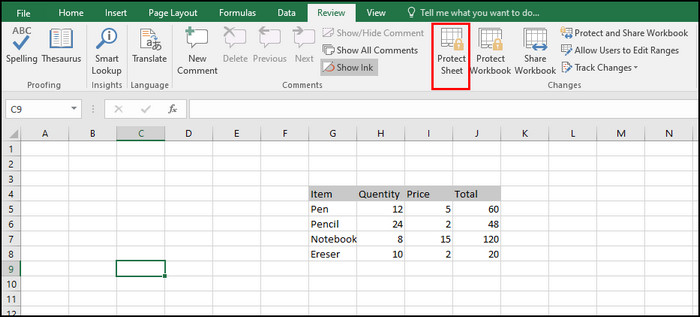
- Select the Protect Sheet button to protect the sheet.
- Type the password to unprotect the sheet and Select OK.
- Re-type your password to allow the changes and again select OK.
Now your sheet is password protected, and anyone with the password can change the value of the selected individual cells.
But before that, go through our epic guide on how to lock a cell in Excel.
How to Lock Cells in Microsoft Excel
When you protect a sheet, all the cells get locked by default. To lock cells in Excel, follow the below instructions.
Here are the processes to lock cells in Excel:
- Open your sheet in Excel.
- Select the cells you want to lock.
- Press the Ctrl + Shift + F keys to open Format Cells.
- Switch to the Protection tab.
- Check the Locked option to lock the cells.
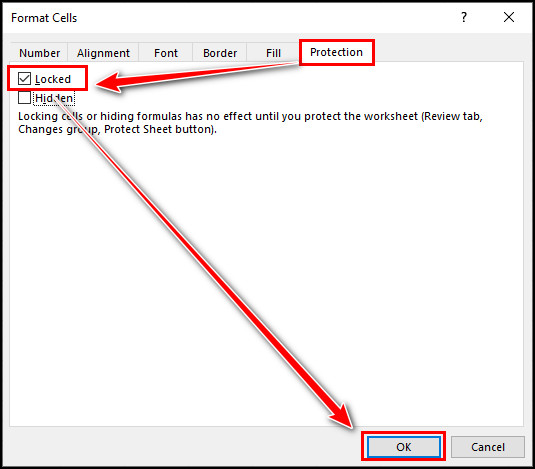
- Click OK to save changes.
Following the above processes will lock the selected cells. The method of locking protected cells is a little tricky. Keep reading to lock protected cells in Excel.
How to Lock Proteded Cells in Microsoft Excel
You can effortlessly lock protected cells in Excel to give some extra privileges to some cells. To learn how you can lock protected cells, follow the below steps.
Here are the steps to lock protected cells in Microsoft Excel:
- Open your Excel document.
- Select Protect Sheet under the Review tab.
- Type a password.
- Tick the below options:
- Select locked cells.
- Select unlocked cells.
- Insert columns.
- Insert rows.
- Click OK and re-enter the password.
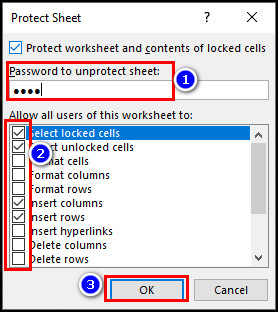
- Click OK to save the changes.
Use this method to lock any protected cells in Excel. Often we need to hide formulas for several reasons. To hide formulas go through the below instructions.
How to Hide Formulas on a Protected Sheet in Microsoft Excel
If any secret formula is implemented on a sheet, you can hide the formulas from being displayed on a protected sheet. Go through the subsequent process to learn how you can hide formulas.
Here are the methods to hide formulas on a protected sheet in Excel:
- Select any cells with a formula.
- Open Format Cells by pressing the Ctrl + Shift + F keys.
- Switch to the Protection tab.
- Tick the Hidden check box.
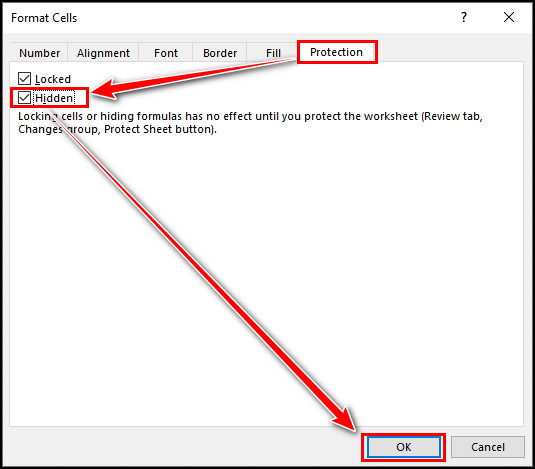
- Click OK to save the changes.
After saving the changes, you need to protect the sheet. Otherwise, anyone can see the locked and hidden cell information.
Also related to this guide on how to randomize a list in Excel.
How to Protect a Sheet in MS Excel
After learning the process of locking and unlocking cells in different circumstances, in case you need any support to protect a sheet in Excel, keep reading the below procedures to learn how to protect a worksheet in MS Excel.
Here are the ways to protect a sheet in Microsoft Excel:
- Open the sheet you need to protect.
- Locate Protect Sheet and Protect Workbook under the Review tab.
- Choose the option according to your need.
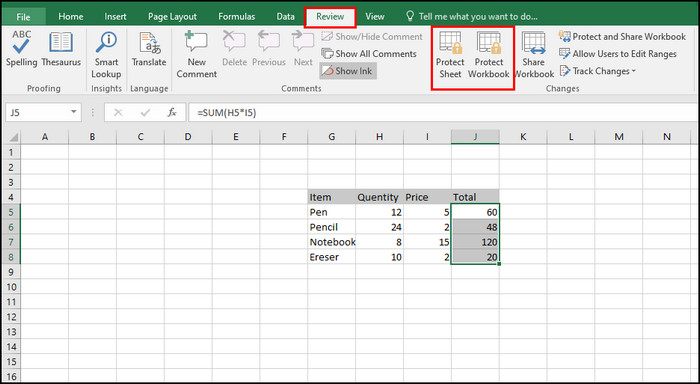
- Set password if required and click OK.
- Re-type password to confirm.
- Click OK to save changes.
Your Sheet or Workbook is now fully protected, and impossible to change the cell values without unprotecting the sheet.
Related contents you should read 4 ways to group rows in Excel.
Frequently Asked Questions
Why can’t I click on a cell in Excel?
You will not be able to click on a cell if you clear the Select Locked Cells check box. That restricts users from selecting any cells outside the defined range.
How do you remove protection from an Excel cell?
You can quickly remove protection from an Excel cell by navigating to Review > Unprotect Sheet. Enter your protection password in the pop-up window and select OK. To confirm the changes, re-type your password and click OK again.
How do I make a cell editable in Excel?
You can make a cell editable by navigating to File > Options > Advanced. Under Editing options, tick the Allow editing directly in cells check box to make cells editable.
Can you unlock cells in excel online?
You can’t lock or unlock cells in Microsoft Excel Online. However, you can click o the Open in Excel button to open your sheet in the desktop application and lock or unlock cells effortlessly.
Summary
Excel offers a vast range of features to use the data more efficiently. Along with thousand excellent features, you can efficiently lock or unlock any cell or a range of cells in Excel.
This article covered all the functions of locking and unlocking cells. It also covered the ways of hiding formulas on a protected sheet and the methods of protecting a sheet by restricting editing access.
I hope this article managed to show you the most straightforward procedures to use the lock/unlock feature of Microsoft Excel.
Did you find this article engaging and helpful? Let us know in the comment.