Are you an adventurer whose digital footsteps echo across the blocky landscapes of Minecraft? If so, a relentless foe may have invaded your experience, Exit Code: 1.
As you create paths and build wonders, this issue can halt your every move. But fear not; if you find yourself entangled in this predicament, you’re standing at the threshold of answers.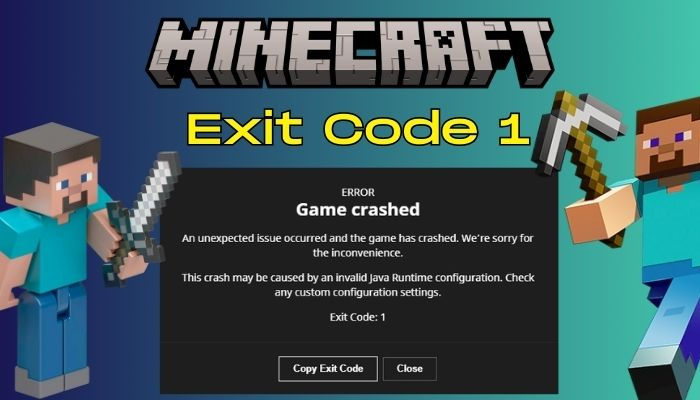
So, without wasting any more words, let’s begin.
Why Does Exit Code 1 Error Occur in Minecraft?
Exit code 1 in Minecraft appears for your system’s Java configuration. An old version of Java causes this issue. Besides, the outdated or massive amount of mods in the game will definitely raise this error. Updating Java and removing selective mods can solve your error.
In Minecraft, code error is a cryptic signal of trouble that significantly impacts your gameplay.
However, what is this exit code 1 in Minecraft?
Exit code 1 signifies a sudden halt in the game’s execution like a script abruptly cut short. The error can take place for the following reasons.
- Outdated Graphics Drivers: Running Minecraft with outdated graphics can lead to compatibility issues, resulting in this error.
- An issue with Java: Minecraft heavily relies on Java, and when Java on your system is outdated, it causes the problem. Also, Java installation or configuration triggers the error 1.
- Outdated or Corrupted Mods: Old or massive amounts of mods in your game folder can conflict with the game code and result in an error.
- Missing or Corrupted Game Files: When essential game files are missing or corrupted, Minecraft may fail to start, leading to the Code-1 error.
These are some of the main reasons for you to encounter the error. Let’s now jump into the below section and fix it.
How to Fix Minecraft Exit Code 1 Error
To resolve the exit code 1 error in Minecraft, you should remove outdated mods. Additionally, updating your graphics driver and Java should also solve this issue. Finally, change the Java executable path or reinstall Java if the problem persists.
Having said that, let’s solve this error in Minecraft once and for all.
Here are the methods to fix the exit code 1 error in Minecraft:
1. Remove or Delete Outdated Mods
Although mods can enhance your gameplay, they can sometimes introduce compatibility conflicts. To isolate the source of the problem, temporarily remove or delete old installed mods and observe if the issue persists.
Before you remove or delete mods, backup the mod folder. Simply navigate the path below, copy the Mod folder, and paste it somewhere else to keep a backup. Otherwise, it might break your game.
Follow the below steps to remove or delete outdated mods from Minecraft:
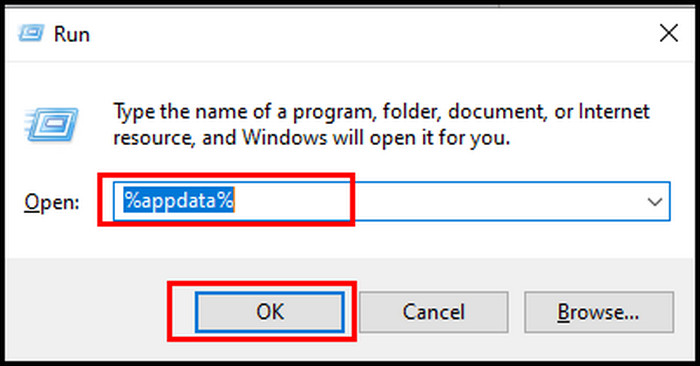
- Launch the Run dialogue prompt by pressing Win + R.
- Type %appdata%\ and press Enter.
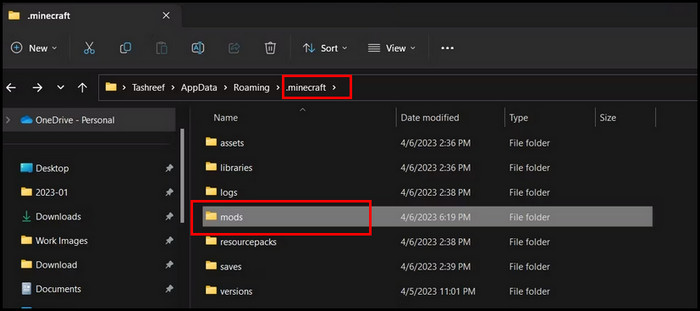
- Locate the .minecraft folder and double-click on it to open.
- Open the mods folder from the .minecraft folder.
- Right-click on each mod and choose Delete.
After you remove the dated mods from the folder, launch the game and look for the issue. If the game runs perfectly, copy 2 of the deleted mods from the backup folder and paste them into the original Minecraft mod folder.
After moving the mod, start the game and play the game for a while to confirm the issue does not persist.
Keep moving the mods to the original folder until you encounter the error, and try to keep track of which mods you are moving. When you start to reencounter the issue, delete the last mods you moved and delete them again to fix the problem.
2. Repair Minecraft Launcher and Xbox App
Think of the Minecraft launcher as the gateway to your gaming experience. If it’s encountering issues, explore the launcher’s settings to initiate a repair process. You can quickly repair it with the Windows built-in repair tool.
Moreover, the Xbox app causes clashes and raises this frustrating error in Minecraft. So, while repairing the Minecraft launcher, you can also improve the Xbox launcher from the same place.
Here are the steps to repair the Minecraft launcher and Xbox app:
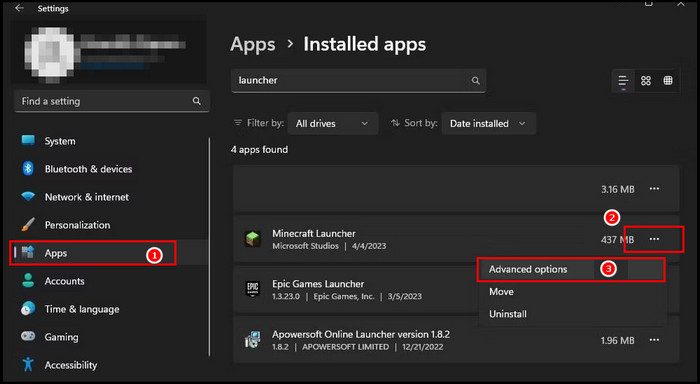
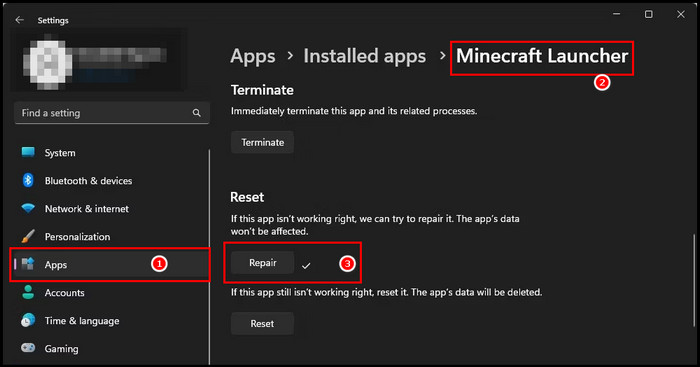
- Launch Settings by pressing Win + I together, and go to Apps.
- Click on Installed Apps and search for Launcher.

- Click on the three dots beside the Minecraft Launcher and choose Advanced options.
- Scroll down to the Reset portion and click on Repair.
- Go back to the Installed app section and locate Xbox.
- Click on the three dots of Xbox and pick Advanced options.
- Scroll down and click on the Repair button from the Reset portion.
Wait patiently until the repair process finishes. Then, initiate Minecraft and look for the error.
3. Change the Minecraft Launcher File Path
The correct file path for the Minecraft launcher is pivotal for its smooth operation. Verify if the file path is accurate, and if not, rectify it. This seemingly minor adjustment can significantly impact the game’s ability to launch successfully and resolve today’s issue.
Follow the below steps to change your Minecraft Launcher file path.
- Right-click on the Minecraft shortcut icon from the desktop and choose Properties.
- Select the Shortcut tab, and on the Target option, add –workDir %ProgramData%.minecraft at the end of the path.
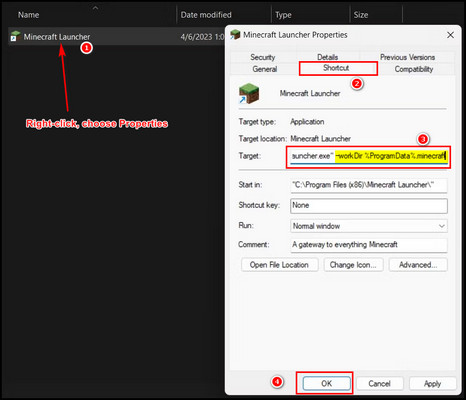
- Click OK.
After modifying the path, launch the game and look for the issue.
4. Modify the Java Executable Path
Java’s role in Minecraft is crucial, but a misaligned executable path can lead to disruptions. Take the time to ensure the Java executable path is correctly configured, allowing seamless interaction between the two components, and fix this error in Minecraft.
Pursue the below steps to modify the Java executable path:
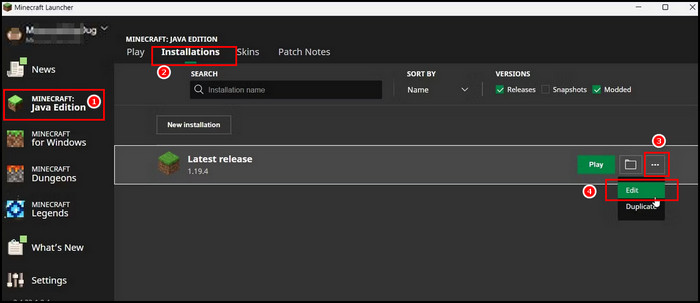
- Launch your Minecraft Launcher and choose Minecraft Java Edition from the left pane.
- Click on the Installations tab.
- Take your mouse on top of the Latest Release, select the three dots, and pick Edit.
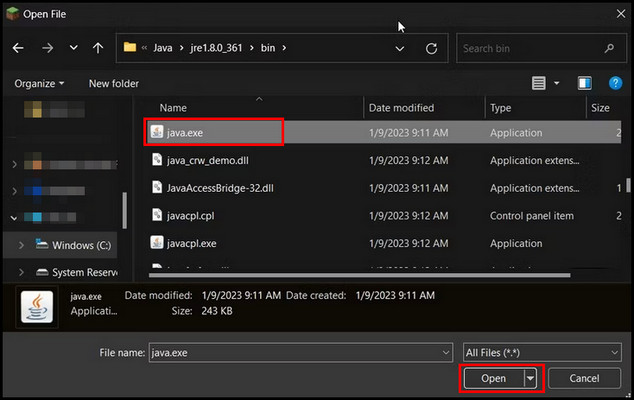
- Select More Options and click Browse.
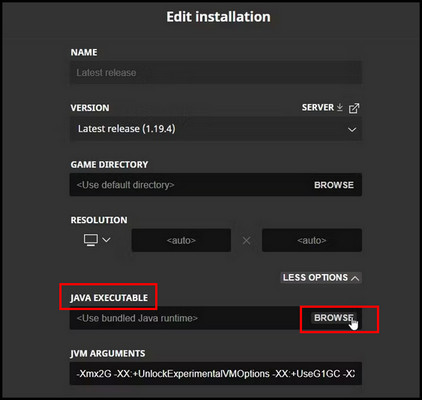
- Find out your Java.exe file from the Java directory. (Java directory path – C:\Program Files (x86)\Java\jre1.7.1_285\bin)
- Click Open from the prompt browser after you locate Java.exe.
- Select Seve to complete the process.
After you save the Java path, restart your Minecraft Launcher, run the game, and look for the issue.
5. Update Graphics Card Drivers
Outdated or incompatible graphics card drivers can also contribute to code 1 error in Minecraft. Also, obsolete graphics drivers conflict with Java.
Pursue the below steps to update the graphics driver:
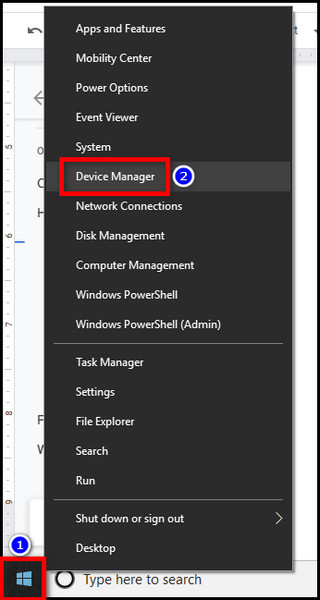
- Press Win + X together and select Device Manager.
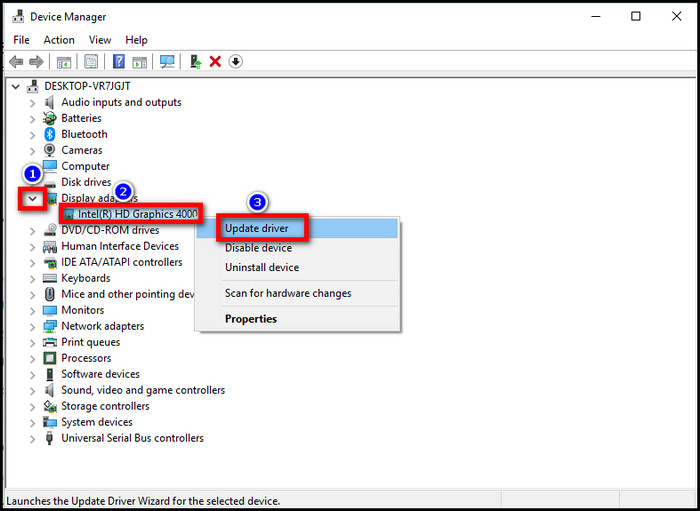
- Click twice on the Display Adapter to expand it.
- Locate your GPU, right-click on it, and select Update Driver.
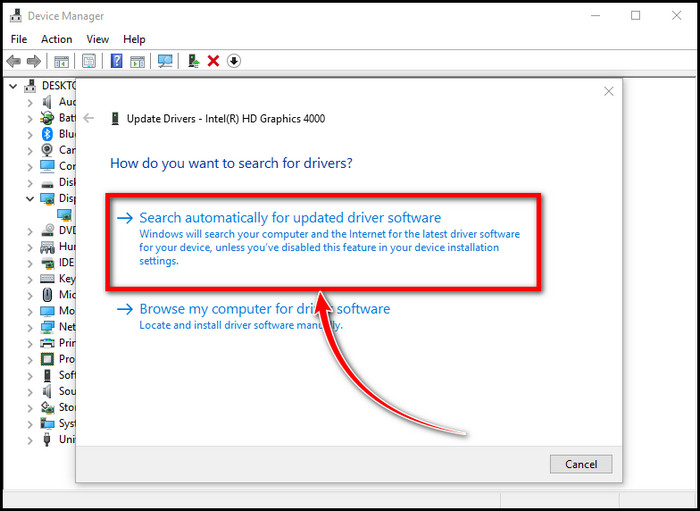
- Choose Search automatically to update driver software.
The process will take some time, and you may need to follow some on-screen instructions. After the update process completes, give a reboot to your PC. The restart will ensure the update takes effect. Now, launch the game and check for the issue.
6. Reinstall Java
Reinstalling Java ensures a clean, up-to-date version is in place, minimizing the potential for conflicts with the game.
Here are the steps to reinstall Java:
- Search control on the search bar and choose Control Panel.
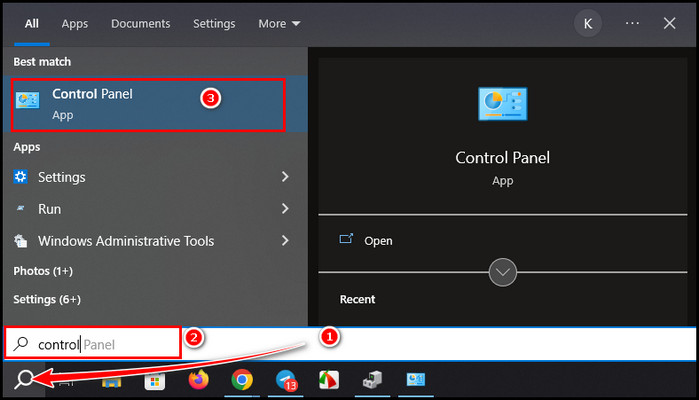
- Select Programs and Features.
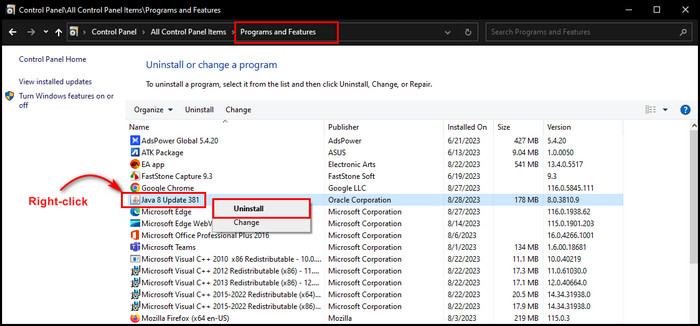
- Find out Java, right-click on it, and select Uninstall.
After uninstalling Java from your computer, go to the official Java download page. Download either an online or offline installer file. The installer file will download to your Download folder.
Double-click on the file and follow the on-screen instructions to complete the installation process.
7. Reinstall Minecraft
If all else fails, it may be necessary to reinstall Minecraft itself. Before uninstalling Minecraft from your computer, back up any saved worlds or important files like mods.
Here are the methods to backup your save games in Minecraft:
- Right-click on the start menu, choose Run and paste %appdata%\.
- Double-click on the .minecraft folder.
- Locate the saves folder, press Win + C to copy the folder, and paste it somewhere else to keep as a backup. Now, uninstall the game.
Follow the below steps to reinstall Minecraft:
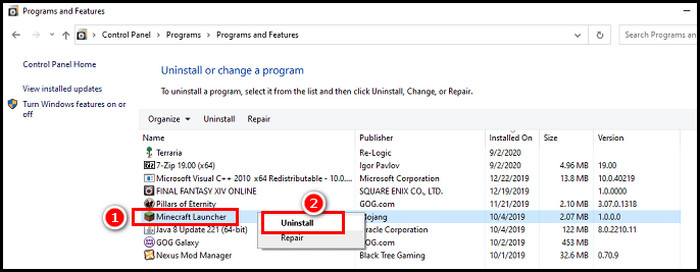
- Press Windows + I together and choose Apps.
- Scroll down and locate Minecraft Launcher, click on it, and choose Uninstall.
After uninstalling the game, go to the official Minecraft website and install the game to your system. Follow the on-screen instructions to install Minecraft properly.
After completing the installation, restart your PC. Launch the Run dialogue box and type %appdata%\. Paste the backup you created on the .minecraft > saves folder.
Diligently following these steps, you can now solve the Code 1 error in Minecraft.
Frequently Asked Questions
How does Exit Code 1 affect your gameplay?
Code 1 error disrupts game execution, causing sudden crashes and compromising gameplay experience. Progress and data loss are expected consequences when encountering this error in Minecraft.
Can mods trigger Exit Code 1?
Mods can induce Code 1 errors due to conflicts or compatibility issues. More than incorrect installation or clashes with the game’s core mechanics can lead to this error. Removing outdated mods can solve this issue.
How does Java relate to Exit Code: 1 in Minecraft?
This error can lead to Java issues, such as installation problems or conflicts. Ensuring correct Java installation is vital for preventing Minecraft error 1. Reinstalling the Java version or changing the Java path can solve the issue.
Final Words
In conclusion, for a perfect gameplay experience, it’s essential to comprehend and fix the Minecraft Exit Code 1 mistake.
You can get beyond this difficulty by investigating its root causes, looking into extensive troubleshooting techniques, and applying professional advice.
With knowledge and perseverance, you can confidently return to your blocky adventures. Accept the challenge, use the suggested fixes, and set forth on a path to uninterrupted Minecraft play.