Do you have a lot of data entries on your spreadsheet that are of different sizes? Are some of them appearing outside the cells of your sheet because of their sizes?
If your answer is YES then you must be looking to change the size of the cells in your spreadsheet. To maintain the aesthetics of your sheet as well as making all your data appear within the bounds of your cells, you can make all the cells the same size.
The processes of making all cells the same size are presented in simple words here in this guide for you to understand and apply them smoothly.
So keep on reading, As I’m about to show you how to make Excel cells the same height and width.
What Is Row Height And Column Width In Excel?
If you have a string of data that is wider than a column’s width, you can make the column wider to accommodate that data.
Again, similarly, if your data string has multiple lines or has a bigger font which does not fit in the row’s height, you will also have to change that so that your data is properly visible to anyone viewing your spreadsheet.
You can employ these Excel tools and change the cell size however you wish to every cell in your sheet at a time. Find out more about this on the next section.
Here’s a complete guide on how to sort by date in Excel.
Is There A Way To Make All Cells The Same Size In Excel?
Changing the cell size in Excel means to change the row height and/or the column width. It is possible to make all cells the same size and that is by selecting the cells altogether and changing their row height and column width. This will then make all your cells of similar dimensions.
The cells on your spreadsheet are all the same size by default. They can surely have trouble accommodating the data you enter into those cells. This is why you may want to change the size of your cells.
Now, if you change some of the cells’ sizes and leave the rest of your worksheet as it is, it won’t look as professional. So it is advised that you make them all the same size.
The ways of making all the cells in your Excel sheet the same size are very simple and straightforward methods. You can find all about them in the next section of this guide, where they have been elaborated clearly. Being able to change the size of all the cells on your worksheet equally at a time is a versatile skill that can be used in a lot of situations.
So move on to the following section to know how to make all the cells the same size in Microsoft Excel.
Check out the easiest way to do a subscript in Excel.
How To Make All Cells The Same Size In Microsoft Excel
Changing the row height and column width to make all the cells in your Excel sheet the same size is quite a simple task. There are a few ways to do this. You can apply custom row and column size in Format tools, drag them manually to change size or use VBA code for this purpose.
These methods are readably discussed in this section. They are explained in such a way so that anyone can can go through them and apply the processes effortlessly.
Follow these steps to make all cells the same size in Microsoft Excel:
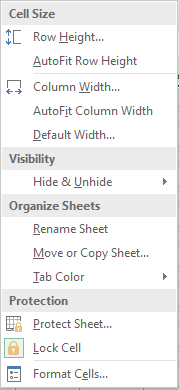
1. Change Row And Column Size From Format Tools
You can make all the cells on your same size by selecting them all of them and changing their row height and column width in Microsoft Excel.
This change can be done within the Format tools that is present on the Ribbon menu of Excel on Home tab. It is a consistent way of making all the cells on your Excel sheet have the same width and height.
Here’s how you can change row and column size from Format tools in Excel:
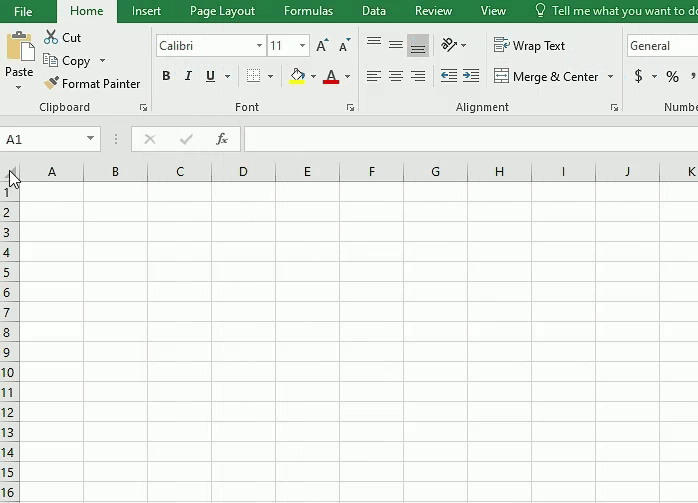
- Open your spreadsheet in Microsoft Excel.
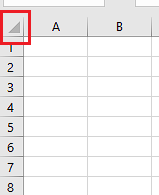
- Click on the Select All arrow icon on the top-left of your sheet to select all the cells.
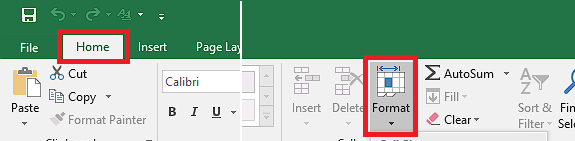
- Go to Home tab and open the Format menu.
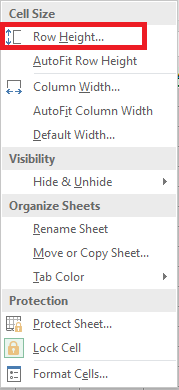
- Click on Row Height.
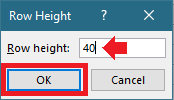
- Enter your desired height and click OK.
- Open Format item again and click on Column Width.
- Enter your desired width and click on OK.
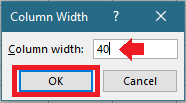
You will now see that the dimensions of all the cells on your Excel sheet have been changed equally according to your settings. They will all have the same new size that you have just applied on them.
Follow our guide step-by-step to remove page break in Excel.
2. Change All Cells Size Manually Using Mouse
In Microsoft Excel, it also possible to manually change the row height and column width by using your mouse to click and drag the edges of rows and columns. This way, you can change the size of all your cells equally by selecting them all and resizing any one of your cells, that will change the size of other cells too.
This is how you can manually change the size of all your cells in Excel using mouse:
- Open your spreadsheet in Excel.
- Click on Select All on the top-left of the sheet to select every cell.
- Click and drag the edge of the top of any column to change width according to your preference.
- Click and drag the edge of any row number to change height as you wish.
While dragging the edges, you can see the value of height or width shown on the screen.
Drag to change that value and then release your mouse button. After you release the mouse button, you will see that all your rows and/or columns have been changed accordingly.
Check out our recent article on add months to date in Excel.
3. Use VBA To Make All Cells The Same Size
Visual Basic for Applications (VBA) can be used in Microsoft Excel to use code for changing the size of all your cells at once. This is method is efficient because it instantly changes the size of all your cells according to your preference when you run the code in VBA.
Go through these steps to use VBA code to make all cells the same size in Excel:
- Open the spreadsheet in Excel.
- Click on Select All on the top-left of the sheet for selecting all the cells.
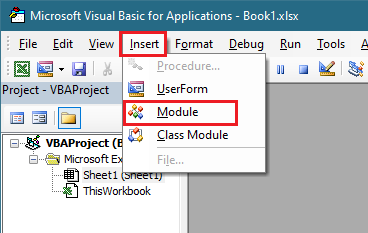
- Press Alt + F11 keys to open VBA.
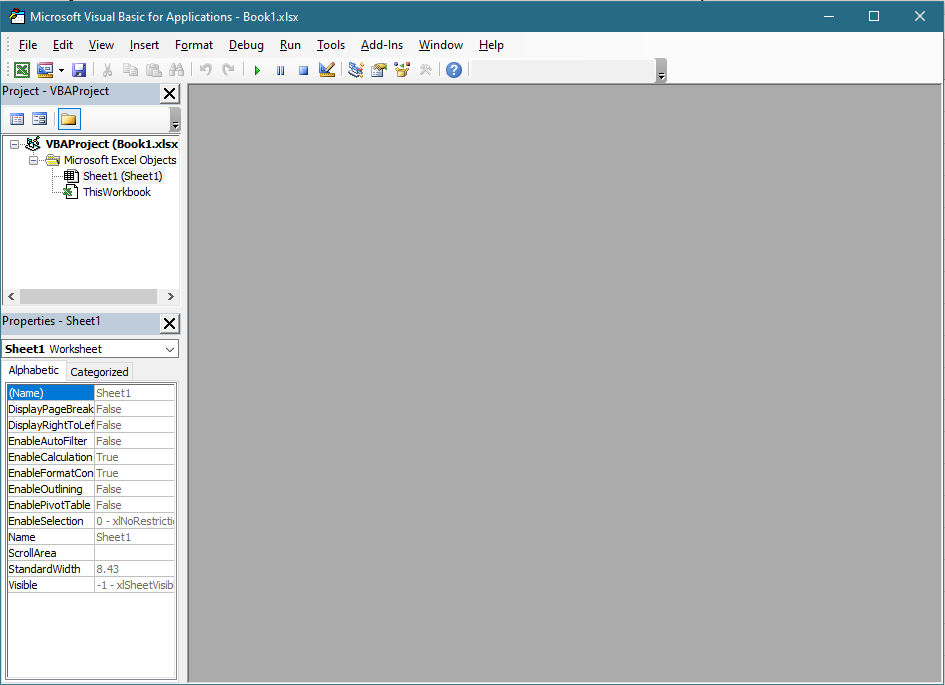
- Select Module from Insert drop-down menu on the top.
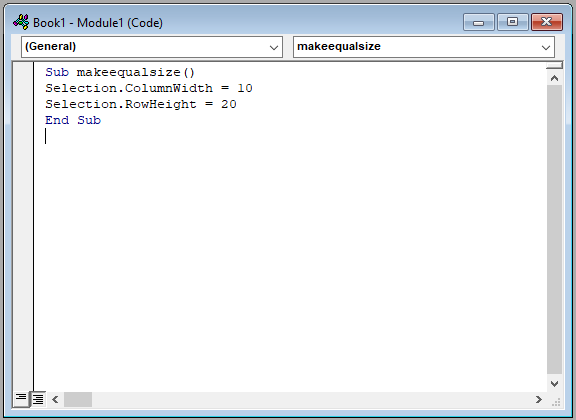
- Enter the following code in the module:
Sub makeequalsize()
Selection.ColumnWidth = 10
Selection.RowHeight = 20
End Sub
(You can change the value after column width and row height as you wish)
- Press F5 key to apply the changes to the cells on your sheet.
- Close VBA.
After you close VBA, you will see that all the cells of your Spreadsheet has changed according to the width and height that you have just applied by running your VBA code.
Conclusion
Official spreadsheets should look like the work of a skilled Excel user when being viewed by other people. Presentation matters when it comes to spreadsheet documents containing a lot of data because it helps when sheet is easy to the eyes.
Congested spreadsheets with a lot of data can get on the nerves of people and bring down the reputation of your expertise and competence as an Excel user.
So it is crucial that you present your spreadsheets with all the cells having equal cell size.
If you have to change the cell size to accommodate the data, you can do so by changing all the cells’ sizes together. This is something you should be adept at by now after having gone through the methods of making all your cells the same size presented in this guide.