When composing a document with numerous chapters or sections, such as a book manuscript, dissertation, or thesis, adding chapter headers can significantly enhance the readability and navigation for your readers.
However, manually putting each chapter title can be slow and tedious, not to mention you can make mistakes, completely breaking the document structure.
Luckily, MS Word lets you set up automatic numbered chapters.
Therefore, in this article, I’ll explain how to create and insert chapter numbers by modifying an existing heading style in a Word document. Let’s begin!
How to Add Chapters in Microsoft Word
To add chapters in Word, start by organizing your document into sections. Use headings (e.g., Heading 1 for chapter titles) and apply styles consistently. Then, go to the Insert tab, click Page Break to separate chapters, and update your table of contents to present the structure.
Here are the steps to add chapters in Microsoft Word:
Add Chapter Headers
To create chapter headers in MS Word 365, ensure all your chapter titles have the same heading. Next, insert section breaks at the beginning of each chapter to ensure that each chapter begins on a new page. Then, add headers to your chapters within the heading section.
1. Apply Style to Headings in Document
To apply chapter headers in MS Word, the first step is to select each of your chapter titles and give them a consistent style.
To apply a style to headings in a document:
- Open the document in which you want to insert chapter headings in Word.
- Put the cursor anywhere in the chapter name, and select Heading 1 from the Styles section.
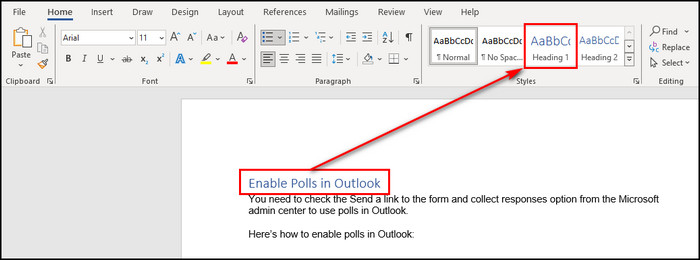
- Apply the same heading style to all the different chapter titles. In this example, I’ve applied the Heading 1.
If you aren’t satisfied with the headings that Microsoft Word has by default, click the Styles button, and you’ll get more headings. You can create chapter headings and subheadings by right-clicking on the heading you want to customize and choose Modify.
2. Add Page Break
Once you’ve inserted the same chapter heading style across your document, you need to add section breaks at the beginning of each chapter. It’ll make every chapter open on a new page.
Here’s how to add a Page Break:
- Place your cursor at the beginning of the 2nd chapter.
- Go to the Insert tab and select Page Break.
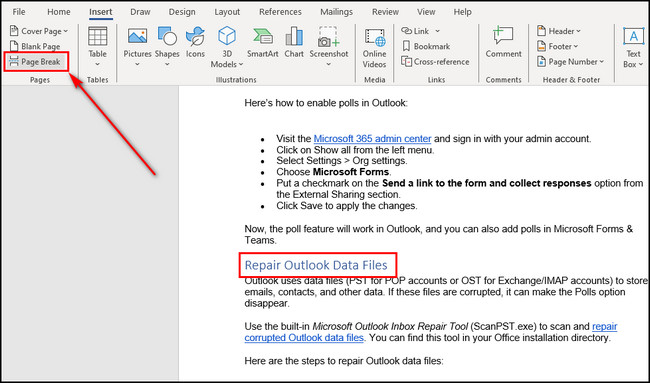
- Add a Page Break for each of your chapter sections in the document.
You can also utilize the Page Break option to insert Roman numerals and page numbers in Word.
Now that you have each of your chapters on its own page, you need to check whether each of the headers in the document is linked before adding chapter headings.
3. Check if the Link to Previous is Enabled
Once you break all the chapters into different pages, make sure all the section headers are connected.
To check if the Link to Previous is enabled:
- Double-click on the Header section of a page to bring out the Header and Footer options.
- Put your cursor in the 2nd chapter header section and make sure the Link to Previous option is highlighted in the Navigation section from the Quick Access toolbar.

If the option is not enabled, click the Link to Previous button to all the headers together. After connecting all the section headings, when you create a chapter for a header, all the other chapters for different sections will be added automatically.
4. Create Chapter Headers
Now, all that’s left to do is to add headers to your chapters in the heading section.
To create chapter headers in Word:
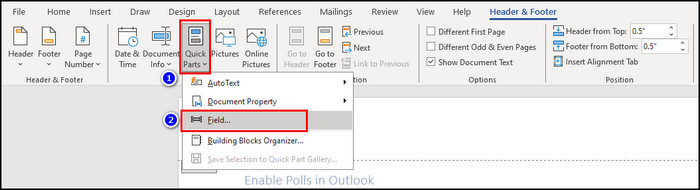
- Return to the 1st heading section at the beginning of your document.
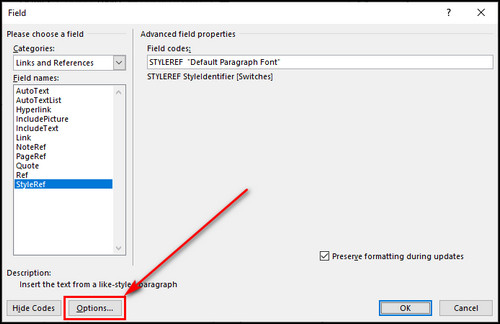
- Expand the Quick Parts option from the ribbon and choose Field.
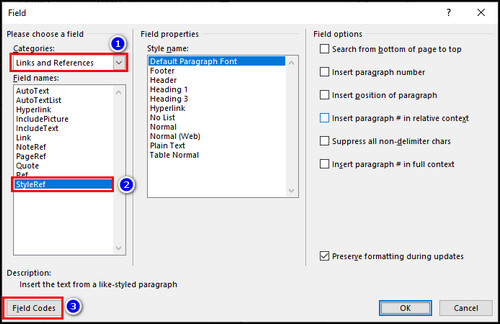
- Select Links and references from the list of Categories.
- Choose StyleRef for Field names.
- Click the Field Codes button.
- Select Options.
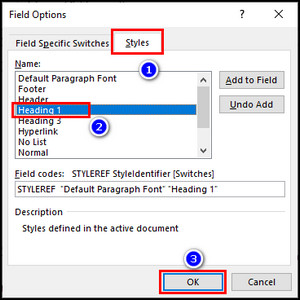
- Go to the Styles tab, double-click on Heading 1, and click OK.
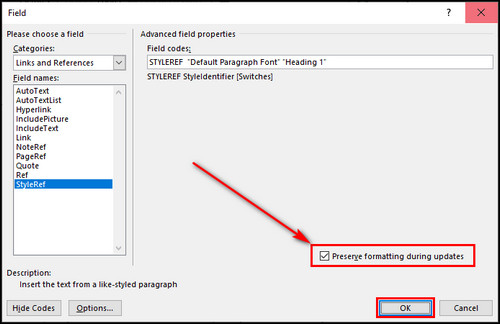
- Make sure the Preserve formatting during updates option is checked, and click OK again.
After these steps, all the chapters will be created in the heading section of your Outlook document automatically. Each header will include the chapter title as you have them in the document.
Now, you’ll have marked headers for each chapter or section in your Word document, which will help your reader navigate it.
Add Chapter Numbers
Inserting numbers into chapter headings in Microsoft Word helps improve document organization and readability, making it easier for readers to navigate through your content.
Here are the steps to add chapter numbers in Word:
- Open your document in Microsoft Word.
- Place your cursor anywhere in the 1st chapter title.
- Click on Multilevel List from the Paragraph section of the ribbon.
- Choose the Chapter 1 option.
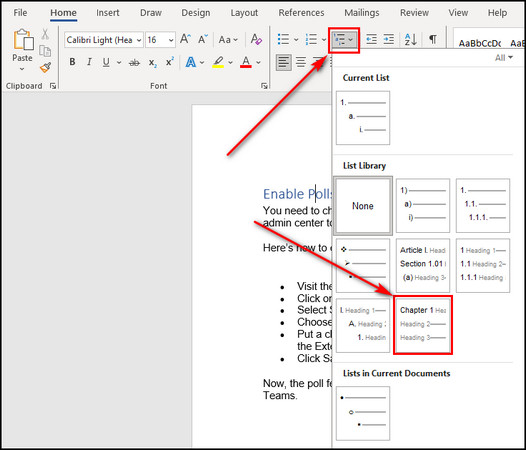
This process will automatically create chapter numbers for all the sections in your MS Word document.
Add Chapter Numbers to Captions
Adding chapter numbers to captions in Word is a simple and effective way to organize and label your document’s figures, tables, or other objects.
To add chapter numbers to captions:
- Select the document object for which you want to insert the chapter number in its caption.
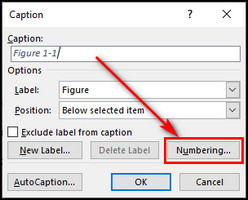
- Go to the References tab and select Insert Caption.

- Provide a name for the object in the Caption field, and click the Numbering button.
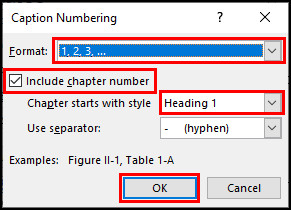
- Choose the chapter number format.
- Check the Include chapter number option.
- Select the heading style that you’ve set for the chapter heading for the Chapter starts with style field.
- Click OK.
How to Make Chapters, Sections, & Subsections in MS Word
Creating organized and structured documents in Microsoft Word is essential for clarity and readability. To achieve this, you can use Heading Styles, which help you define chapters, sections, and subsections easily.
Start by adding Heading Styles to the Ribbon if they’re not already present. Then, customize these styles to suit your document’s needs, specifying different formats for chapters, sections, and subsections. Then, apply them to the relevant headings and titles in your document.
Finally, to add an automated table of contents, simply go to where you want to insert it, click on the References tab, and choose Table of Contents. Word will generate a table of contents based on the Heading Styles you’ve applied.
Here are the steps to make chapters, sections, & subsections in MS Word:
1. Add Heading Styles to the Ribbon
If you use Word for personal, academic, or professional purposes, customizing the Ribbon with heading styles can help you create documents that are easy to navigate.
Here’s how to add heading styles to the ribbon:
- Open your document in MS Word.
- Click on Styles and choose Manage Styles.
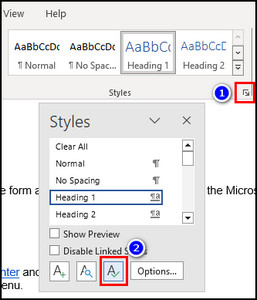
- Proceed to the Recommend tab.
- Select Heading 2 and click the Show button. Then, choose Heading 3 and click Show again.
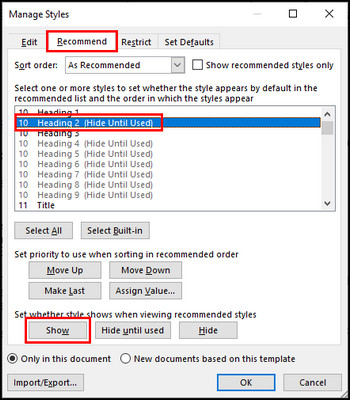
- Click OK and close the Styles panel.
Now, the Heading 1, 2, and 3 styles will be available right on the Quick Access toolbar so you can easily change your chapters, sections, & subsections to those heading styles, respectively.
2. Define Chapters, Sections, and Subsections Styles
Designing Chapters, Sections, and Subsections Styles in Microsoft Word allows you to create well-structured and easy-to-navigate documents.
To define chapters, sections, and subsections styles:
Customize Heading 1 Style for Chapters
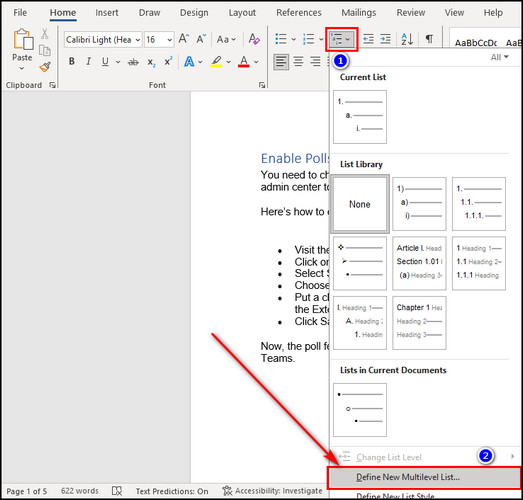
- Click the Multilevel List option from the Paragraph section and choose Define New Multilevel List.
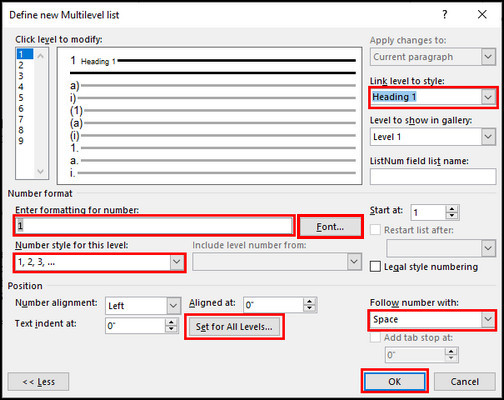
- Click the More button.
- Enter Chapter for the 1st level, set the Number format to 1, 2, 3, …
- Select Set for All Levels and put every level to 0 so you won’t have any indents to your chapters, sections, and subsections.
- Choose Space for the Follow number with field.
- Set Heading 1 for the Link level to style field so whenever you choose Heading 1 from the ribbon, Word will insert the Chapter format in your document.
- Click the Font button to change the font style, size, and color of the chapter heading style.
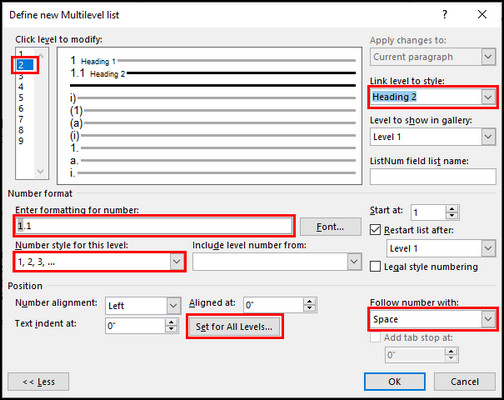
Define Heading 2 Style for Sections
- Select level 2 to customize the section heading.
- Choose Level 1 for the Include level number from option so the sections show the chapter number they are in. Then, put a full-stop in the Formatting box and choose 1, 2, 3, … for the Number style of the document sections.
- Select Space for the Follow number with field.
- Set Heading 2 for the Link level to style field so whenever you choose Heading 2 from the ribbon, Word will add the Section format in your document.
- Click the Font button to change the font style, size, and color of the section heading style.
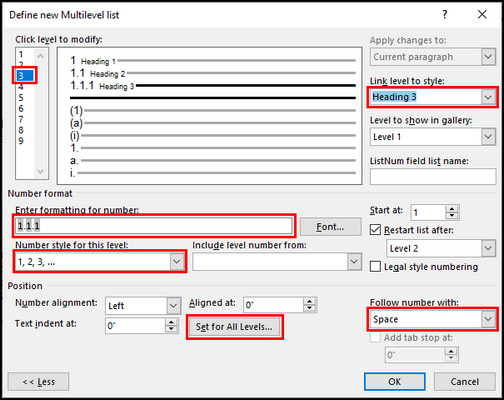
Modify Heading 3 Style for Subsections
- Choose level 3 to define the subsection heading style.
- Select Level 1 for the Include level number from option, enter a full-stop, and select Level 2 from the dropdown, then put a full-stop again in the heading style format box. so the subsections show the chapter and the section number they are in.
- Choose 1, 2, 3, … for the Number style of the document subsections.
- Set Space for the Follow number with field.
- Set Heading 3 for the Link level to style field so whenever you choose Heading 3 from the ribbon, Word will insert the Subsection format in your document.
- Click the Font button to change the font style, size, and color of the subsection heading style.
- Click OK to apply the changes.
3. Add Chapters, Sections, and Subsections to Your Document
Inserting chapter headers in Word and designing sections & subsections to your document is essential for organizing and structuring your content effectively.
To add chapters, sections, and subsections to your document:
- Select Heading 1 style from the top ribbon, and the Chapter format will be inserted for the document chapter name. But the actual title will remain the same.
- Select the chapter title and change its font style, size & color same as Heading 1’s style.
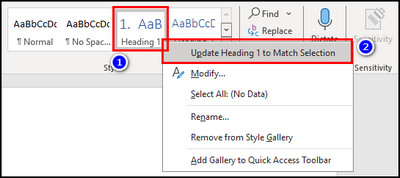
- Put the cursor somewhere in the chapter name, right-click on the Heading 1 style, and select Update Heading 1 to Match Selection.
Now, any time you select Heading 1, Word will change the selected title to the chapter format you defined earlier. Do the same to change your sections and subsections to the custom Heading 2 and Heading 3 styles.
FAQs
How do you create a table of contents and chapters in Word?
To add chapters in MS Word, highlight the chapter title and select Heading 1 Style. Do this for all the chapters. Once all the chapters, sections, and subsections are formatted to their respective heading styles, insert a blank page for the table of contents. Place the cursor on the blank page, move to the References tab, select Table of Contents, and choose the format you like.
How do you create headings and subheadings in Word?
To create headings, highlight the section you want to change to a heading, then choose a heading style from the Quick Access toolbar. For subheadings, choose a smaller heading style than you’ve selected for the headings.
How do you create collapsible sections in Word?
To create collapsible sections within Microsoft Word, highlight all the headings you wish to make collapsible. Next, click on the Paragraph dialog box launcher from the Home tab and make sure the Collapsed by default option is checked. Now, readers can utilize the collapsed headings when viewing the document, similar to a table of contents. They can click on the triangle icon of the specific section they wish to read.
Final Thoughts
By following the steps provided in this article, you can easily divide your document into chapters, add headings, and create professional and well-structured documents in Word.
Utilize features like Page Breaks, Heading Styles, and Table of Contents to enhance the readability of your document.
Comment below if you have further questions, and we’ll get back to you.