Graphics card not being detected in the BIOS seems like a very complicated and intimidating problem. Usually, this happens due to improper installations or some minor software issues.
If you are experiencing your dedicated GPU not getting recognized by the system BIOS, you are not alone. This problem is regularly encountered by heavy users and moderate gamers alike.
In this article, I explain why GPU is not detected in the BIOS and how to resolve them. Keep reading to learn in detail.
Why does the GPU fail to get detected in the BIOS?
If your GPU isn’t being detected, there are several plausible explanations for this. The reason might be a simple one or could be an accumulation of multiple issues.
For instance, if you’re using the wrong or outdated driver, you will likely face GPU detection issues. In addition, a BIOS setting that disables GPU identification or an OS upgrade that contains a flaw can also exacerbate the problem.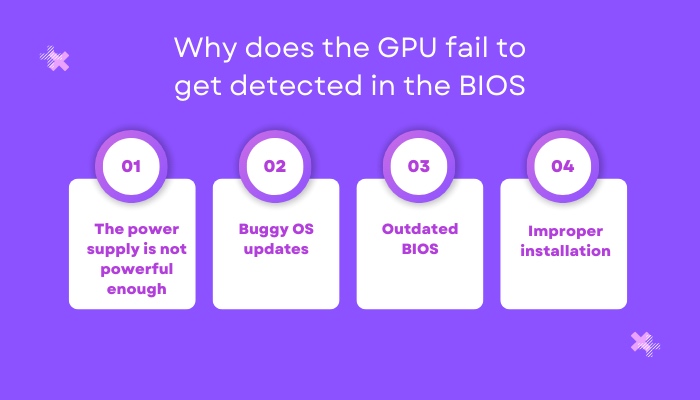
Here are some common reasons that are responsible for GPU detection problems in the BIOS:
1. The power supply is not powerful enough
Your power supply may be causing problems if you’re testing a graphics card for the first time and are confident that it works properly.
Frequently, the graphics card runs out of power because the power supply can’t keep up. Hence it gets undetected by the BIOS.
There is no way to tell if your graphics card is receiving adequate power just because you can see it running.
Ensure that your graphics card is receiving enough power by checking the specifications of your power source.
Even if your current power supply’s power rating matches the minimum power requirements of the GPU, you’ll still need to replace it.
Remember that your graphics card’s power supply should have considerably more wattage than your system’s power requirement.
2. Buggy OS updates
There are times when the latest Windows update brings on the issue. Numerous users have reported that a recent upgrade introduced a bug to Windows, which causes problems with the drivers and other components.
If you started noticing the problem immediately after installing the Windows updates or if you remember installing Windows updates around the time when you started noticing this issue, then there is a high chance that the Windows update might cause the problem.
3. Outdated BIOS
Let’s get one thing out of the way before we get into the specifics. If you see UEFI and no BIOS on your computer, you don’t need to be concerned about anything.
UEFI is the successor of BIOS in modern computers and is still commonly referred to as the BIOS.
Even if the system does not recognize the secondary GPU you have plugged in, you can still enter the BIOS using the integrated GPU. Your BIOS may be outdated if you can’t find a way to activate your graphics card.
Modern GPU drivers are not compatible with older BIOSes. As a result, the graphics card fails to get detected.
4. Improper installation
Improper installation of the GPU is one of the most common sources of GPU detection problems. The system won’t detect if you incorrectly use a GPU slot.
Several things can go wrong while you plug in a GPU into your system.
For example, your GPU is probably getting power from the power supply, for which you are likely to use a 6-pin PCI power header to 4 pin MOLEX converter. This is cumbersome work, and mistakes can happen very easily.
Additionally, this issue can happen due to driver software too. If you install a GPU from NVIDIA but install AMD drivers on your PC, your BIOS won’t recognize the GPU.
If any such GPU-related hardware or software is incompatible, your GPU won’t get detected in the BIOS.
How to fix GPU not getting detected in the BIOS?
Graphic cards, also called Graphics Processing Units or GPUs, are essential pieces of hardware that help our screens run complex programs.
But if the PC is unable to detect them, the software won’t work as well, and you might even get a black screen. There are a few ways to ensure that your GPU works with other parts of your computer.
Setting your BIOS correctly should allow your computer to recognize your graphics card. Alternatively, you can upgrade your BIOS to fix any issues that may have already occurred. Thus, the computer ought to be repaired.
Here is how you can resolve GPU detection issue in the BIOS:
1. Modify BIOS settings
There are situations when improper BIOS settings are to blame for your GPU being found. As a preliminary step, you should try adjusting the setting to see if that resolves your problem.
Follow these steps to tweak the BIOS settings of your computer:
- Restart your computer.
- Press the key shown on the prompt screen (e.g., Esc/ Del/ F2/F12) to access the BIOS while the computer is turning on.
- Navigate to the BIOS menu by using your keyboard’s arrow keys > Hit Enter.
- Go to Peripherals > Press Enter.
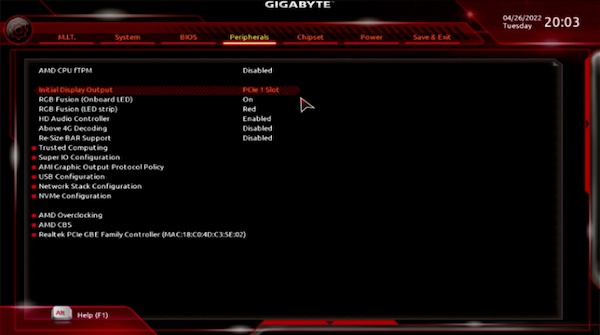
- Look for the option named Initial Display Output > Press Enter
- Select the PCIe slot that your GPU is plugged in.
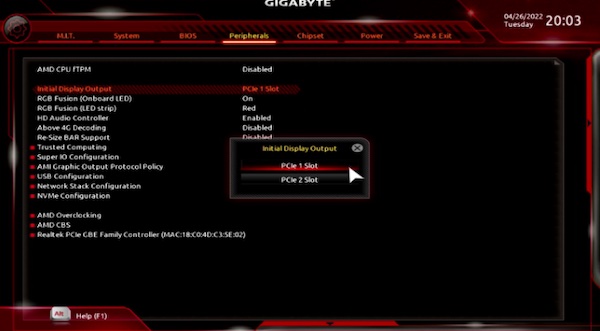
- Save changes > Exit BIOS.
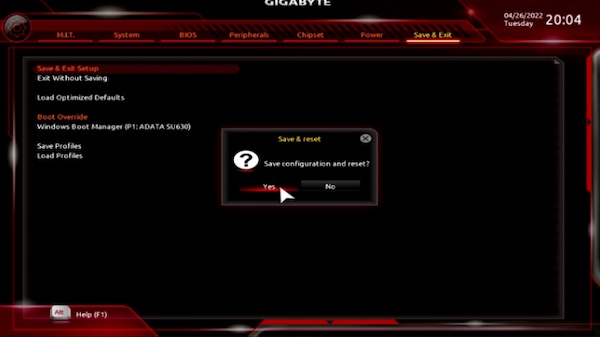
Now check whether your GPU got detected in the BIOS. If not, keep reading and follow the other methods.
2. Disable the integrated graphics card
Your PC might rely on its integrated graphics processor to process graphic data. This can happen if you have plugged in a new dedicated GPU and the system can not recognize the device.
Disabling the integrated graphics of your PC can solve dedicated GPU detection issues.
Here is how to disable the integrated graphics of your PC:
- Restart your computer.
- Press the key shown on the prompt screen (e.g., Esc/ Del/ F2/F12) to access the BIOS while the computer is turning on.
- Go to the Chipset menu by using the arrow keys of your keyboard.
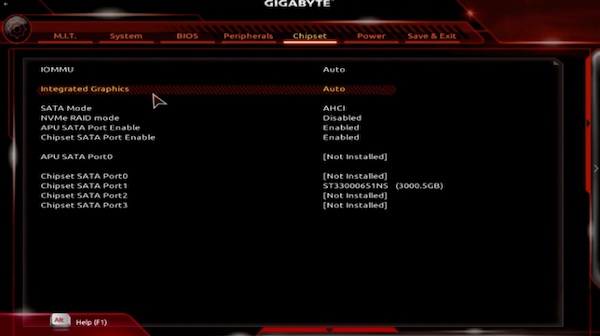
- Find Integrated Graphics option > Hit Enter.
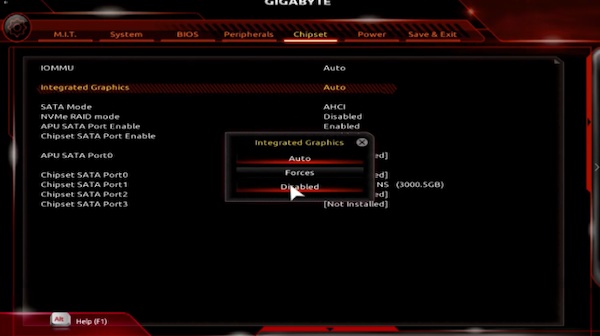
- Select Disabled from the popup menu.
- Save the changes > Exit BIOS.
Doing so would force your PC to look for an alternative GPU, as the integrated GPU gets disabled.
3. Update the BIOS
If none of the previous methods have been effective, updating the BIOS should wipe all issues. The GPU will then be compatible with the new BIOS version.
Here is how to update the BIOS of your computer:
- Press Win + R to open the Run window.
- Type msinfo32 in the text field >Hit Enter.
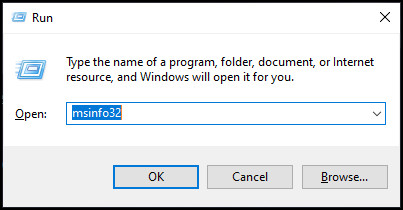
- Navigate to the BIOS version/Date on the popup window.
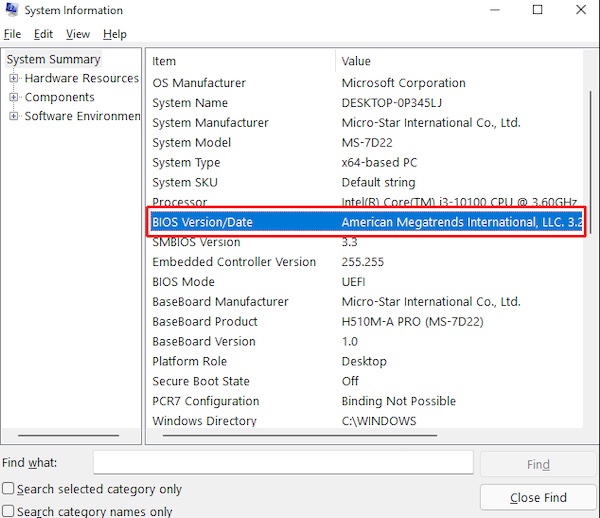
- Visit the manufacturer’s website to see whether any update is available.
- Download any available update > Install the update.
- Restart your PC.
Your updated BIOS will come into action, and hopefully, the GPU detection problem will be resolved.
4. Uninstall any recent OS updates
Imagine that you’re using your GPU to play games or for productivity, and everything is running smoothly. After that, your PC will alert you of a Windows update, and you will install it. But suddenly, after installing the updated files, your PC gets bad at handling graphics tasks.
If that’s the case, then your Operating system could be to blame. You must remove the present version of the operating system from your device.
Here is how to uninstall the OS updates in Windows 10:
- Press Win + S to open the search bar.
- Type Control panel > Click on Programs > Select Programs and Features.
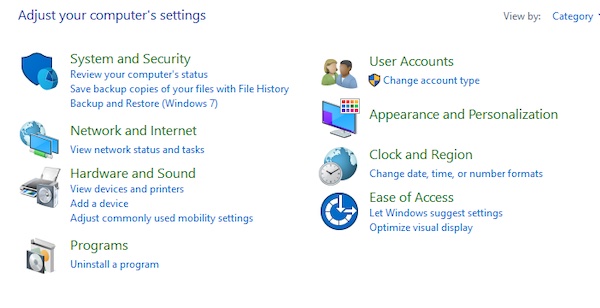
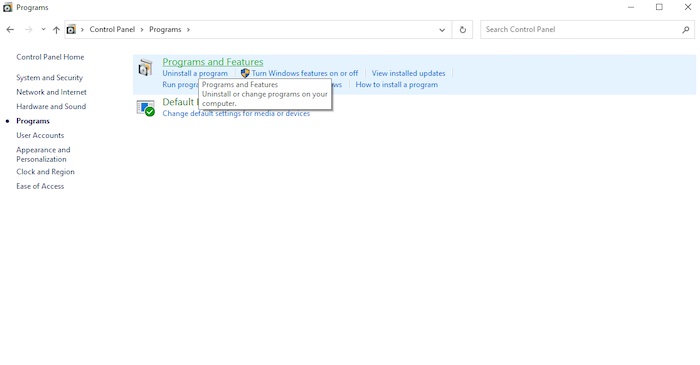
- Click on View installed updates from the left pane.
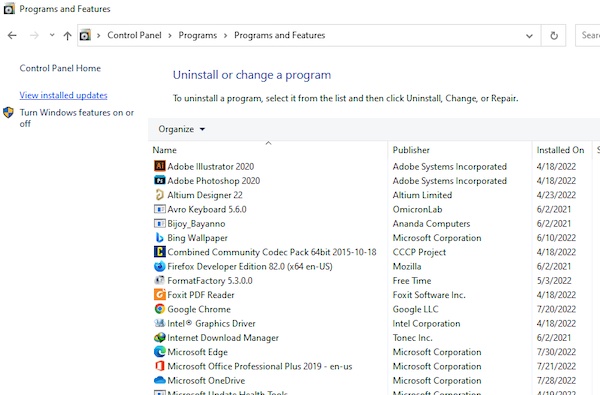
- Determine your latest update by looking at the installation date.
Rebooting your computer is necessary after uninstalling an OS update. This should fix the OS bug if there are no other additional issues.
5. Enable discrete GPU
This has to be done if you disabled or removed the GPU from your computer at some time. It is another straightforward method that can be utilized to tackle the GPU detection issue.
Enabling discrete GPU alters another parameter in your BIOS and lets you see the graphics processing unit (GPU).
Here is how to enable discrete GPU on your computer:
- Turn your PC on, and press the designated key to access the BIOS.
- Navigate to Chipset Configuration by using the arrow keys on your keyboard.
- Select GPU Configuration > GPU function > Set as Enabled.
- Save changes > Exit.
If your BIOS is operational, this technique should resolve the issue. If the problem still persists, don’t worry about it. Go through all the solutions mentioned in this article.
6. Run GPU using command prompt
You can run your GPU from the command prompt by following simple instructions.
Follow these steps if you intend to run the GPU from the command prompt:
- Press Win + R to access the Run window.
- Type cmd > Press Enter.
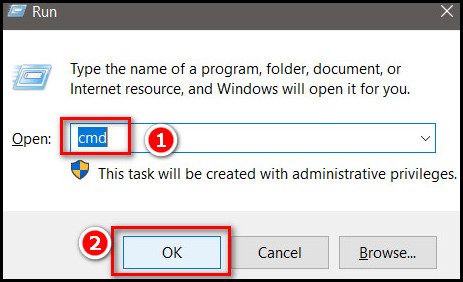
- Type bcdedit /set pciexpress forcedisable in the command window > Hit Enter.

Check to see if the problem is solved by restarting your system when you receive confirmation of the successful procedure.
Conclusion
There are a few different approaches you may take to ensure that your GPU is compatible with the other components of your computer. Problems with your dedicated graphics card might be resolved if you update the BIOS or disable the integrated graphics on your computer.
Enabling discrete graphics processing on your computer is an additional primary method. This modifies a different option in your BIOS, allowing the system to detect the GPU. So, which solution works best for you?