Integrating Outlook with Microsoft Teams massively improves collaboration and communication within an organization. But when you enable contact synchronization between the two apps, the identical contacts are replicated.
It is a huge problem as it jumbles your address book and a simple task like finding the right contact becomes difficult.
That’s why, in this article, I’ll explain how to fix duplicate contacts in Outlook after turning on contact synchronization with MS Teams.
Let’s begin!
How to Fix Duplicate Contacts in Outlook After Syncing Contact with Microsoft Teams
After receiving mass reports about users’ contacts getting duplicated after syncing contacts with Teams, Microsoft quickly rolled out a patch on August 09, 2023, to fix the issue. By September, it had resolved the duplicate contact problem across all Outlook accounts.
So, to fix the identical contacts issue after syncing Outlook and MS Teams contacts, you have to turn off the Sync device contacts option from the Teams app and then update Outlook. It will automatically delete the replicated contacts from your contact list.
Here’s how to fix duplicate contacts in Outlook after syncing contact with Microsoft Teams:
1. Disable Sync Device Contacts in Teams
When you deactivate sync device contacts in the Teams app, it stops MS Teams from integrating the device contacts with Outlook.
Here are the steps to disable sync device contacts in Teams:
- Launch the Teams app on your Android or iOS device.
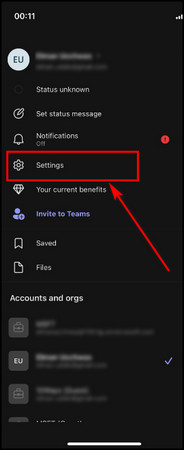
- Tap on your profile from the top-right corner.
- Select Settings.
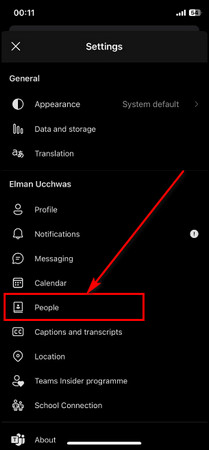
- Choose the People option.
- Toggle off Sync my device contacts.
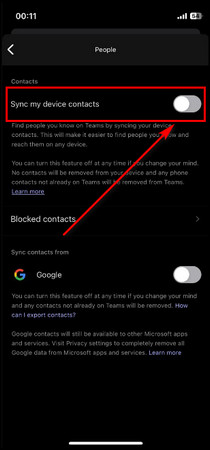
When the duplication of contacts in Outlook gets fixed, you can re-enable the syncing contact option.
2. Update Outlook
Now, all you have to do is update the Outlook app, and when the latest version gets installed, it’ll automatically clean up your contact list and remove duplicate contacts.
Here’s the process to update the Outlook app:
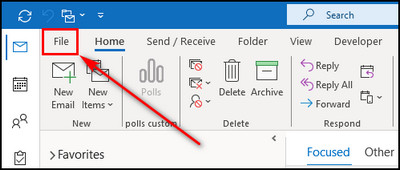
- Launch Outlook and select File from the upper-right corner.
- Choose Office Account from the left menu.
- Click the Update Options button.
- Choose Update Now from the dropdown menu.
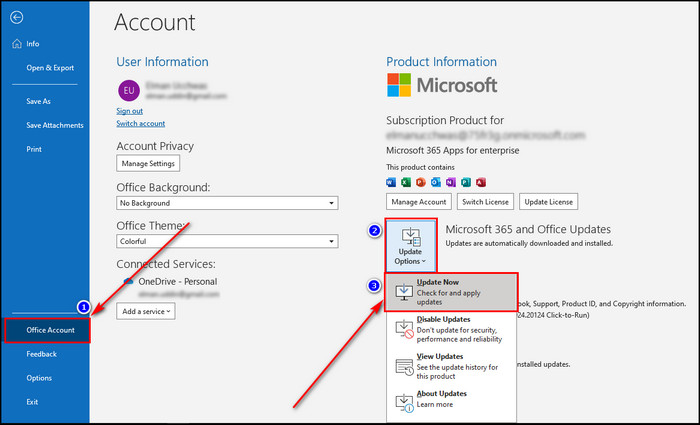
After these steps, your system will update the Outlook version.
If the identical contacts issue persists, even after upgrading to the newest software, then unfortunately, you have to delete the replicated contacts yourself, which I’ve explained in the following section.
How to Remove Duplicate Contacts in Outlook
Duplicate contacts clutter your address book, and it becomes hard to find the information you need. Luckily, you can just select the duplicate contacts and remove them from your contact list in Outlook. You can also utilize Outlook’s import/export feature to clean up your contacts.
Additionally, Outlook lets you combine the information of identical contacts to tidy up the address book.
Below, I’ve provided different ways to remove duplicate contacts in Outlook:
1. Delete Duplicate Contacts Manually
This method involves going through your list of contacts individually and manually identifying and deleting the duplicates. It is a straightforward but time-consuming process.
Here are the steps to delete duplicate contacts manually:
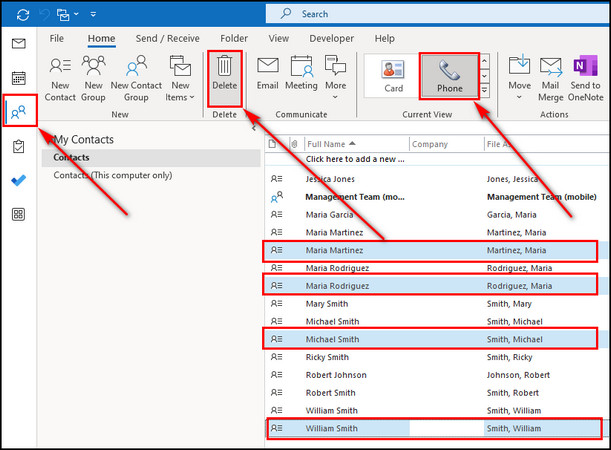
- Open the Outlook app and select People.
- Go to the Home tab.
- Click the Change View button from the Current View section in the Quick Access toolbar.
- Select the Phone view.
- Press and hold the Ctrl key on the keyboard.
- Select the duplicate contacts from the list.
- Click the Delete button from the toolbar.
2. Clean Up Duplicate Contacts by Using Export and Import
When you import contacts in Outlook, it checks for identical contacts and removes all duplicate connections. You can utilize this feature to delete duplicate contacts from your address book.
Here’s how to clean up duplicate contacts by using Export and Import:
Export Contacts as CSV
- Launch the Outlook app and select People.
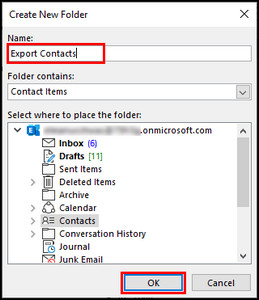
- Right-click on Contacts and choose New Folder.
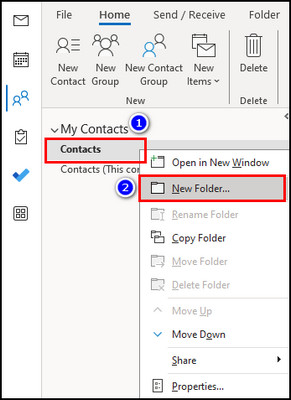
- Input Export Contacts as the folder name.
- Go to your contact list.
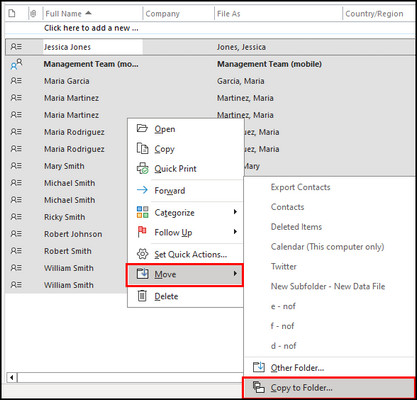
- Press Ctrl + A to select all contacts. Then right-click and select Move > Copy to Folder.
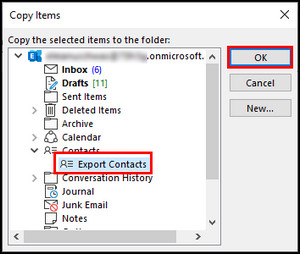
- Select the Export Contacts folder and click OK.
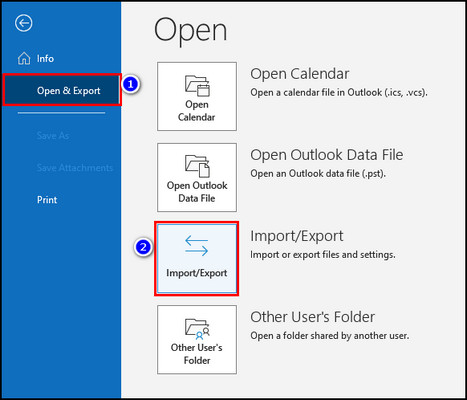
- Choose File from the top-right corner.
- Go to the Open & Export tab and click on Import/Export.
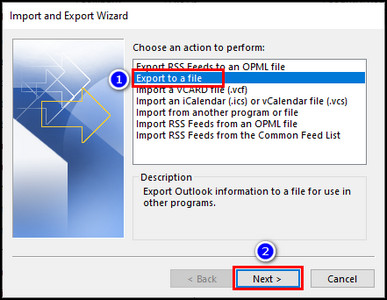
- Select Export to a file and click Next.
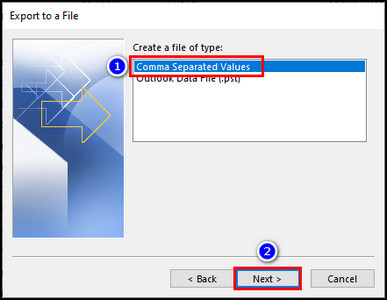
- Choose Comma Separated Values and click Next.
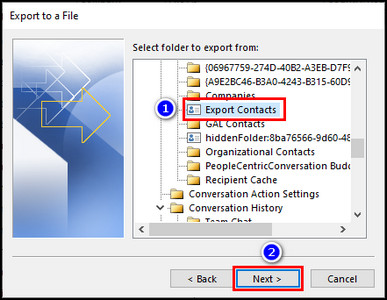
- Select the Export Contacts folder and click on Next.
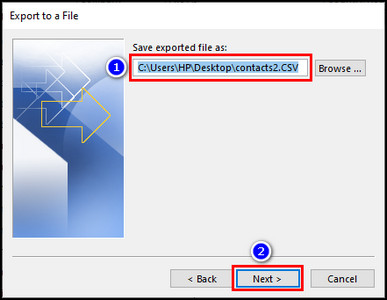
- Browse to the directory where you want to save the exported contacts list and click Next.
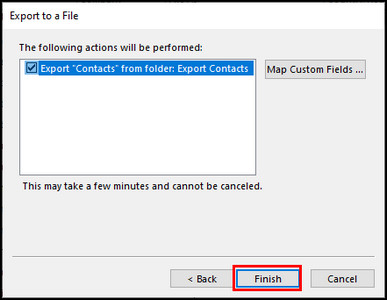
- Click the Finish button.
Import Contacts Without Duplicates
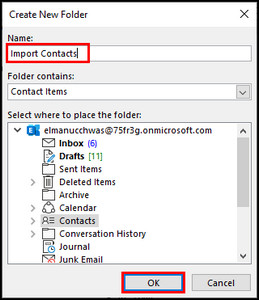
- Right-click on Contacts and select New Folder.

- Enter Import Contacts as the folder name.
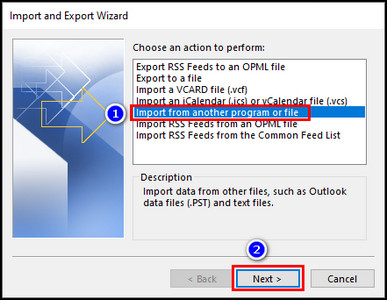
- Select File > Open & Export > Import/Export.

- Choose the Import from another program or file and click Next.
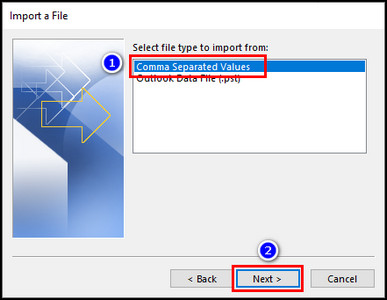
- Select Comma Separated Values and click Next.
- Check the Do not import duplicate items and click Next.
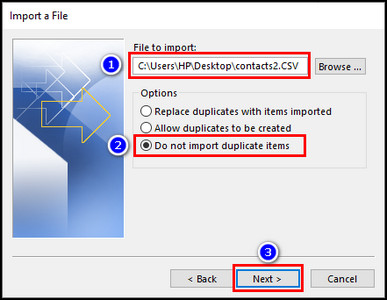
- Select the Import Contacts folder and click on Next.
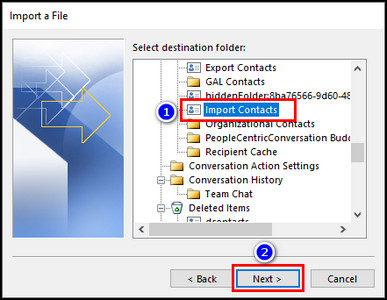
- Choose the exported .csv file.
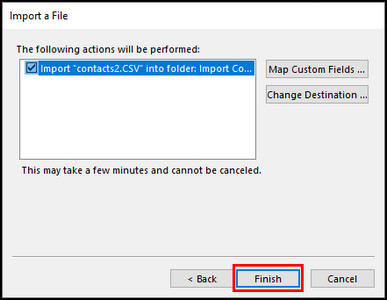
- Click the Finish button and all your contacts will be imported without duplicates.
3. Tidy Up Outlook Duplicate Contacts Using Gmail
If your contact list still has duplicate contacts, you can use the contact merge and fix feature of Gmail.
Here’s the process to tidy up Outlook duplicate contacts using Gmail:
- Export your contact list as a .csv file from Outlook.
- Log in to your Google account and open Google Contacts.
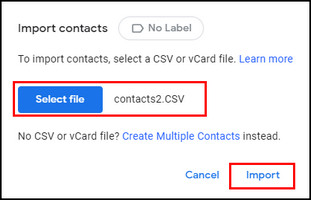
- Select Import from the left menu.
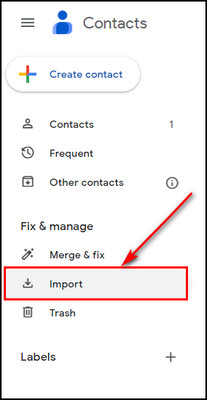
- Choose the exported .csv file from Outlook and click Import.
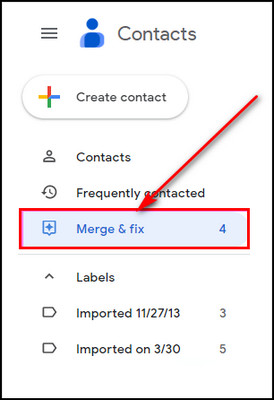
- Go to the Merge & fix tab.
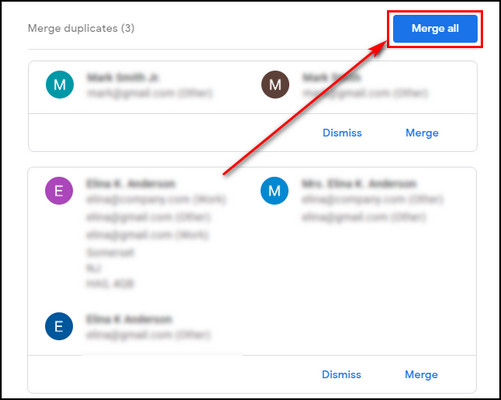
- Click the Merge all button.
- Move to the Contacts tab when the merging process is complete.
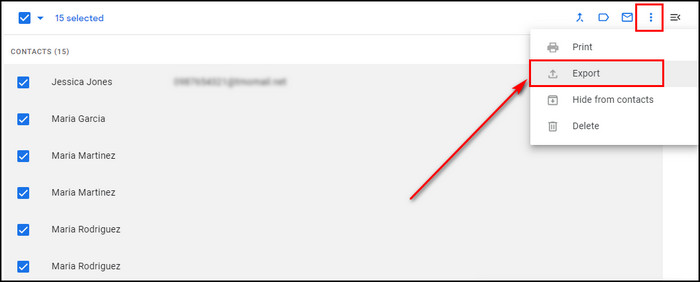
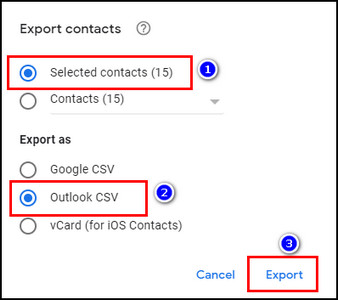
- Select all the contacts, click on More actions, and choose Export.
- Choose Outlook CSV and click on Export.
- Open Outlook and import the merged contact list.
4. Merge Duplicate Contacts
Outlook allows you to link duplicate contacts instead of deleting them. This way, you maintain all the information from the duplicates but access it from a single contact entry.
Here are the steps to merge duplicate contacts:
- Go to the People tab in Outlook.
- Select the contact you want to merge.
- Click on the Contact’s ellipses and choose Link Contact.
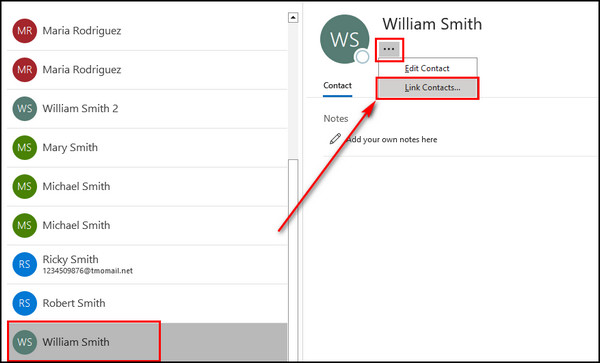
- Enter the contact you want to link in the text field and click OK.
As you can see, you have various options to deal with duplicate contacts in Outlook.
How to Prevent Duplicate Contacts in Outlook
To stop duplicate contacts in Outlook, enable the automatic duplicate detection feature in Outlook settings to catch and prevent new duplicates from being added. Also, regularly clean up your existing contacts by merging or deleting duplicates.
Below, I’ve explained how to prevent duplicate contacts in Outlook:
- Open Outlook on your device.
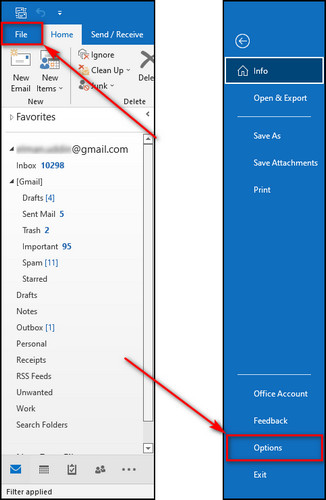
- Select File from the top left corner.
- Choose Options from the left bar.
- Go to the People tab.
- Enable the Check for duplicates when saving new contacts option and click OK.
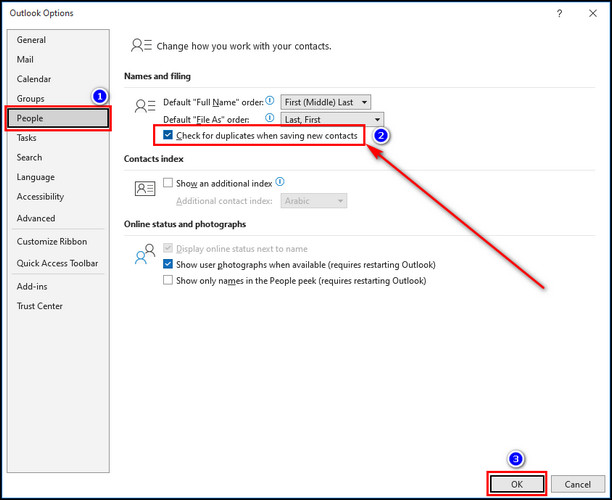
Now, whenever you try to save the same contact in Outlook, you will get a pop-up informing you that the contact already exists.
Final Thoughts
Resolving duplicate contact issues in Outlook after integrating with Microsoft Teams is essential to maintaining an organized address book.
By updating Outlook and reviewing & merging duplicates, you can keep your contacts accurate. It provides a more efficient workflow between Teams and Outlook.