Outlook allows users to use and configure the Reading Pane to preview messages. By default, the Preview Pane is enabled. However, there are several ways to turn on and off the Preview Pane.
Throughout this article, I will demonstrate several methods to turn the Preview Pane on and off to preview your Outlook messages.
Without further discussions, let’s get started!
How to Enable and Disable Preview Pane in Outlook
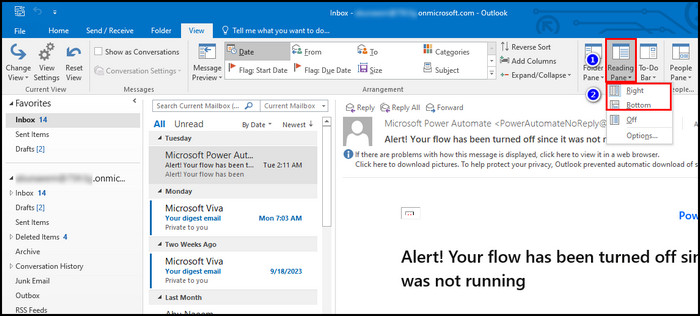
To turn on the Reading Pane in Outlook, go to the View tab, click the Reading Pane under the Layout group, and choose Right or Bottom. It will enable and reposition the Reading Pane. Contrarily, to turn off the Reading Pane, navigate to the View tab, click Reading Pane, and choose Off.
Outlook Preview Pane settings may vary depending on the Outlook app version. Besides, the options are also different on Windows, Mac, and Outlook Web. Following are all methods to turn on and off the Preview Pane of Outlook.
Here are the methods to disable and enable Preview Pane on Outlook:
On Windows
By default, the Reading Pane is turned on. So, let me first show how to disable the Reading Pane on the Outlook desktop app. The following steps apply to Outlook for Microsoft 365, Outlook 2013, 2016, 2019, and 2021.
Here’s how to disable the Reading Pane in the Outlook desktop client on Windows 10:
- Launch Outlook on your PC.
- Switch to the View tab.
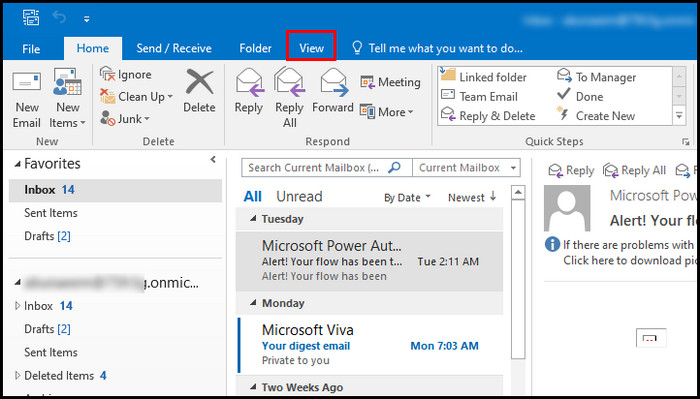
- Locate the Reading Pane under the Layout group.
- Click on Reading Pane and choose Off from the popup menu.
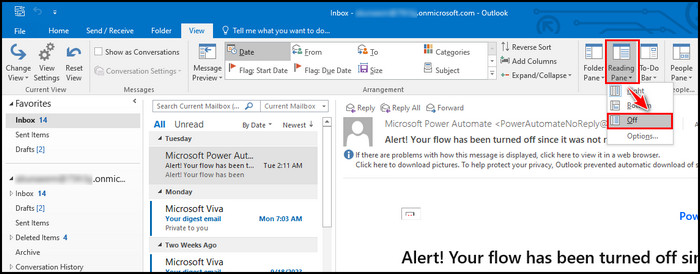
Check the following method to enable the Reading Pane on Outlook:
- Open Outlook on your desktop.
- Go to the View tab.
- Locate and click on the Reading Pane.
- Choose Right or Bottom to enable and reposition the Reading Pane.
It will change the Reading Pane in Outlook Windows 10 and 11. Turning off the Reading Pane only applies to the folder you’re in. But how can you disable Reading Pane for all other Outlook folders?
To turn off the Reading Pane for all other mail folders, navigate to the View tab, click Change View, and choose Apply Current View to Other Mail Folders. Select the folders in the Apply View dialog box and click OK.
On Mac
Mac users can quickly disable the Reading Pane. The following steps will turn off the Reading Pane on Outlook 2016, 2019, and Outlook 365 for Mac.
Execute the following instructions to disable the Reading Pane:
- Launch Outlook on your Mac.
- Navigate to Organize > Reading Pane.
- Choose Off.
Consider the subsequent instructions to enable the Reading Pane:
- Open the Outlook app on your Mac.
- Go to Organize > Reading Pane.
- Choose Right or Bottom to enable and reposition the Reading Pane.
If you use the Outlook Web version, you can also turn on or off the Reading Pane feature with some similar steps. Let’s move down to the next section to learn more.
On Outlook Web
Outlook 365 account users can enable and disable the Reading or Preview Pane on the Outlook Web. For step-by-step instructions, check the following method.
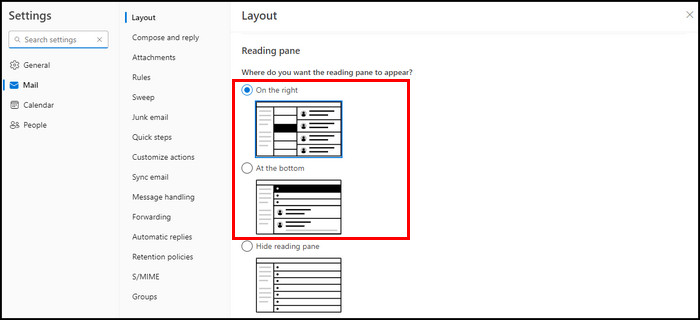
Here’s how to disable Reading Pane on Outlook Web:
- Open your browser and go to Outlook.com.
- Sign in using your login credentials.
- Click on the Gear icon to open Settings.
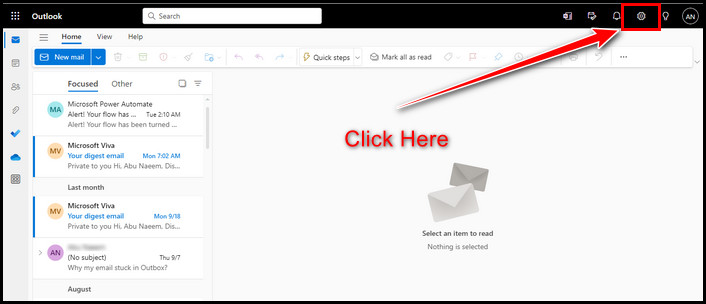
- Ensure you’re on the Layout tab.
- Scroll down and locate the Reading Pane.
- Choose Hide Reading Pane and click Save.

Perform the following steps to turn off the Reading Pane on Outlook Web:
- Go to Outlook.com.
- Open Settings by clicking on the Gear icon.
- Switch to the Layout tab.
- Scroll through and track down the Reading Pane.
- Choose On the right or At the bottom to enable and reposition the Reading Pane.
- Click Save to apply the changes.
That’s all you should know about enabling and disabling the Reading Pane of Outlook on Windows, Outlook Web, and Mac.
In case you’re interested, you can preview attachments in Outlook. Furthermore, you can create a shortcut to run Outlook with a disabled Reading Pane. To learn how to do that, move down to the next section.
How to Disable Reading Pane with Outlook Shortcut
As I mentioned earlier, by default, the Reading Pane is enabled. However, you can create an Outlook shortcut to launch the app without reading Pane. The shortcut will assist in deactivating the Reading Pane for all the folders and all your email accounts.
Here’s how to create an Outlook shortcut to disable Reading Pane:
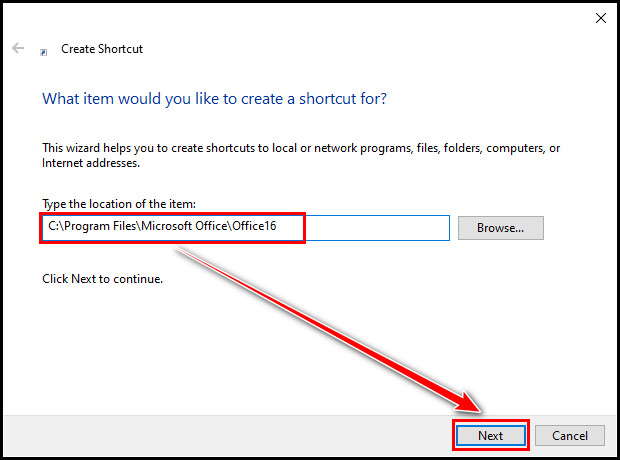
- Open File Explorer and navigate to the C:\ drive.
- Search for Outlook.exe using the search bar.
- Right-click on OUTLOOK.EXE and choose Open file location from the context menu.
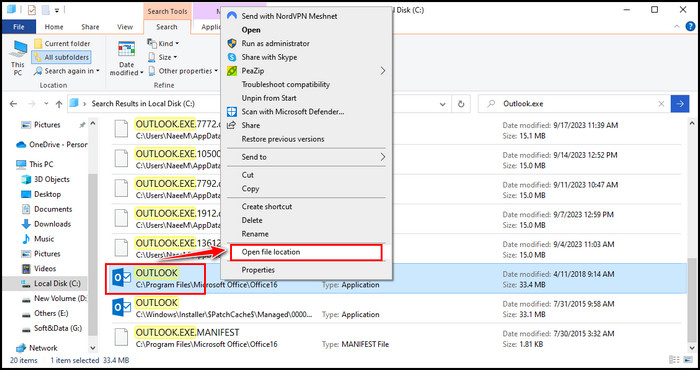
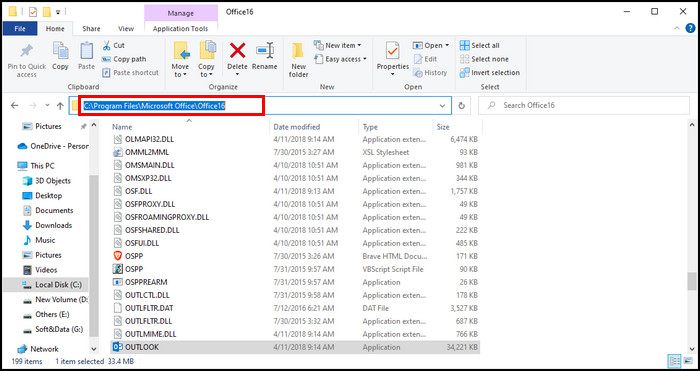
- Click on the address bar and copy the file path.
- Return to the desktop window, right-click, and choose New > Shortcut.
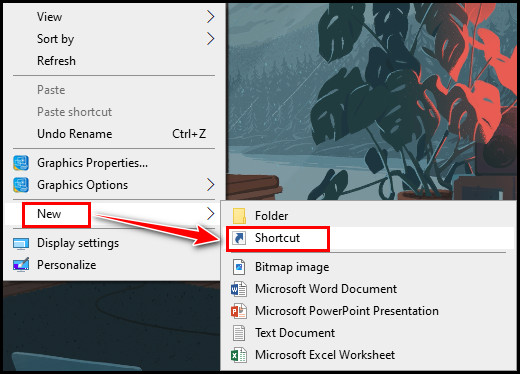
- Paste the copied path in the Type the location of the item box and click on Next.
- Type a name for the new shortcut and click Finish.
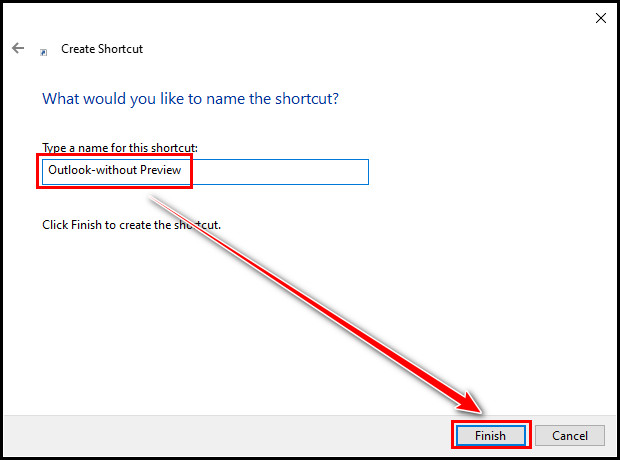
Voila! You’ve successfully created an Outlook shortcut to turn off Reading Pane by default. Now, whenever you open Outlook using this shortcut, you will see the Reading Pane is disabled for all mail folders.
Disable Message Previews on Microsoft Outlook
If you’re not interested in checking message previews, you can always turn it off. The options are different on the desktop app and the web version. However, the following methods will disable the Message Previews for your Outlook desktop app and Web.
Perform the following steps to turn off Message Previews on Outlook:
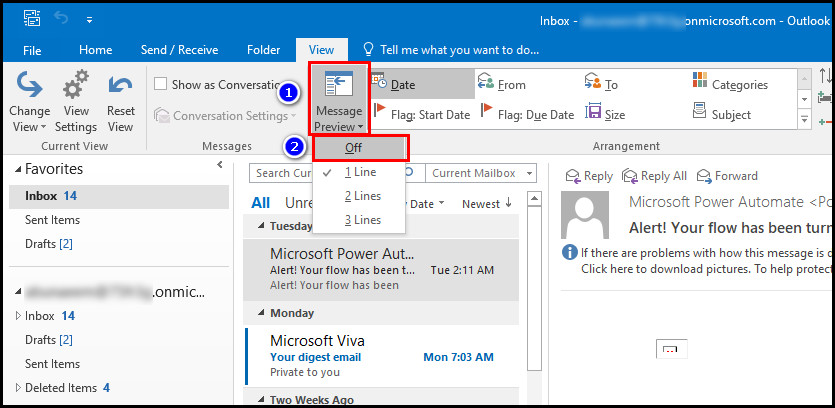
On Outlook Desktop App
- Launch Outlook on your PC.
- Navigate to the View tab.
- Click on Message Preview under the Arrangement group.
- Choose Off from the popup menu.
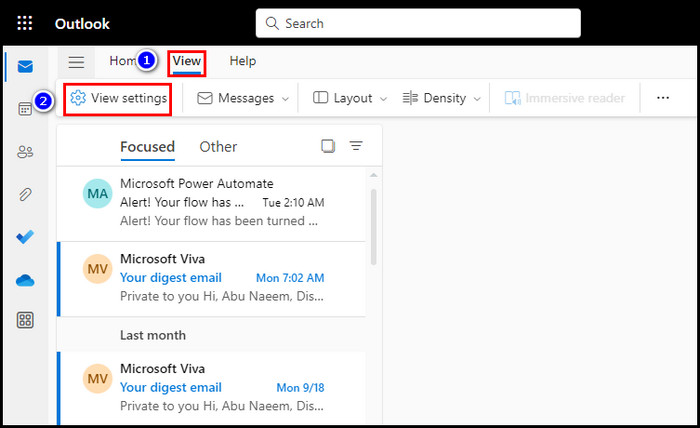
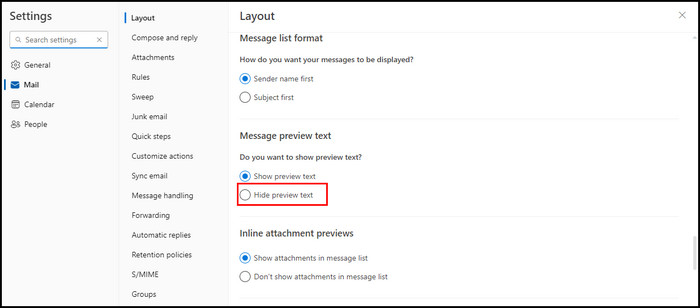
On Outlook Web
- Open your browser and go to Outlook.com.
- Switch to the View tab.
- Click on View Settings.
- Switch to the Layout tab.
- Scroll down and locate Message Preview Text.
- Check the Hide Preview Text option and click Save.
Once the option is turned off, you will no longer see the previews for your Outlook messages. If necessary, you can always enable it using the same options.
Frequently Asked Questions
How do you change the preview settings in Outlook?
To change the Outlook email preview settings, navigate to the View tab, click Message Preview, and choose a preview option (Off, 1 Line, 2 Lines, or 3 Lines). Finally, select the folders you want to apply the settings.
Why did your Outlook inbox view change?
Your Outlook inbox view can be changed due to conflicting add-ins, damaged cache files, corrupted user profiles, and outdated app versions. Moreover, misconfigured inbox settings can also lead to this issue.
How do you get your Outlook inbox back to normal?
You must reset the Mail View to restore your Outlook inbox to normal. To do so, navigate to the View tab and click View Settings. In the Advanced View Settings window, click Reset Current View and click Yes when prompted.
Concluding Words
Outlook reading pane or preview pane allows users to scan messages without opening them. This feature comes in handy to protect yourself from unauthorized and harmful emails.
I have shown different methods to turn on and off the preview pane so that you can customize your inbox and keep yourself safe. If you need further assistance, mention your queries in the comment section.
Have a nice day!